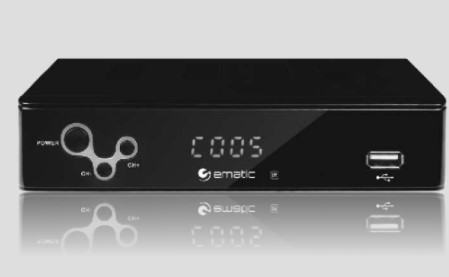
CONVERTER BOX
To ensure that the product operates at its best, please read this user manual before use and keep it for future reference
Safety Warning
FCC Notice
This equipment has been tested and found to comply with the limits for a Class B digital device, pursuant to part 15 of the FCC rule. These limits are designed to provide reasonable protection against harmful interference in a residential installation. This equipment generates, uses and can radiate radio frequency energy and, if not installed and used in accordance with the instructions, may cause harmful interference to radio communications. This is no guarantee that interference will not occur in a particular installation. If this equipment does cause harmful interference to radio or television reception, which can be determined by turning the equipment off or on, the user is encouraged to try to correct the interference by one or more of the follow measures:
- • Reorient or relocate the receiving antenna
- • Increase the separation between the equipment and receiver
- • Connect the equipment into an outlet on a circuit different from that to which the receiver is connected.
- • Consult the dealer or an experienced radio/TV technician for help
Important Safety Instructions
CAUTION
RISK OF ELECTRIC SHOCK DO NOT OPEN: To reduce the risk of electric shock. Do not remove cover. No user-serviceable parts inside. Refer servicing to qualified service personnel.


1. Read, follow and keep these instructions.
2.Do not use this apparatus near water.
3. Clean only with a damp cloth. Please unplug power prior to cleaning.
4.Do not block any of the ventilation openings. Install in accordance with the manufacturer’s instructions.
5. Do not install near any heat sources such as radiators, heat registers, stoves, or other apparatus (including amplifiers) that produce heat. 6.Protect the power cord from being walked on or pinched particularly at the plug, receptacles, and the point where they exit from the apparatus.
7. Only use attachments/accessories included within this package.
8. Unplug this apparatus during lighting storms or when unused for long periods of time.
9. Refer all servicing to qualified service personnel. Servicing is required when the apparatus has been damaged in any way; such as when the power supply cord or plug is damaged, liquid has been spilled or objects have fallen into the apparatus, the apparatus has been exposed to rain or moisture, does not operate normally, or has been dropped.
A Class II APPARATUS shall be permanently marked with the words “DOUBLE INSULATION” or “Double Insulated” and “When servicing use only identical replacement parts.”
WARNING: To reduce the risk of fire or electric shock, do not expose this apparatus to rain or moisture.
Safety Warning
Precautions
Please read these precautions before operating this unit.
1.Power cord protection
To avoid any malfunctions of the unit, and to protect against electric shock, fire or personal injury, please observe the following.
- • Hold the plug firmly when connecting or disconnecting the AC power cord.
- • Keep the AC power cord away from heating appliances.
- • Never put any heavy object on the AC power cord.
- • Do not attempt to repair the AC power cord in any way.
- • Never make or change connections with the power switched on.
2.Placement
Avoid placing the unit in areas of:
- •Direct sunlight or heating radiators
- •High temperature (over 35°C) or high humidity (over 90%)
- •Dust as the internal parts may be seriously damaged.
3.Non–use periods
When the unit is not being used, turn it off. When left unused for a long period of time, the unit should be unplugged from the power source.
4.No fingers or other objects inside
• Touching internal parts of this unit is dangerous, and may cause serious damage to the unit. Do not attempt to disassemble the unit.
• Do not put any foreign object in this unit.
5.Keep away from water
• Keep the unit away from flower vases, tubs, sinks, etc. if liquids are spilled into the unit, serious damage could occur.
Overview Of The Equipment
1. Front Panel
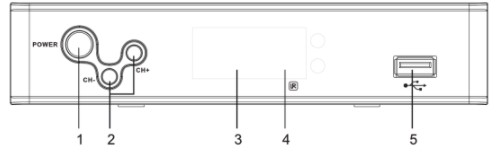
1 POWER BUTTON: Press to power on/off the converter box
2 CH+ / CH-: Channel up/down
3 LED indicator
4 IR: Remote control receiver
5 USB
2. Rear Panel
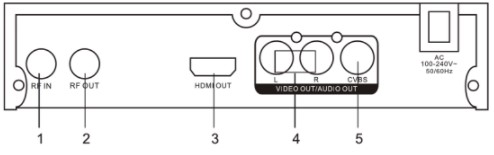
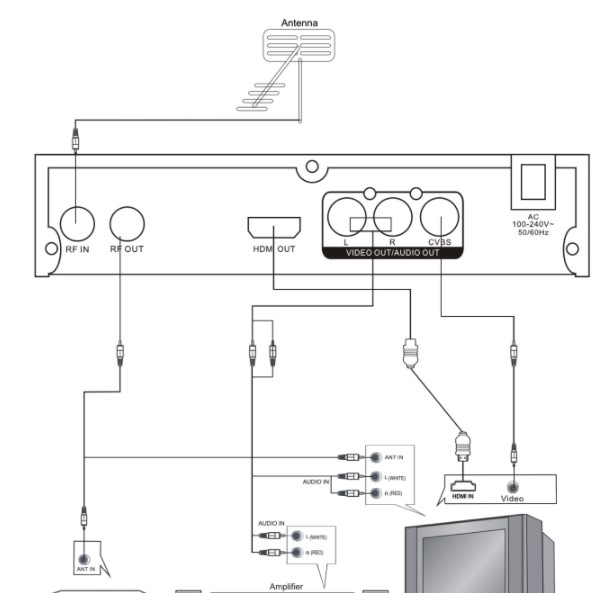
1. RF IN Connect to antenna.
2. RF OUT CH 3/4 NTSC RF output
3. HDMI HDMI output
4. L-AUDIO-R Connects these terminals to analog audio inputs of a TV set. Or connect these terminals to the L/R inputs of a separate audio component.
5. VIDEO If your TV or monitor has composite Audio/Video cable, connect this jack to the AV input jack on your TV or monitor using an Audio/Video cable.
3. Remote Control Unit
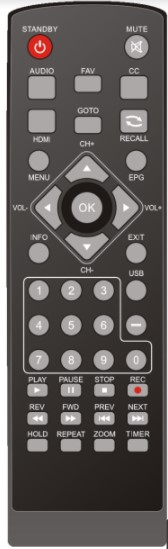
The remote key list:
- • STANDBY: Press to turn on or standby
- • HDMI: Adjust resolution
- • MUTE: Press to mute the sound of TV audio, press again to restore the sound
- 0 – 9: Press to enter the required numbers in the input box or select a channel to watch Press directly to tune a particular channel.
- -: Press to input a dash in a virtual channel number
- • REC: Press to start recording
- RECALL: Press to switch between current & last TV channel TIMER: Press to go to Programmed Time Recording setup MENU: Press to display the Main Menu on the screen
- EXIT: Press to return to the previous menu
- • A/VICH+/-: Move cursor up/down ; Channel + / –
- • S//VOL+/-: Move cursor left/right; Volume + /
- • OK: Confirm
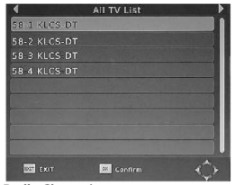
(LIST): Press to display all TV channels or all Radio channels
- K»»: Prev/Next
- +/-: Rev/Fwd
- • FAV: Press to display the favorite channel’s list for setting
- • EPG: Electronic Program Guide
- CC: Press to turn on/off closed captioning
- • INFO: Show/Hide service info:
Press once a Service Info Bar will appear Press again to show Detail Info
Press again to show Program Info
- PLAY: Press to resume playback
- PAUSE: Press to pause playback or recording
- STOP: Press to stop playback or recording
- REPEAT: Press this button to repeat the current options
- USB: Press to view content of connected external HDD or Flash drive
- AUDIO: Switch Audio channel
- • HOLD: This is a Control Key under USB/Video and PVR mode
- ZOOM: Press to zoom in or out.
INFO. key
Press “INFO” key to display the Information banner while viewing TV programs.
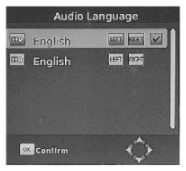
AUDIO key
Some programs may have multilingual audio language and this audio broadcast may be on a different audio mode such as Stereo, Left or Right. All the available audio languages will be displayed on the audio track window when you press the L/R key. The screenshot illustrates this below. If there is no audio output after you have selected the audio language, it indicates that there is no audio on the current audio mode, so you have to select the previous audio mode.
CC key
Certain programs have multilingual subtitle information. All available subtitle languages will be displayed in the subtitle information window when you press the SUBTITLE key. Follow the help information in the subtitle window to select preferred subtitle.
<<&>> (PREV/NEXT) key & I<<&>> I (F.R./ F.F) key
The PREV/NEXT key and F.R./F.F. key can be used during playback of multimedia programs from your external USB device. Press the PREV/NEXT key to go to the previous/next program and F.R./F.F. key to fast forward or rewind during playback.
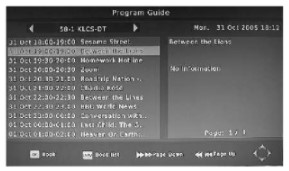
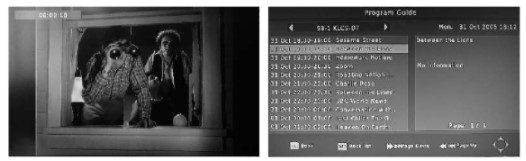
EPG key
Press EPG key to display the on screen electronic program guide. This displays a 7 days Electronic Program Guide for all programs being broadcast from available broadcasters.
OK/(LIST) key
Press OK key to display all TV channels or all Radio channels. Follow the help information at the bottom of the window to select preferred channel.
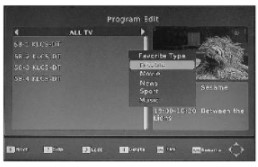
FAV key
Setting up Favorite TV or Radio Channels:
You can add preferred channels to a favourite’s channel list. Press the Menu key to access the Program Edit Menu. The Favourite channel option allows you to classify the channels by different genre: Movies/News/Sports/Music. Press the “FAV” or “OK” key to confirm your selection. A heart shaped symbol will appear next to that channel which confirms your selection.
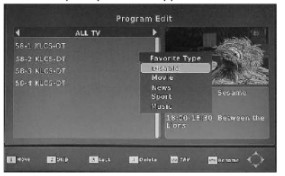
Disable Favourite TV or Radio Channel:
Press the Menu key to access the Program Edit Menu. The list of the favourite channels will be displayed. Highlight the desired channel to be disabled. Press “FAV” button, select the “Disable” option and press the “FAV” or OK” key to cancel. Press the “Exit” key to exit the menu.
Cable Connections
Make sure the STB is connected properly as below:

Menu Operation
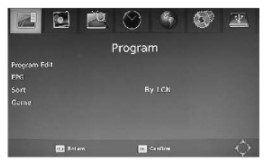
Press MENU key to display the main menu. It consists of 7 items as following:
- · Program
- . Picture
- · Channel Search
- · Time Setting
- · Option
- · System
- · USB
Note: In any page of the menu, you can use EXIT key to return to previous menu page, or press MENU key switch to Main Menu page and then press MENU key again to exit Main Menu.
Program
Press key first, then presskey, enter into Program setting menu. (password: 000000)
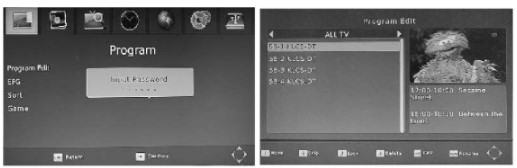
Choose the menu as per request (Move/Skip/Lock/Delete/FAV/Rename).
Picture
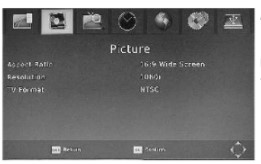
Aspect Ratio: AUTO, 16:9 Pillar Box, 16:9 Pan & Scan, 4:3 Letter Box, 4:3 Pan & Scan, 4:3 Full, 16:9 Wide Screen
Resolution: 480i, 480p, 720p, 1080i & 1080p (60Hz) TV Format: NTSC/PAL
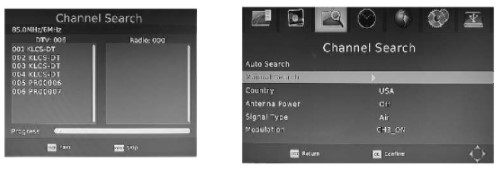
Channel Search
1. Auto Search 2. Manual Search 3. Country 4. Ant-out
Use A & V keys to move up and down from one item to another, and press key to display corresponding sub-menu.
Auto Search
In the Main menu, use A & V keys to select Auto Search item, and press key to enter into Auto Search menu.

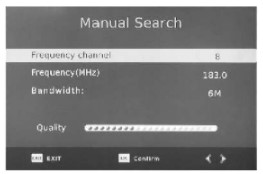
Manual Search
In the Main menu, use .. & …keys to select Auto Search item, and press …key to enter into Manual Search menu.
1. You can press the number keys into channel, or press directional keys to choose.
2. It is suggested that you use auto channel search.
3. Press EXIT to quit
Country
In the Main menu, use A & V keys to select Auto Search item, and press key to enter into Country menu to select different countries.

Antenna Power: on/off
Signal Type: Air/Cable
RF Output
The system can output channel 3 or channel 4 NTSC RF signal as following:

1. Use a cable to connect “RF OUT” converter of the STB and your TV can support CATV input.
2. Auto search the program and change current channel to CH3 or CH4 directly by inputting the channel number in your TV.
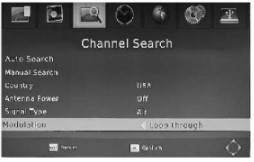
Loop through output setting
The system can select the loop through as following: 1. Use a cable to connect “RF OUT” converter of the STB and your TV can support CATV input 2. Go to the Setup Menu and ON/OFF the loop through RF output 3. Auto search the program to the target channels. (when searching programs, please use TV Remote) Note: When under the setting of LOOP THROUGH, the machine will not play the TV program.
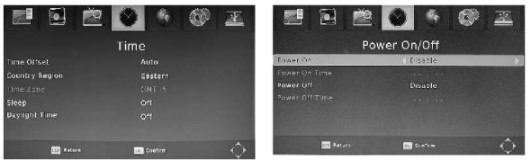
Time Setting
Time Zone: select Time and Timezone.
Sleep: press key to select the Sleep Time (1~12hours).
Power ON/OFF: presskey into the setting menu, select Power ON Time or Power OFF Time.
Option
OSD Language: English, Spanish, French
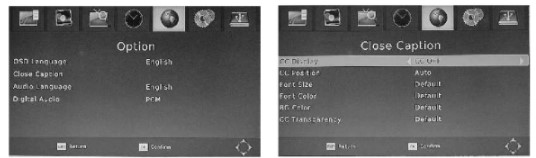
Close Caption
CC option list:
| CC Display | CC OFF, CC1, CC2, CC3, CC4, CC5, CCO |
| CC Position | Auto, Top, Bottom |
| Front Size | Default, Small, Medium, Large |
| Front Color | Default, White, Black, Red, Green, Blue, Yellow, Magenta, Cyan |
| BG Color | Default, White, Black, Red, Green, Blue, Yellow, Magenta, Cyan |
| CC Transparency | Default, Solid Transparent, Transparent | Default, Solid Transparent, Transparent |
System Setup
In main menu, select System Setup item and press OK key to enter into System Setup menu. Press A & V to select item and key to enter into sub menu or change current item setting.
1. Parental Guidance: Press key when this item is highlighted, input password.
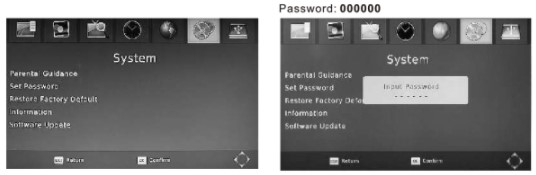
Select Rating Region:
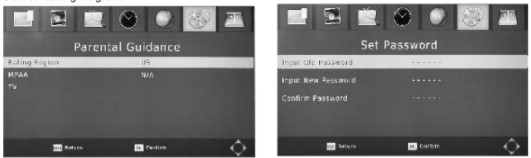
2. Set Password: Press key when this item is highlighted.
-> Input old password (Default 000000) -> Input new password
3. Restore Factory Default: Restore system setting parameter to default setting if you press key when this item is highlighted. * Default password is 000000
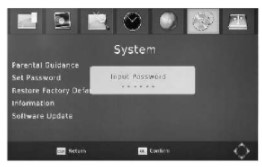
4. Information: Restore system setting parameter to default setting if you press key when this item is highlighted.
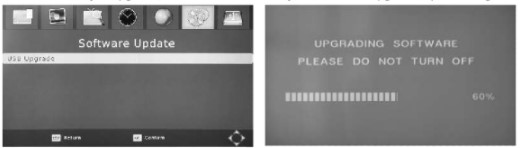
5. Software Update: Insert USB disc while the unit is on, choose the upgrade file, press the right directional key to upgrade, make sure the unit stays on while the upgrade is processing.
USB
Multimedia
MENU=>Multimedia You can now choose to view Photos, play MP3 music files and view Movie files via the multimedia player. Known supported files are outlined below.
NTFS, FAT32 and FAT16 file systems are supported.
| Player | Supported file |
| Photo | JPEG, BMP, PNG |
| Music | *.wma, *.mp3, *.aac |
| Movie | *.avi, *.mpg, *.dat, *.vob, *.mkv, *.mjpeg |
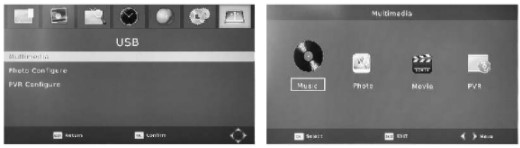
Music: You can choose your favorite songs, fast forward & fast rewind, stop and play, go to, REPEAT.
Photo: After choosing a specific picture from the preview file, you can press the “Enter”key to enter full screen mode. Press “Play” key to enter slide show mode. To play music with your side show, make sure music is playing before you open the picture.
Movie: You can choose any movie or song as you like, change last and next, fast forward & fast rewind, play and stop, goto, REPEAT and so on. Press the “PLAY” key to enter full screen.
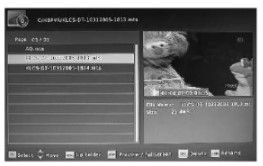
PVR: Depends on user’s choice, there are some functions like remove/edit/delete and so on. Play/stop/last/next/fast forward/fast rewind/ repeat all these functions can be done with the remote, If you press the remote’s “HOLD” key, you will enter the “Full Screen” status.
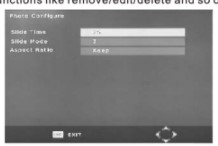
Photo Configure Here you can choose slide time, mode and aspect ratio
PVR TV (Recording)
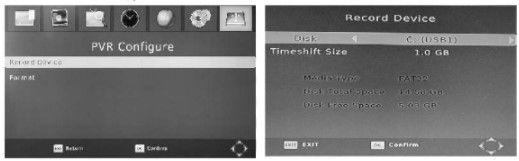
PVR
Choose record device, partition.
Recording
1. Real-time recording
-> You can record a TV program by inserting a USB hard drive to save the recording on your USB.
Please advise that your recordings are for your personal enjoyment only. They cannot be used for commercial distribution or public showings.
Timeshift
The Timeshift function allows you to pause the TV program being viewed. Once paused the TV program is being stored on your connected USB Hard Drive or Flash Drive. When watching a program, press the PLAY key on the remote control to activate the function. You can now use the F.R. (Rewind function) to go back to the point you began the TIMESHIFT function or F.F. (Fast Forward) to catch up to live viewing. If you wish to stop the TIMESHIFT function, press the STOP key.
To save space on the USB hard drive, the recorded program is not stored under time shift mode. If you press the INFO key, you can access the TIMESHIFT information screen.
WARNING: For the compatibility of HDD and USB devices with TIMESHIFT and PVR function, please refer to the table below:
| TIMESHIFT | PVR RECORD | FORMAT | |
| USB flash drive | Works | Works | Fat32 |
| 3.5inch HDD | Works | Works | NTFS |
| 2.5inch HDD | Works | Works | NTFS / FAT 32 |
| 1.8inch HDD | doesn’t work | Works | NTFS / FAT 32 |
MENU=>USB=>Multimedia=>PVR
PVR (TV Recording) Recording
-> Press the remote’s “REC” key to enter the recording status, and press the “Stop” key when you finish the recording.
2. Programmed Time Recording
Option 1: Simply press “TIMER” key on the remote to go to Programmed Time Record menu.
Option 2: Press the “EPG” key enter the TV program interface, and then press the “Enter” key to enter into the Programmed Time Record menu , Press the number key “1” to enter it
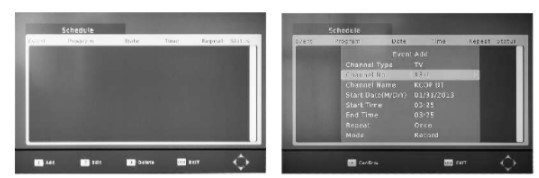
-> Select the desired channel, key in the date & time to start recording and the time to end recording, press “OK” to confirm then EXIT to go back to previous screen.
-> The recorded video will be saved into your external USB drive or Hard drive in PVR file format.
The user can remove/edit/delete the video as you like. Press the remote’s “HOLD” key, you will enter the “Full Screen” status. Play/stop/last/next/fast forward/fast backward/repeat can be done on the remote.
Appendix
Troubleshooting
If you have difficulty with your digital TV tuner box, there are several possibilities you should investigate before calling for a service technician.
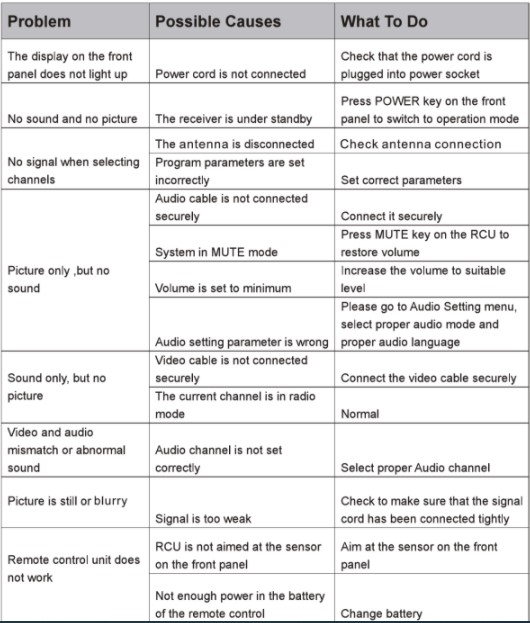
CAUTION: If the problems are still unresolved after you’ve done all of these, do not disassemble the device yourself. Please contact the dealer or a trained service personnel for assistance.
Appendix
Specifications
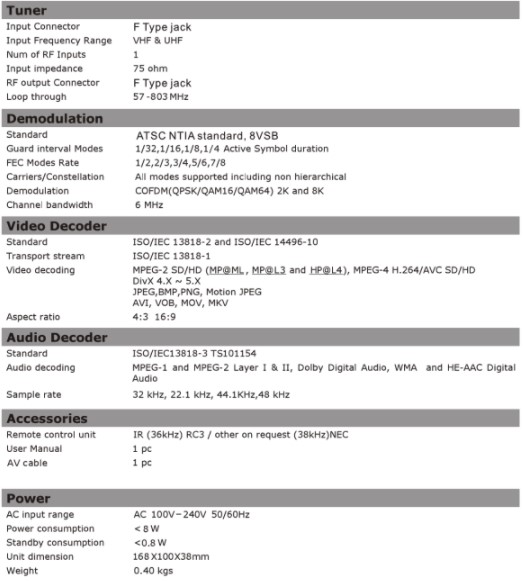
You can download the PDF version of the Sematic USER’S MANUAL (AT103B ) here.