Manufactured by: Puronics Water Systems, Inc. 5775 Las Positas Road Livermore, CA 94551 (800) 339-8780 www.puronics.com
IMPORTANT
This booklet contains your Owner Limited Warranty Card. Make sure this Warranty Card is filled out by your Dealer and returned to Puronics Water Systems, Inc. within two weeks of installation to assure proper warranty registration.
Questions about your warranty registration may be answered by writing to:
Warranty Registration Dept. do Puronics Water Systems, Inc. 5775 Las Positas Road Uvermore, CA 94551
Congratulations
Puronics welcomes you to a new, carefree way of life with conditioned water. You can take pride and satisfaction knowing that you own the very best. We are proud that you have selected the Puronics deluxe quality Water Conditioner for your home. Your sound judgment is supported by the wide acceptance received for these units throughout the world. More and more quality conscious homeowners are purchasing Puronics Water Conditioning equipment because of its superior performance and its premium quality workmanship. The following pages of this booklet will introduce you to your new Puronics Water Conditioner by
explaining operation, care and maintenance. In addition, the booklet provides recommendations for getting the very best performance from your unit as well as answers to commonly asked questions. At Puronics, we not only care for your water …we care for your family.
Puronics Water Systems, Inc.
General lnformation
Your Puronics Water Conditioner is completely automatic. It will provide an abundance of conditioned water with just an occasional addition of salt to the brine tank when the salt reaches the “add salt” level. Your unit was thoroughly tested at the factory before shipping, and again at the time of installation.
The automatic timer is set to “regenerate” your water conditioner at night while you are sleeping. From experience, this is the best time because your water demand is lowest then and regeneration will not interfere with baths, washing clothes, etc. However, unconditioned water is available from all faucets during the regeneration cycle. With the Puronics Water Conditioner you are never without water.
It is lgood idea to wipe the unit occasionally and then apply a good coat of wax. This procedure will kee1 your water conditioner looking bright and clean for a lifetime.
In case some problem should arise, you can manually by-pass the unit by throwing one lever . Then call your authorized Puramics dealeL He has been trained in all phases of maintenance and repair work and will have the unit back In operation quickly, If there is not an Puronics dealer in your vicinity, then contact another reliable water conditioning firm. Failing that, please write directly to the factory: Puronics Water Systems, Inc., 5775 Las Positas Road, Livermore, CA f4551 Attention: Service Department.
READ ALSO: PENTAIR WHOLE HOUSE WATER SOFTENING SYSTEMS 1.0, 1.5, 2.0 SERVICE MANUAL
Regeneration
Your Puronics Water Conditioning unit consists of a tank filled with a premeasured amount of a special mineral called S-759, formulated especially for Puronics equipment. On top of the tank is the control valve/timer, which works on the same principle as an electric clock. Alongside the unit is a storage tank which holds the salt and brine for the regeneration cycle.
Regeneration means recharging or recleaning the special S-759 mineral. It is important to know that the entire cycle is automatic and you will have nothing to do with it. The following steps are for your own enlightenment… and to demonstrate the thoroughness of the automatic cycle: 1. Backwashing, which reverses the action of the water, throws off the sediment (called turbidity) that has been filtered out of the water, and flushes it down the drain. 2. Salt, as brine, is injected into the unit to clean and revitalize the S-759 mineral. (The amount of salt used is controlled by a float valve, which operates the same as the float in the water tank of your toilet.) 3. Slow rinse. 4. Fast rinse. 5. Valve automatically returns to the service position to again supply you with good, conditioned water.
What Salt To Use
Salt is your water conditioner’s fuel. Using the right fuel is as important here as it is to get the best performance from your car. It is strongly recommended to use only nugget or pellet type salt in your water conditioner. This type of salt is pure and free of undesirable insolubles. Nugget or pellet type water conditioner salt is available from your Puronics dealer.NOTE: Common rock salt is NOT recommended because much of it contains insolubles. The continued use of common rock salt will necessitate more frequent cleaning of the brine tank, or worse, it may cause a malfunction of the valving. However, specially processed water conditioner rock salt, as handled by your local dealer, may be used.
When To Add Salt
The brine tank has a capacity up to 250 Ibs. of nugget or pellet salt. You can add salt whenever it is most convenient for you, but it is important to replenish the supply before the pellets reach the “add salt” level indicated by the label on the salt storage tank.
Bridging Or Caking
The salt platform in your brine tank has been engineered to eliminate salt bridging or caking. However, under certain atmospheric conditions these circumstances can occur and will prevent the salt from coming in contact with the water level. When your water seems to be hard, check the salt in the storage tank. If it appears to be bridging or caking, break it up with a short wooden stick. In doing so, be careful not to probe the full depth of the brine tank because you may damage the salt platform.
Bacteriostatic – An Puronics Exclusive
If your Puronics Water Conditioner is an Environmental Protection Agency (EPA) Registered Bacteriostatic model, you have two unique added features. First, this unit inhibits the growth of bacteria within the S-759 ion exchange filter media bed. Second, it reduces and in many cases completely eliminates organic tastes, odors and colors from the water.
Inside the Bacteriostatic model water conditioner a layer of HYgene* silver-impregnated activated carbon (EPA-Registered Bacteriostatic Water Filter Media) is placed on top of the S-759 mineral. The silver acts as the inhibiting agent while the activated carbon adsorbs objectionable tastes, odors and colors.
IT IS A VIOLATION OF FEDERAL LAW to use this product in a manner inconsistent with its labeling. Only use EPA Registered HYgene® silver-impregnated carbon replacement media in this unit. Use of any medium other than HYgene® silver carbon manufactured by Puronics Water Systems, Inc. is a violation of the proper operation of the unit, and voids the manufacturer’s warranty. For your protection, do not accept a replacement media unless it is factory-sealed with both the tape and label reading “HYgene” manufactured by Puronics Water Systems, Inc.. The EPA has restricted the Bacteriostatic models for use only on treated municipally supplied tap water, which precludes its use on well water.
THE INSTALLATION OF ANY REPLACEMENT PARTS, FILTERS OR MEDIA NOT SOLD OR AUTHORIZED BY PURONICS WILL VOID THE WARRANTY.
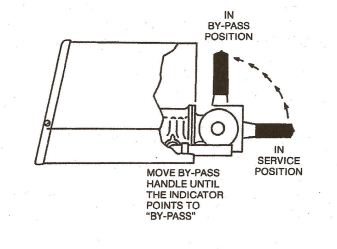
By-Pass Instruction
In case any problem should occur that cannot be immediately resolved, it is recommended to manually by-pass the unit as shown and call your authorized Puronics dealer.
MODELS IQ and EE
LIFE EXPECTANCY OF HYGENE® BACTERIOSTATIC MEDIA
| Model Nos. (IQ) | Tank Diameter | HYgene Content | Bacteriostatic Gallons | Media life Family of 4 |
| 0820-B | 8″ | 21b. | 75,000 | 12 months |
| 1030-8 | 10″ | 31b. | 112,500 | 18 months |
| 1240-8 | 11″ | 41b. | 150,000 | 24 months |
NOTE: CHLORINE LEVELS IN EXCESS OF 1 PPM MAY REDUCE LIFETIME OF MEDIA.
It is suggested that a water meter reading be noted at time of installation. Add to that reading the expected gallon life of the Bacteriostatic medium from the above chart. Record what the water meter reading will be when replacement should be made.
Water meter reading at time of installation _____ Gallons
Expected life of media (from above chart) + ________Gallons
Water meter reading, media replacement ______ Gallons
Model lQ Special Features
Directions For Use
It is a violation of Federal Law to use this product in a manner inconsistent with its labeling. For use on cold water only.
Meter-Controlled Regeneration
The Model 10 control minimizes salt usage and water waste by accurately monitoring the conditioned water and then initiating a regeneration only when the S-759 mineral is near exhaustion. Six-cycle down-flow brining assures accurate salting while the adjustable time regeneration program uses the minimum amount of water required per cycle.
In service a mechanical meter accurately monitors water usage. This feature eliminates the costly wasted capacity due to premature regenerations.
Vacation Periods
There is no need to be concerned about disconnections or adjustments on your Model 10 Water Conditioner before leaving your home for long periods of time. When no water is being used, the “brain” will simply remain idle for that period of time and be ready to monitor water usage when you return home.
High Usage Demand/Weekend Guests
The Model 10 Water Conditioner’s “brain” will automatically recognize the increase in water usage and regenerate before running out of conditioner water. Unpredictable water demand is never a problem with the Puronics Model 10.
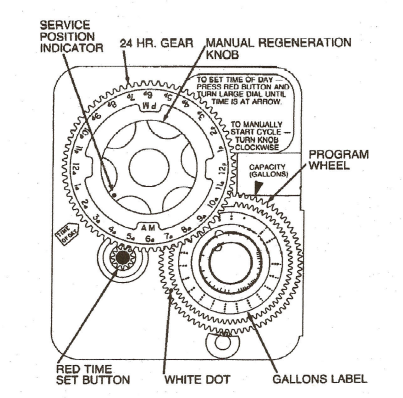
How To Set The Time Of Day
If you should have a power failure or want to adjust for Daylight Saving Time, follow these Instructions.
Press and hold in the red button to disengage the drive gear.
Turn the large gear until the actual time of day is opposite the time of day pointer.
Release the red button to engage the drive gear.
How To Manually Regenerate Your Water Conditioner At Any Time
Turn the manual regeneration knob clockwise.
This slight movement of the manual regeneration knob engages the program wheel and starts the regeneration program.
The black center knob will make one revolution in the following three hours and stop in the position shown in the drawing.
Even though it takes three hours for this center knob to complete one revolution, the regeneration cycle of your unit might be set for only one-half of this time.
In any event, conditioned water may be drawn after rinse water stops flowing from the water conditioner drain line.
Model EE Special Features
Directions For Use
It is a violation of Federal Law to use this product in a manner inconsistent with its labeling. For use on cold water only.
Energy Efficient Control
This fully automatic six-cycle valve with 12-day timer schedules regenerations at preset intervals. The day and the hour for regeneration, as well as the salt dosage, have been set at the time of installation by the installer. These settings have been carefully calculated according to your family needs and to get the maximum recovery of the resin while minimizing water usage. Do Not Change These Settings Without First Consulting Your Dealer.
Vacation Periods
Why allow your water conditioner to continue regenerating while you are on vacation? It would be a waste of salt to recharge an already charged mineral bed. With your Energy Efficient Puronics Model EE Water Conditioner, vacation time has been taken into account. Simply move the by-pass valve lever until the indicator points to “by-pass”. By doing so, the unit will continue to go through the preset regeneration cycles, but actually it will not regenerate. When you return home, move the by-pass valve lever back to the “service” position and you will again have conditioned water as before.
High Usage Demand/Weekend Guests
As mentioned previously, your Puronics Model EE unit is set for your own needs. Higher than normal usage such as weekend guests will naturally place a greater demand for conditioned water on the unit. The method for manually regenerating the unit . This “extra” regeneration will not interfere with the regular programmed cycle.
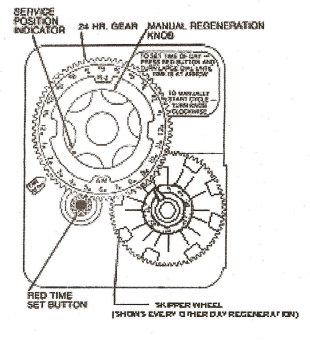
How To Set The Time Of Day
If you should have a power failure or want to adjust for Daylight Saving Time, follow these instructions.
Press and hold in the red button to disengage the drive gear.
Turn the large gear until the actual time of day is opposite the time of day pointer.
Release the red button to engage the drive gear.
How, To Manually Regenerate Your Water Conditioner At Any Time
Turn the manual regeneration knob clockwise.
This slight movement of the manual regeneration knob engages the program wheel and starts the regeneration program.
The black center knob will make one revolution in the following three hours and stop in the position shown in the drawing.
Even though it takes three hours for this center knob to complete one revolution, the regeneration cycle of your unit might be set for only one-half of this time.
In any event, conditioned water may be drawn after rinse water stops flowing from the water conditioner drain line.
INSTALLATION INSTRUCTIONS FOR THE Model IQ and EE
All water conditioners should be installed in accordance with applicable state and local plumbing and electrical codes.
These instructions supplement and do not supersede local codes.
Please read & understand the installation instruction completely before installing the water conditioned system.
VALVE POSITIONS
I. Service
- Backwash
- Brine and Slow Rinse
- Fast Rinse
- Brine Tank Refill
The entire water conditioner has been factory tested to ensure proper performance and the customer’s satisfaction.
UNPACKING
This automatic water conditioner has been shipped complete in two cartons. These containers have been carefully designed to assure the customer of satisfactory arrival at the destination.
One carton contains the water conditioner tank which is preloaded with permanent high capacity ion exchange resin. The control valve is mounted on top of this tank. The carton also contains the homeowners manual, water conditioner tank leveling legs, meter, bypass, transformer (if 24V system) and warranty card. Care should be executed in unpacking to prevent accidental loss of these components.
The second carton contains the salt storage tank and its components. These consist of a salt grid system, a three-foot section of polyethylene brine tubing and a disassembled slide-a-salt brine valve assembly.
Remove control face plate and shroud. Place the mineral tank on the three plastic leveling legs and level.
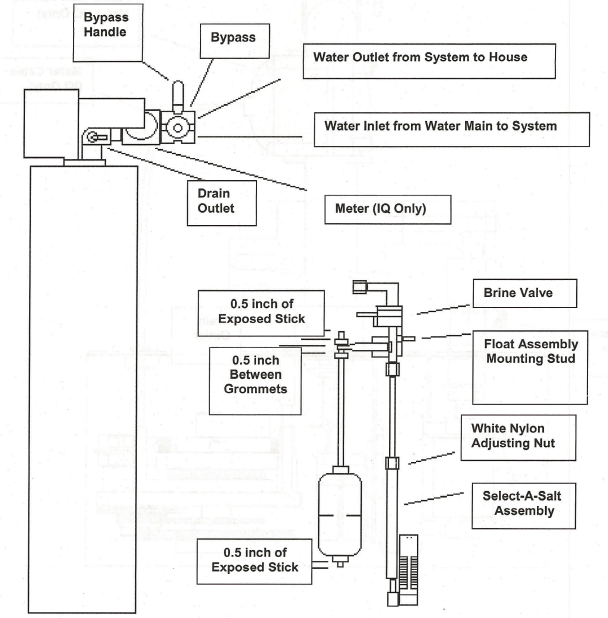
For Model IQ, attach the meter to the main valve and then the bypass to the meter. When installed properly, while standing in front of the system, the attachment point for the meter cable on the meter will be on the right and the bypass handle, when in the bypass position, will be pointing straight up.
Make sure you have moved the bypass lever so that the indicator points to bypass position. Plug the meter cable into the meter. This is done by just pressing the cable end into the small receiving hole in the rounded cover in meter case.
INSTALLATION
Select a location that is convenient for drain facilities, electrical outlet, and for servicing and adding salt. The stainless steel tank MUST be placed on the plastic leveling legs provided. The legs can be adjusted to level the system effectively.
Turn main water supply off. Drain plumbing system by opening a cold water faucet as low as possible in the house and one as high as possible.
The connection point for the plumbing to the water conditioner should be in the main water line after any installed check valves and/or pressure regulators. The installation should also be cut in after any backflow prevention devices or sprinkler/irrigation systems. The cut-in must be before any Tee’s in the main plumbing line that feeds any fixtures in the house.
Cut the main supply line and remove approximately 6 inches of existing plumbing. If existing plumbing is galvanized pipe, you will have to cut the pipe and thread or remove a section of pipe and replace with copper tubing or any code approved plumbing product.
Run the plumbing from the main shut off side or “street side” of the cut that was made in the plumbing to the inlet opening in the bypass valve marked “In” or with the “in arrow”. This connection must be into the bottom of the two openings in the bypass valve.
Use caution in soldering so that excessive heat is not applied in the vicinity of the valve for any extended time. Use wet towels or rags to conduct heat from the valve. Also avoid excess pipe dope and solder that might enter the valve.
Run the outlet plumbing from the opening in the bypass valve marked “outlet” or with the “out arrow” to the return or “house” side of the cut that was made in the main plumbing. The outlet must come . from the top of the bypass valve
Puronics recommends not reducing the size of the existing plumbing. If main service line is 3/4″ then the system should be installed in 3/4″ copper tubing or pipe.
When the connections are fully completed verify that the bypass handle is in.the bypass position. Turn main water supply on. Check for leaks. Shut off the lower faucet that was turned on earlier and then turn off the upper faucet. Re-check to make sure there are no leaks in the plumbing.
RUN & CONNECT THE DRAIN LINE
The Drain Adapter is the black fitting located on the right side of the main valve with the barb adapter in it. If vertical drain is necessary, limit to a rise of 8 feet under average water pressure. Best plumbing practice and most plumbing codes require a 1-1/2″ (or two times the size of the drain line) air gap between end (outlet) of the drain line and receiver (floor drain, utility sink, etc.).
Use caution when screwing the barb adapter into the drain housing. The lock screw should be loosened and the black drain adapter should be pulled out to attach the barb fitting while in hand. The male threads on the barb fitting should have Teflon tape applied and only be hand tightened snugly. Over tightening can stress and crack the black drain adapter.
The end (outlet) of the drain line must be secured in position to avoid movement from the set position. Never use any tubing smaller than 1/2 inside diameter for drain line.
PLACEMENT OF THE SALT STORAGE TANK
Make sure that salt storage tank is level and on a smooth surface. If a rough or uneven floor is the only support available, set the salt storage tank on a piece of Masonite or plywood and level.
SETTING UP THE BRINE VALVE ASSEMBLY
Loosen the nut on the underside of the brine valve and insert the gray salt draw tube to the bottom of the brine valve. Be sure the gray tube inserts fully into the brine valve and then tighten the nut. (Hard, hand tight if using the black plastic valve and wrench tight if using the brass valve).
The float stick is attached to the arm on the Brine Valve by removing the top grommet from the float stick. Put the float stick end through the valve arm and put the grommet back on.
Attention must be given to proper adjustment of the rubber grommets on the float rod. There must be ‘1/2 inch of free stick extending beyond the bottom grommet. There must be 1/2 inch of free stick extending beyond the top most grommet above the valve arm. There must be 1/2 inch of free stick or “play” between the two grommets on either side of the Brine Valve arm.
SETTING THE SALT USE FOR BRINE TANKS WITH A GRID PLATE SYSTEM (Brine tanks not equipped with a Grid Plate System do not need any salt setting adjustment)
Adjust the Select-A-Salt slider to the proper settings below; For all 12″ systems set the salt settings to 12 Ibs.
Tighten the white nylon nut, hand tight at the Ibs. of salt selected. Then wrench tighten 1/4 turn only. Mount brine valve assembly into the brine well making sure air check at the bottom of the draw tube is turned to the extreme right or left to be sure there is sufficient clearance for the float to move freely up & down.
Connect the 3/8 brine line to the safety brine valve on the left side of the main valve of the system (opposite the drain line). Then attach to the brine valve making sure that the brass inserts (stiffeners) provided are used at each end of the 3/8 brine line. Make sure nuts are tight at each end of the brine line. Make sure the brine line is fully inserted into the valves before tightening.
ADD WATER TO THE SALT TANK
(For salt tanks with Grid Plate Systems only.)
Salt storage tank must be pre-filled with water on initial installation. Do not overfill. Water level must be to 1″ over grid system. If you fail to do so the first regeneration will not be effective as the water will not go above the grid table.
If a salt tank without a grid plate system is used. do not fill with water.
ELECTRIC HOOK-UP
Plug electric cord into electrical outlet. Many receptacles in present installations may not have provisions for the 3-prong plugs. If not, a parallel ground adapter must be used. If used, make certain that the grounding tab on this adapter is firmly attached to the screw on the receptacle box. Do not plug into ungrounded temporary power supplies. Verify that the receptacle used is “hot” all of the time & is not operated by a wall switch.
24 volt systems should be wired from the “pig tail” wires on the back of the timer control assembly to the transformer using proper 24 volt wire. Be sure to completely wire the connections before plugging in the transformer.
SETTING UP THE SYSTEM
To set the system for regeneration the water hardness will have to be tested by a water professional or call the local municipality. The hardness must be set in Grains Per Gallon (gpg).
Locate the Program Wheel on the lower right corner of the timer. (See Homeowners Manual for location). To adjust the settings, the back (largest) gear must be held in place while the dial with the two stick figure people on it (People Dial) is pulled slightly out and rotated. Use your pre-established Grains Per Gallon (gpg) as the reference point, pull and rotate the People Dial so that the number in YOUR family matches (is directly across from) your pre-established Grains Per Gallon.
To set time of day, push in the red button and rotate the time gear so that the white Time of Day arrow point to the correct time of day & release the red button.
SYSTEM START-UP
Open a utility sink, bath tub, or any faucet without an aerator. With the faucet running push the bypass lever forward until indicator points to service position to fill, expel air, and rinse out the system.
THIS IS A MUST.
LET THE WATER RUN FROM THE FAUCET FOR A FULL TEN (10) MINUTES
After ten minutes pull the bypass handle up to the bypassed position and shut off the running faucet.
Now turn the Regeneration Dial (the one with the finger grips) clockwise one click to the backwash position to expel air compressed in the unit through the drain. (If nothing happens check the electric hook up. If the electric is fine, then turn the regeneration dial clockwise one more click). When the air has stopped purging from the drain, open the bypass only 1/3rd of the way. When there is a steady flow of water at the exit point of the drain line, open the bypass handle completely.
Now add the salt to the Brine Tank. The salt in the brine tank can be maintained at any level between almost empty to completely full as long as the brine tank does not run out of salt the system will perform properly.
Run all of the faucets in the house to clear all of the plumbing lines of air and water from the installation.
Fill out warranty card in the Homeowners Manual. Fill out information required on inside of face plate.
Replace control face plate, and shroud. The installation is now complete. Double check the following items before leaving installation site:
(1) Check plumbing for possible leaks.
(2) Has warranty card been correctly and completely filled out?
This warranty card MUST be returned to validate your Factory Warranty.
(3) Is control valve power cord plugged in?
(4) Did you add water to the brine tank? (brine tank with grid plate only)
(5) Is there salt in the storage tank?
(6) Is Slide-A-Salt brine valve adjusted for amount of salt per regeneration?
(7) Is bypass lever in service position?
(8) Has air (caused by water being shut-off for installation) been released from all water lines in the house?
(9) Have the proper regeneration settings been made?
(10) Has correct time of day been set and proper regeneration time?
Side View of the System
Top View of Main Valve & Control Assembly

Questions And Answers
What is water conditioning?
Water conditioning is that branch of engineering that determines the chemical characteristics of a tap water supply, as it enters your home, and treats these characteristics so as to provide water more suitable and economical for household use.
Why is it essential to improve water quality?
Beyond being an absolute necessity of life, water is an outstanding cleaning agent. The trouble is that nature does a lot of things with water long before you have a chance to use it in your laundry or at your kitchen sink. You get it, as it were, second hand. Therefore, improving your water quality by water conditioning is just as essential as any other home appliance.
Does the conditioned water have a ··different” taste?
Taste is difficult to define as no two people have the same sense of taste. A water conditioner will remove certain minerals and turbidity from the water, giving you a cleaner, better fasting water.
Will conditioned water give a cleaner, brighter wash?
Yes. For best results, you should use the proper amount of laundering agent. Keep in mind a 60 to 80% soap saving can be achieved with conditioned water. Learn to use less laundering agent because none of the cleansing compound will be wasted as in hard water cleaning. The amount of . laundering agent you use depends on: (1) its effectiveness, (2) the volume and temperature of water, (3) the size of the wash load, and (4) the type and amount of dirt and grime.
What effect will conditioned water have on plumbing?
Before the water was conditioned, the hard water caused a scale buildup in the hot water pipes and water heater. Scale acts as an insulating material. In the water heater, scale reduces heat transmission, wastes fuel and often causes heating coil and tube failure. The installation of a water conditioner not only prevents further scale formation but will gradually remove previously formed . scale deposits. A recent study indicates that softened water offers a saving of 23% in energy cost in the operation of a hot water heater.
Are the minerals which a conditioner removes from hard water essential to health?
No. The quantity of minerals found in hard water are not essential to good health.
Is the sodium in softened water harmful to people on restrictive diets?
Much depends on the strictness of the diet itself. When the patient is on an extremely restrictive diet, . he should drink neither hard nor softened water. Under these conditions he should have demineralized water, distilled water, or water known to be free of sodium for drinking and for the cooking of foods. Such patients are commonly hospitalized.
In establishing a salt-free diet for patients, physicians should not overlook the fact that even hard’ water may contain appreciable amounts of sodium. To determine the amount a complete analysis of the water is necessary.
How much sodium is added to softened water?
Each grain per gallon (GPG) hardness removed adds 7.875 milligrams (mg) of sodium to a liter of water, which is approximately one quart. The average daily sodium intake of an adult individual is 3,000 to 4,000 milligrams and the average fluid intake is 1.6 to 2.0 liters per day. A liter is slightly more than four 8-ounce glasses of water. Two liters per day or 8.4 eight-ounce glasses of water amounts to a total sodium intake from a source of softened 8 GPG water of 125.16 milligrams. This is approximateIY 3% of the average daily sodium intake.
There is another way to answer this question, and that depends on the hardness of your raw water. The following table shows the additional amount of sodium consumed by drinking ONE quart of softened water.
Initial Water Hardness 5 Grains/Gallon
10 Grains/Gallon
20 Grains/Gallon
40 Grains/Gallon
Sodium Added By Softening 37.5 Milligrams/Quart
75.0 Milligrams/Quart
300.0 Milligrams/Quart
300.0 Milligrams/Quart
How does this sodium content of conditioned water compare to sodium found in common foods?
The data in the following table demonstrate the usual range of sodium in common foods.
| Food | Amount | Milligrams of Sodium |
| Milk | 2 Cups | 226 |
| Bread | 2 Slices | 322 |
| Corn Flakes | 1 Ounce | 260 |
| Tomato Juice | 4 Ounces | 504 |
| Chili | 1 Cup | 1194 |
| Tomato Soup | 1 Cup | 935 |
| Beef Broth | 1 Cup | 1152 |
| Frankfurter | 1 Medium | 610 |
| Hamburger (Fast Food) | 1/4Pound | 1510 |
| Catsup | 1 Tablespoon | 204 |
| Canned Baked Beans | 3/4Cup | 1130 |
| Canned Asparagus | 1/2 Cup | 560 |
| Frozen Peas | 1/2 Cup | 295 |
| Cottage Cheese | 4 Ounces | 457 |
| Parmesan Cheese | 1 Ounce | 528 |
| Pretzels | 1/4 Pound | 1925 |
It is important to note that about 2/3 of the daily water intake of any individual is through food and only about 1/3 from water itself.
You can download the PDF version of the PURONICS WATER CONDITIONER MODEL IQ AND Model EE BACTERIOSTATIC USER’S MANUAL here.