
Digital pictures—plus music and videos

IMPORTANT SAFETY INFORMATION
Please read all safety and operating instructions carefully before use and keep these for future reference.
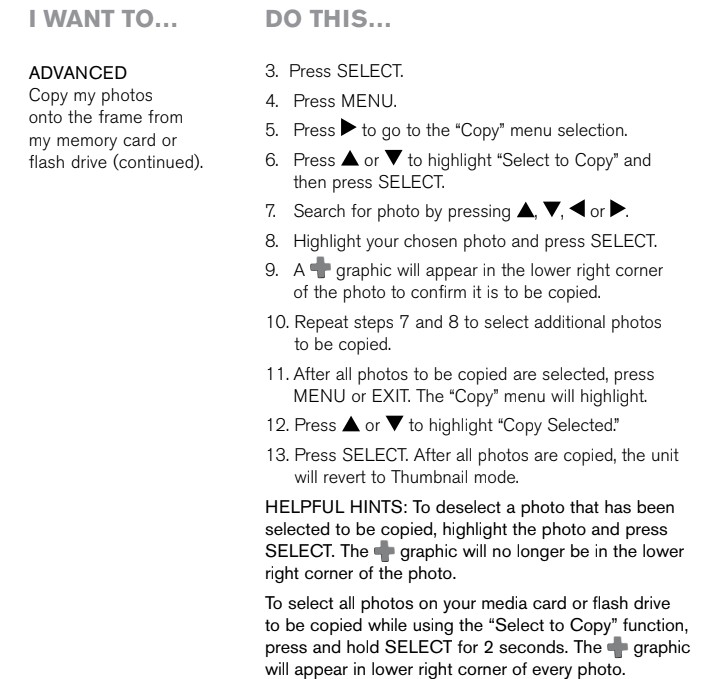
CAUTION
- TO REDUCE THE RISK OF ELECTRIC SHOCK, DO NOT REMOVE COVER. THERE ARE NO SERVICEABLE PARTS INSIDE.
- TO REDUCE THE RISK OF FIRE OR ELECTRIC SHOCK, DO NOT EXPOSE THIS UNIT TO RAIN OR MOISTURE.
The lightning flash with arrow-head symbol within an equilateral triangle is intended to alert the user to the presence of uninsulated “dangerous voltage” within the unit’s enclosure that may be of sufficient magnitude to constitute a risk of electric shock.
The exclamation point within an equilateral triangle is intended to alert the user to the presence of important operating and maintenance (servicing) instructions in the literature accompanying the unit.
IMPORTANT SAFETY INSTRUCTIONS
All the safety and operating instructions should be read, adhered to and followed before the unit is operated.
DANGER
To reduce the risk of electric shock, burns, fire or injury:
- Always unplug the unit from the electrical outlet immediately after using.
- Do not use while bathing or in a shower.
- Do not place or store unit where it can fall or be pulled into a tub or sink.
- Do not place in or drop into water or other liquid.
- Do not reach for the unit if it has fallen into water. Unplug it immediately.
- Care should be taken so that objects do not fall and liquids are not spilled onto the unit.
WARNING
- Close supervision is necessary when this unit is used by or near children.
- Use this unit only for its intended use as described in this manual.
- Unplug this unit during lightning storms or when unused for long periods of time.
- Never drop or insert an object into any opening.
- Protect the power cord from being walked on or pinched, particularly at plug outlets, convenience receptacles, and the point where it exits the unit.
- Do not allow cord to touch hot surfaces. Wrap cord loosely around the unit when storing.
- The unit should be situated away from direct sunlight or heat sources, such as radiators, electric heaters, heat registers, stoves, or other units (including amplifiers) that produce heat. Avoid placing on top of stereo equipment that radiates heat.
- Never block the air openings of the unit with materials such as clothing, plastic bags or papers, or place it on a soft surface such as a bed or couch, where the air openings may be blocked.
- Do not overload electrical outlet. Use the power source as indicated.
- Do not carry this unit by the cord or use the cord as a handle.
- Never operate this unit if it has a damaged cord or plug, if it is not working properly, if it has been dropped or damaged, or dropped into water. If the unit’s power supply cord or plug is damaged, do not attempt to fix it yourself.
- To avoid the risk of electric shock, do not disassemble or attempt to repair the unit. Incorrect repair can cause risk of electric shock or injury to persons when unit is used.
- Do not operate in the presence of explosive and/or flammable fumes.
Accessories
Adapter
Bonus Walnut Finish Frame
MediaImpressionTM Software CD
Location of Parts and Controls
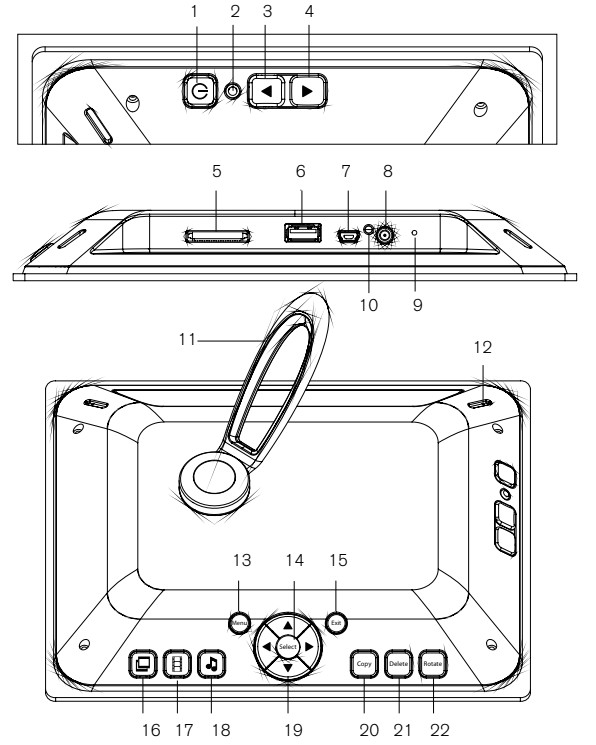
- Power
- Power Save Light Sensor
- Volume Down
- Volume Up
- Card Reader Slot
- Flash Drive
- USB In
- DC In
- Reset
- Power On LED
- Stand
- Speaker (2)
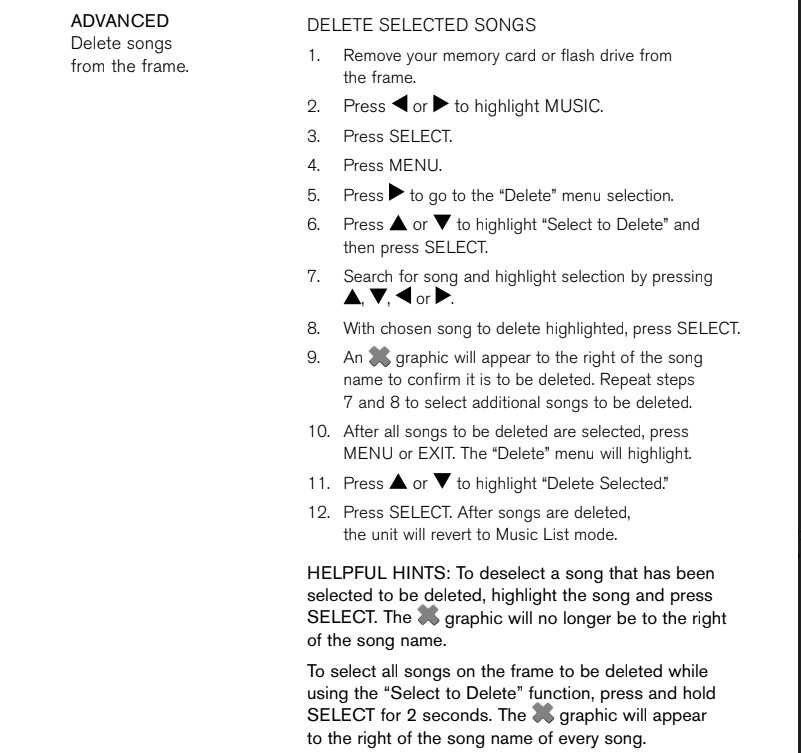
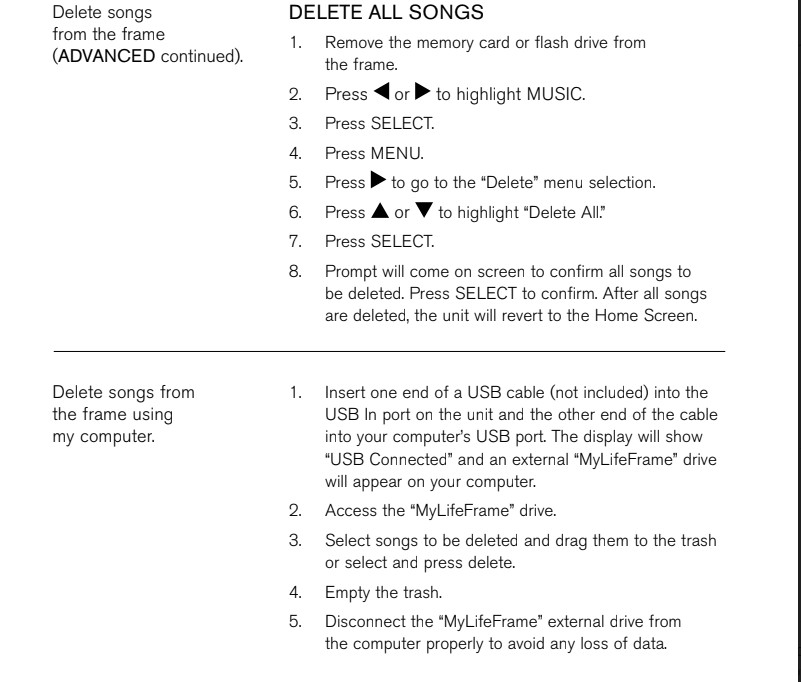
- Menu
- Select
- Exit
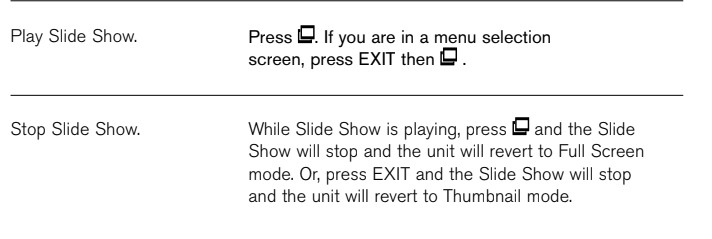
- Quick Access Slide Show
- Quick Access Video
- Quick Access Music
- Up, Down, Left, Right
- Copy
- Delete
- Rotate
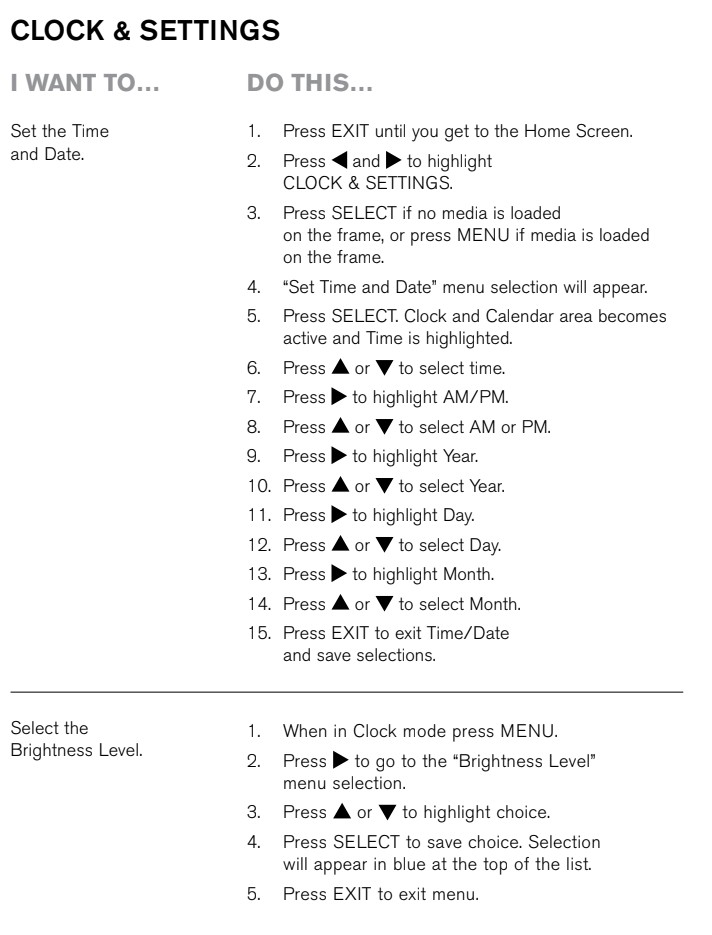
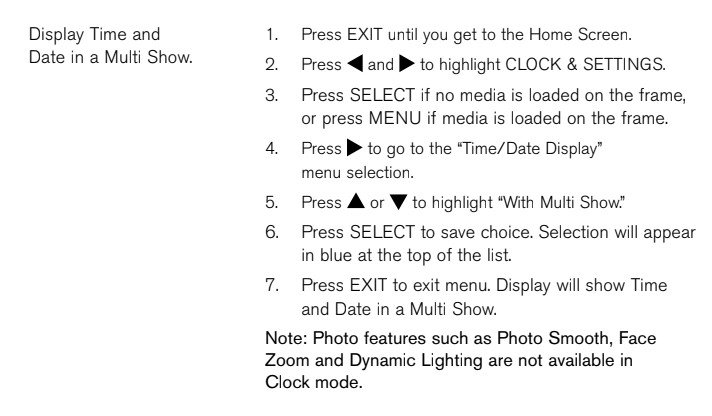
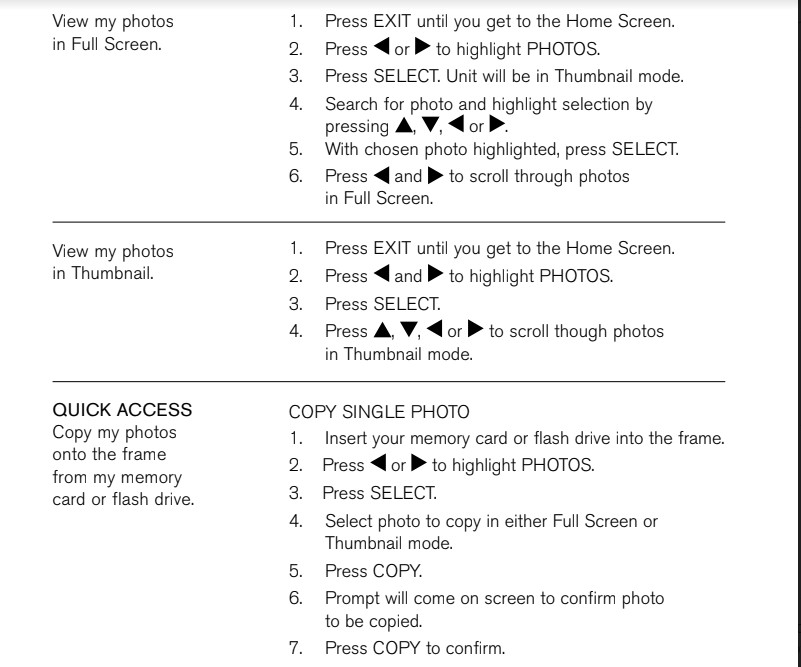
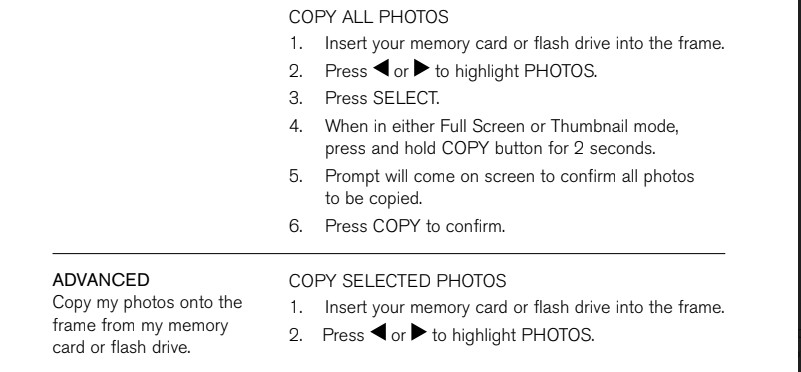
FRAME OPERATION
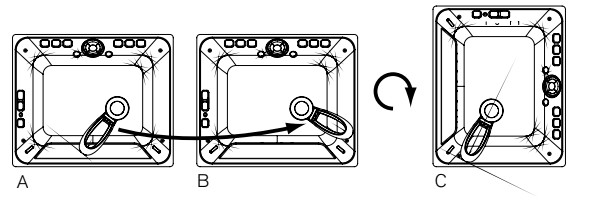
ATTACHING THE STAND
Line up pins on stand with holes on the frame and insert stand
Rotate stand to first position for landscape viewing (see A). Or, rotate stand to second position (see B) and stand the frame upright for portrait viewing (see C).
TURNING THE FRAME ON/OFF
Plug in adapter.
Press and hold the POWER BUTTON until the Brookstone® logo appears on screen to turn on the frame (5-6 seconds). The Home Screen with memory bar appears on the display after the frame is turned on. See below.

Note: A blue fill in the bar indicates used memory. When the bar is completely blue, the memory is full.
Press and hold POWER BUTTON for 2 to 3 seconds to turn off the frame.
The Brookstone® logo will appear on the screen as it is shutting down.
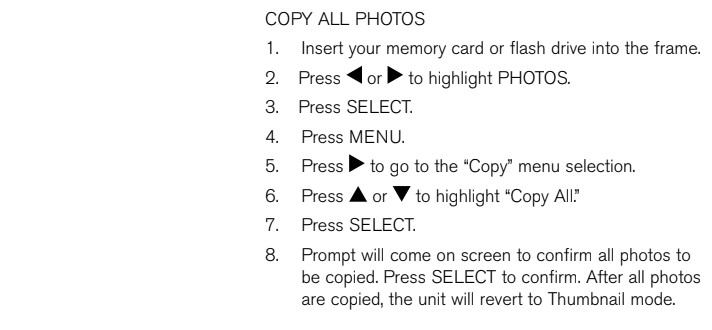
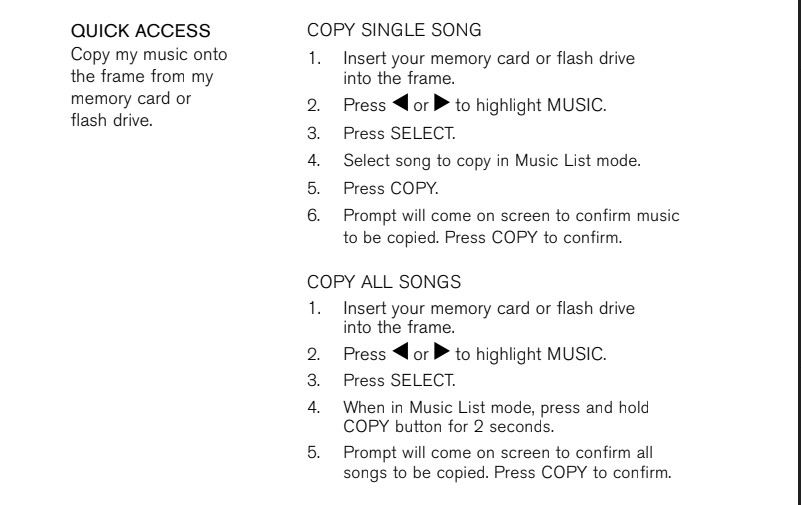
INSERTING A MEMORY CARD OR FLASH DRIVE
With the frame powered on, insert your memory card or flash drive into the appropriate
slot. The Home Screen will show for 60 seconds if no selection is made. After 60 seconds the media will auto-play.
Note: When a memory card is inserted into the frame, the frame’s internal memory (media you have copied to the frame’s drive) will not be available.
USING THE VOLUME
Press VOLUME and VOLUME to adjust volume level. Volume graphic appears on screen to show volume level.
FRAME FEATURES
PHOTO SMOOTH
The PHOTO SMOOTH feature modifies faces within your photos with a smoothing airbrush effect. Feature only works in Slide Show mode (normal transition).
DYNAMIC LIGHTING
The DYNAMIC LIGHTING feature improves your photo’s light balance to enhance dark photos. Feature only works in Slide Show mode (normal transition).
FACE ZOOM
The FACE ZOOM feature automatically pans and zooms to faces within your photos.
Feature only works in Slide Show mode (normal transition).
MULTI SHOW
The MULTI SHOW slide show transition will show multiple photos at the same time.
POWER SAVE
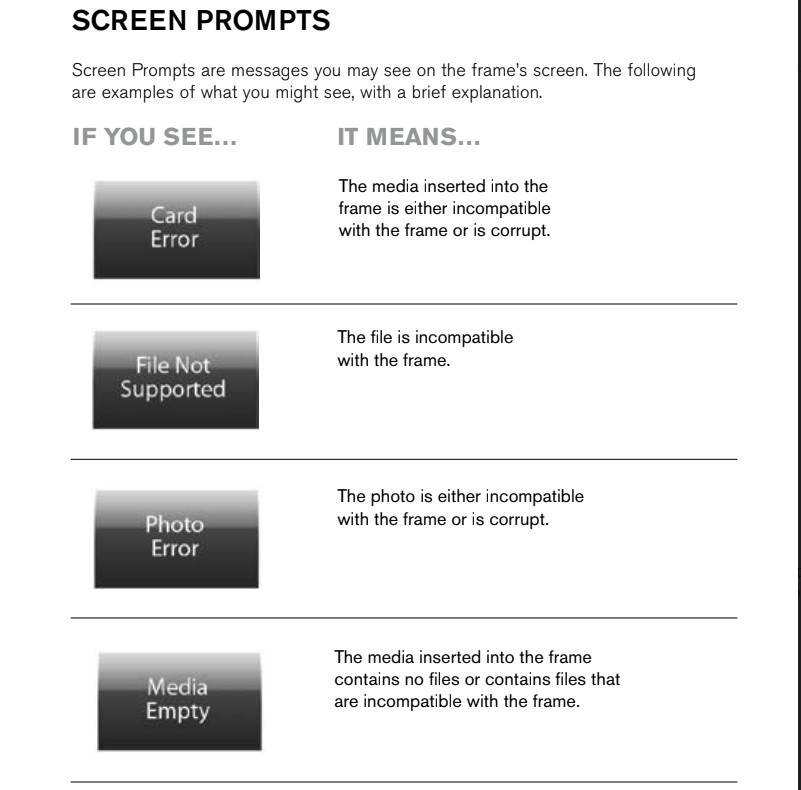
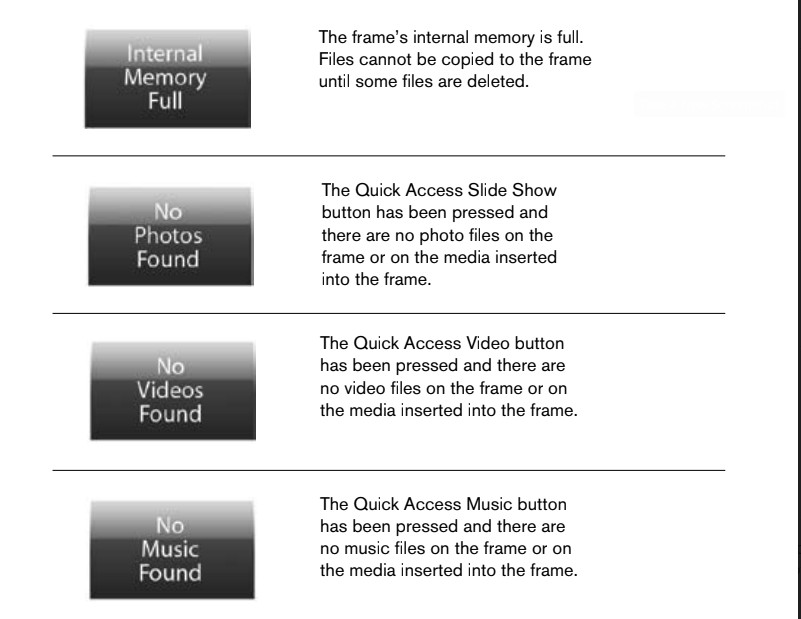
The POWER SAVE feature detects the room’s light level and automatically puts the frame into energy saving mode by shutting down the LED display. If the frame senses that the room is dark for more than 15 minutes and no buttons have been pressed, the following graphic appears on screen.

When the frame senses light, or any button on the frame is pressed, the LED display will turn on and the frame will resume current operation.
ANTI-VIRUS
When the frame is powered on, any files with the extension “.exe” or “.bat”(common extensions for possible viruses) that have been put on the frame’s drive via the computer will be automatically deleted from the frame.
RESET
Press the RESET button with a thin, pointed object (such as a paper clip).
Power the unit on after pressing the RESET button. The frame will default to the factory settings, however, the frame’s internal memory will remain intact.
Note: Frame should not be used as a storage device.
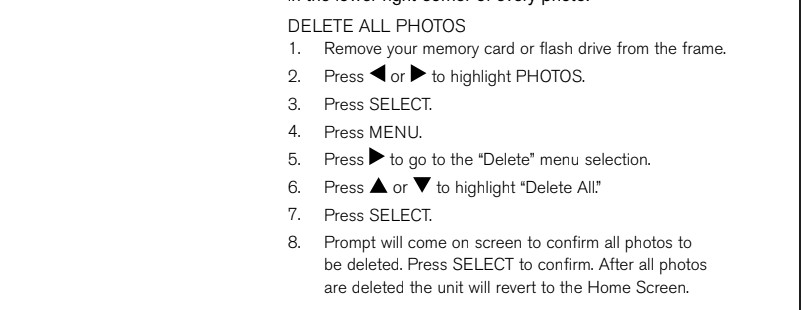
OPTIMIZING PHOTO STORAGE CAPACITY
When the photos are downloaded to the frame with either a memory card or a flash drive, photos are automatically optimized for the frame’s screen resolution.
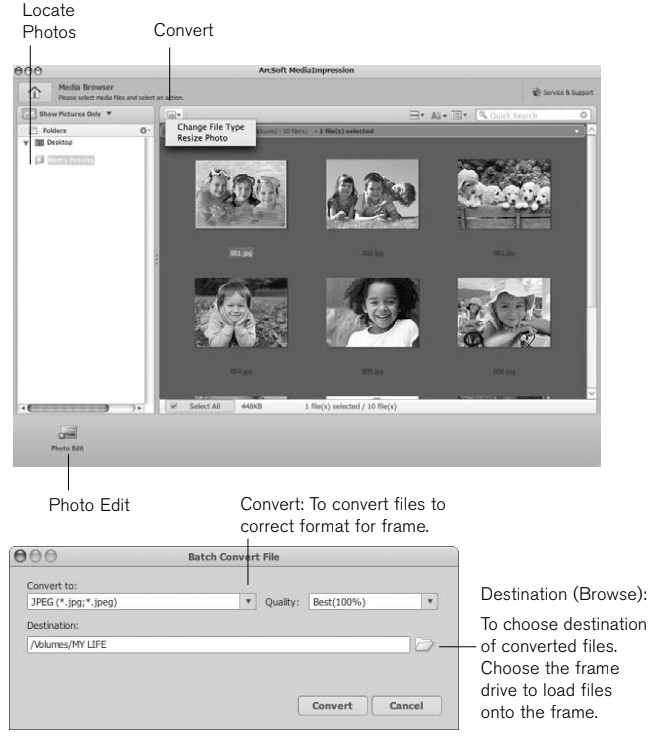
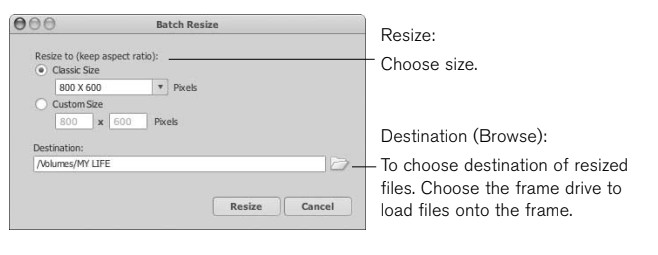
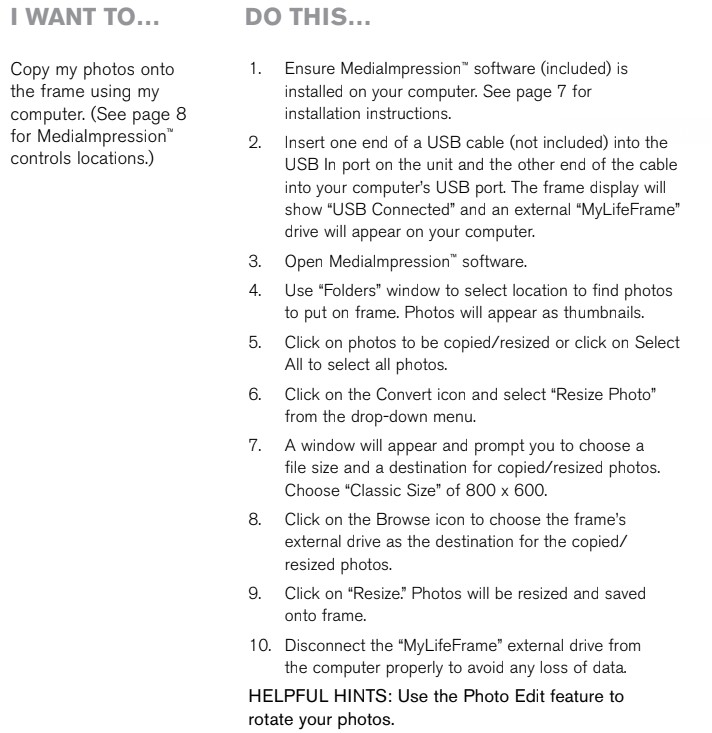
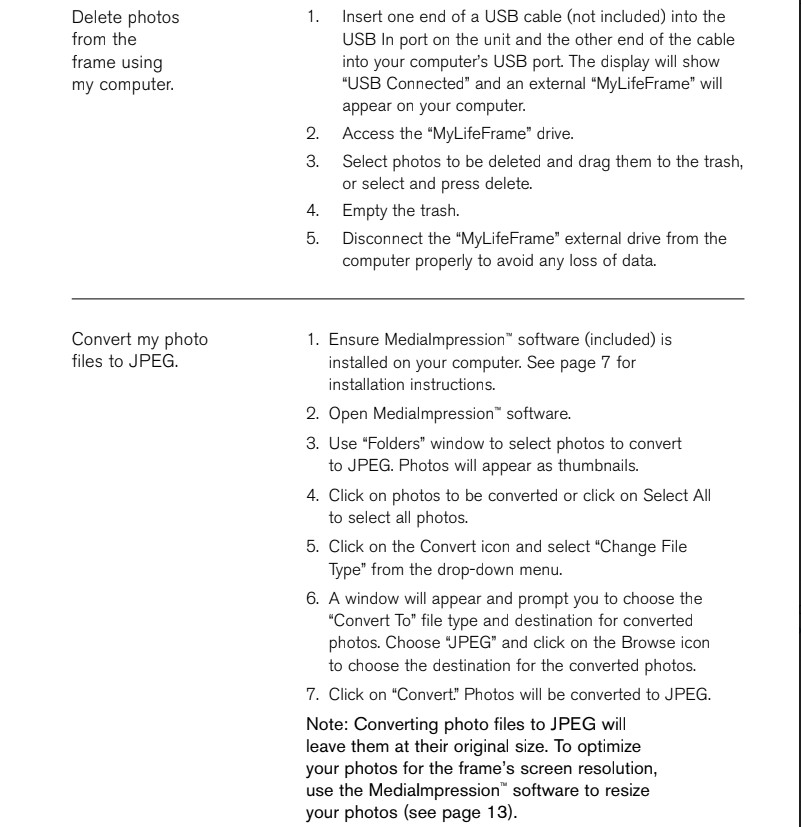
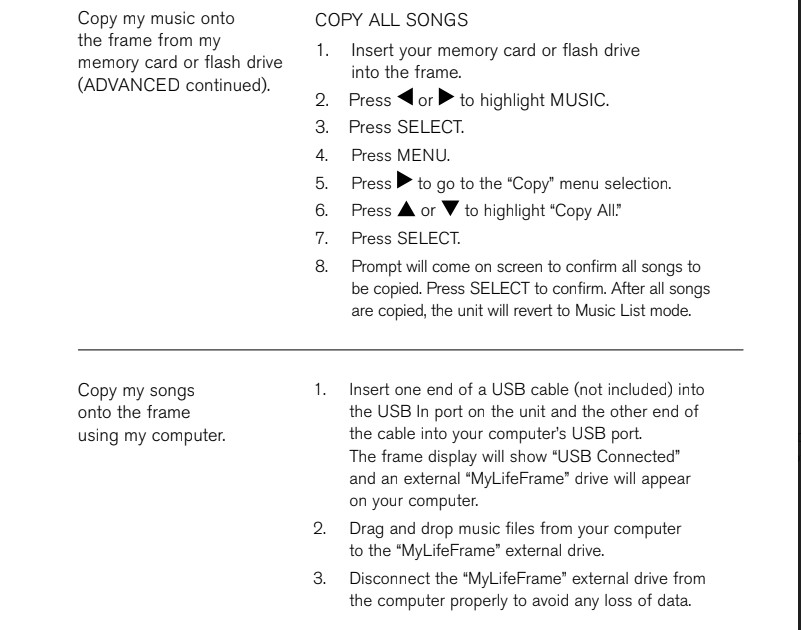
MediaImpressionTM SOFTWARE
When using your computer to download photos onto the frame, it is recommended to use the included MediaImpressionTM software.
The MediaImpressionTM software optimizes your photos for the frame’s screen resolution. (800 x 600 pixel dimensions, 72 dpi (pixels per inch)).
The MediaImpressionTM software will make new files of your photos when it saves them to the frame. Your original photos will remain intact/unchanged.
Note: If your photo’s dimensions are smaller than 800 x 600, there is no need to resize. To find out the dimensions of a photo, simply place your cursor over the thumbnail while using the MediaImpressionTM software. This will show a pop-up box with your photo’s dimensions.
An example of the MediaImpressionTM screen is on the following page.
INSTALLING SOFTWARE ON YOUR COMPUTER
Photos placed on the frame using a computer and without using the MediaImpressionTM software will not be optimized to your frame’s specifications and could possibly use more memory than necessary.
FOR WINDOWS®2000/XP/VISTA®/7:
- Insert MediaImpressionTM SOFTWARE CD into your computer’s CD-ROM drive.
- Open the CD and double click Windows folder (this software does not auto-run).
- Double click on the Setup.exe file.
- InstallShield® Wizard will launch on your computer. Follow the InstallShield®Wizard on-screen instructions to install the MediaImpressionTM software on your computer.
- To open MediaImpressionTM, locate the installed software on your computer anddouble click on the MediaImpressionTM icon.
FOR MAC® OS X 10.4 AND LATER:
- Insert MediaImpressionTM SOFTWARE CD into your computer’s CD-ROM drive.
- Open the CD and double click on the Mac folder (this software does not auto-run).
- Double click on “MediaImpression Installer”.
- Follow the MediaImpressionTM Installer on-screen instructions to install the MediaImpressionTM software on your computer.
- To open MediaImpressionTM , locate the installed software on your computer and double click on the MediaImpressionTM icon.
Software control locations
HOW TO… IT’S EASY


SPECIFICATIONS
Key Features: . . . . . . . . . . . . . . . . . . . . . . . . . . . . . . . . 10″ TFT LCD Screen,
512MB Internal Memory,
USB Mass Storage,
800 x 600 Screen Resolution
Compatible Memory Cards*: . . . . . . . . . . . . . . . . . . . SD® and Mini SDTM (Secure DigitalTM),
MMC® (MultiMedia Card), MS, MS
PRO, MS Duo (with adapter), MS PRO
Duo (with adapter) (Memory Stick®)
Power Supply: . . . . . . . . . . . . . . . . . . . . . . . . . . . . . . . . AC Adapter (included)
Compatible Software: . . . . . . . . . . . . . . . . . . . . . . . . . Windows® 2000/XP/Vista®/7,
Mac® OS X 10.4 and later
*Cards must have a minimum of 64MB.
Download the complete PDF version of the user manual here