SETUP REQUIRES:
- Display Power
- Adapter (3 AAA backup batteries recommended)
- 5-in-1 Sensor (may be sold separately)
1.PLUG IN DISPLAY AND CONFIGURE SETTINGS
Plug in the power adapter. Once the display is powered on, configuration will begin automatically. Use the Up and Down arrows to select between options, and press the Gear button to confirm your selections.
- RF Channel (A, B, C; A recommended)
- Auto DST (ON / OFF)
- 12 or 24 Hour Clock Display
- Clock Hour
- Clock Minute
- Calendar Month
- Calendar Date
- Calendar Year
- Temperature Units (°F / °C)
- Wind Speed Units (mph, km/h, knots)
- Rainfall Units (inches / mm)
- Pressure Units (inHg / hPa)
You can configure these settings at any time by pressing the Gear button.
2. INSTALL SENSOR BATTERIES
In the 5-in-1 outdoor sensor battery compartment, install four AA alkaline or lithium batteries. The Display should automatically sync with the sensor and start showing readings within a minute. NOTE: In the battery compartment of the sensor, there is a small switch A/B/C switch that should match the selection on the Display. By default this is “A” and doesn’t need adjustment.
3. MOUNT SENSOR
Find a suitable place to mount the outdoor sensor.
- At least 5 feet (1.5 meters) off the ground
- Front solar cell facing south
- Away from heat and humidity sources
- Level for accurate rain reporting using bubble level on top of sensor
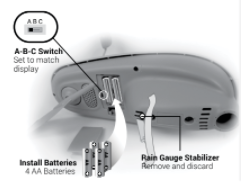
Once the sensor is mounted, remove the rain gauge stabilizer from sensor.
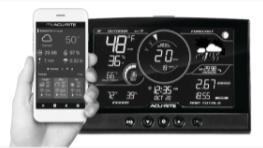
Set up your Weather Station O61OOM
Connect to My AcuRite with Wi-Fi
SETUP REQUIRES:
- 2.4 GHz Wireless Network
- Phone, Tablet, or Computer with Wi-Fi
- Display set up with 5-in-1 Sensor
- CONNECT TO DISPLAY WI-FI
Connect to the Wi-Fi signal coming from your Display using your phone or Wi-Fi compatible device. - ACCESS WI-FI SETUP PAGE
Open a web browser on your device. Type “192.168.4.1” in the address bar and hit enter to access the AcuRite Wi-Fi display settings website. - ADD YOUR WI-FI CREDENTIALS
Select your Wi-Fi network name and enter your network password. Press “Save”. Once your credentials are successfully entered, reconnect to your normal Wi-Fi. - SET UP YOUR MY ACURITE ACCOUNT
Download the My AcuRite mobile app or visit www.myacurite.com to complete setup.
ADDITIONAL NOTES
The Wi-Fi set up page is available for 30 minutes after the display is powered on. Press the gear button to re-activate the setup page at any time. To retain Wi-Fi configuration details, backup batteries are strongly recommended in the display. The display can be power cycled at any time to clear Wi-Fi credentials.
www.acurite.com ACURITE Quick Setup Guide O61O0OM WE’RE HERE TO HELP!
For support, visit acurite.com/support. Limited 1-year warranty Full product manuals, warranty and FCC statement available on acurite.com
You can download the PDF version of the ACURITE quick setup guide User’s Manual here.