- Please read and follow all safety rules and instructions in this manual before operating.
- The product warranty is printed on the back of this guide, so please keep it in a safe place for future use.
- This product is manufactured for use only in USA/CA
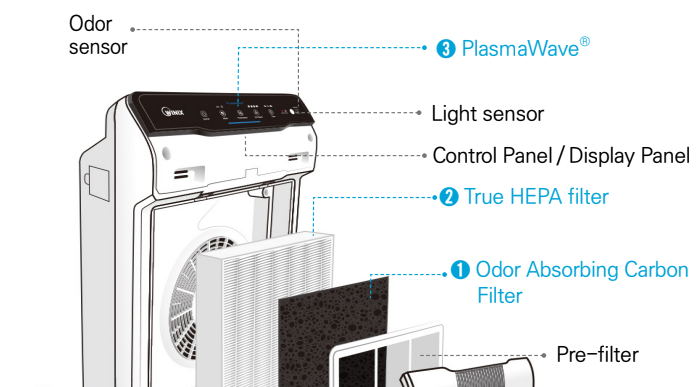
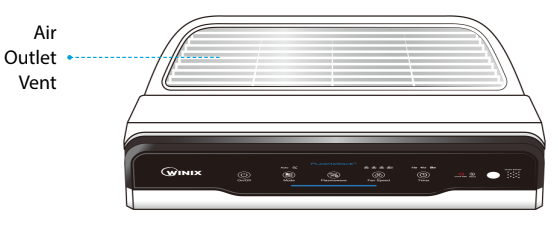
3-STAGE AIR PURIFICATION
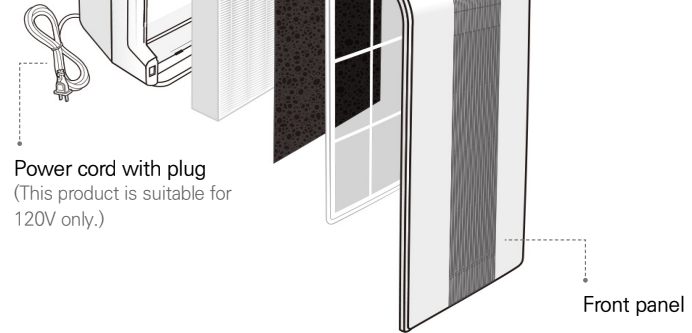
This product is suitable for 120V only.
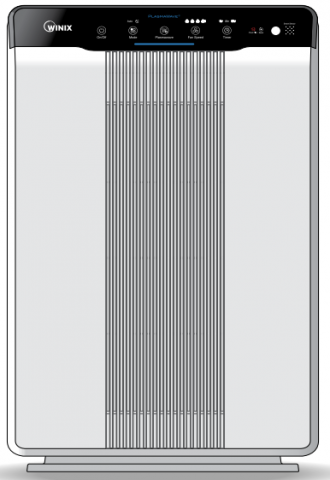
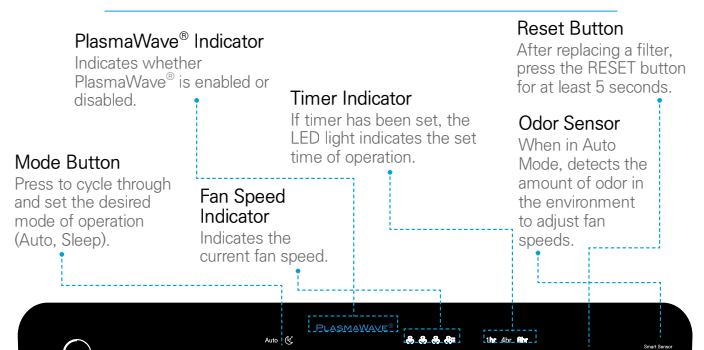
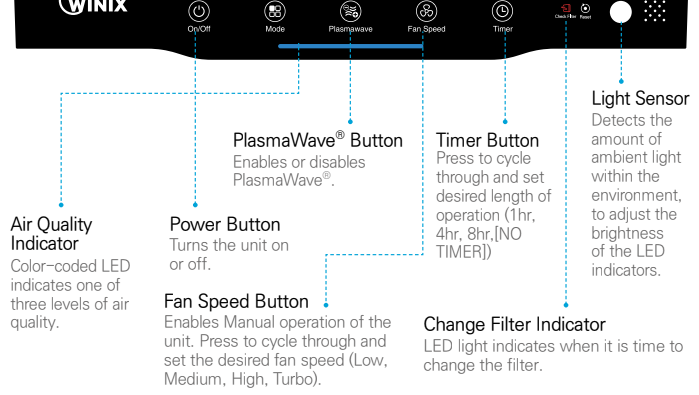
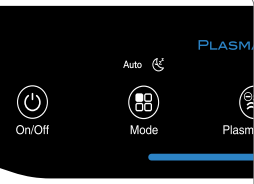
CONTROLS
Set up
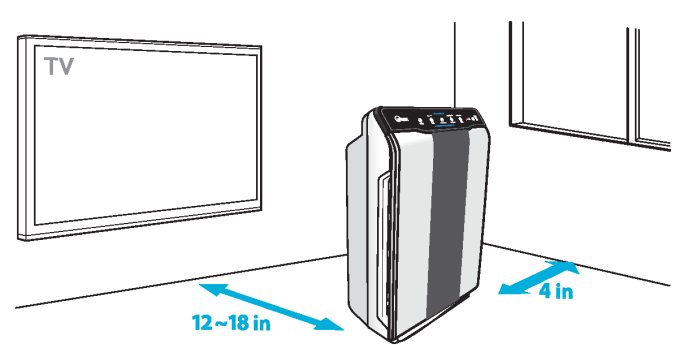
WHERE TO USE
Allow 12 ~ 18 in. of space between TVs, radios, and other electronic products. Electromagnetic interference from certain electronics may cause product malfunction.
Place indoors away from direct sun light. Direct exposure may cause product malfunction or failure.
Only place on hard, flat surfaces. Flimsy or slanted surfaces may result in abnormal noise and vibrations.
WARNING: Follow these instructions to reduce the risk of serious injury or death and to reduce risk of damaging the unit.
- Do not use around mist or fumes from industrial oil or around large quantities of metallic dust
- Do not install in any sort of motor or transport vehicle (trucks, boats, ships, etc.)
- Do not place near any flammable materials (aerosols, fuel, gases etc.)
- Do not place below any electrical outlet
- Do not place around heating elements
- Do not place in an area with excessive amounts of noxious gases
- Do not have unit facing into wind or draft
- Do not place in excessively humid areas where unit may become wet
This unit is not intended to be used to preserve documents or in art conservation.
INSTALLING FILTERS
This product comes with all the required filters. The protective plastic wrap must be removed from the filters before use
※ Operating the unit without removing the plastic wrap may result in product failure.
※ Unplug and make sure the unit is turned off before installing filters.
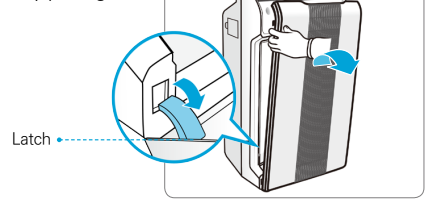
1 Remove the front panel by grasping its upper edge and gently pulling forward.
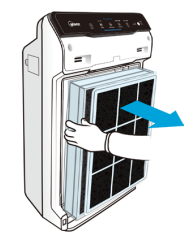
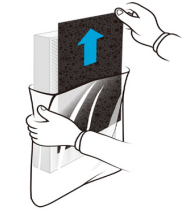
2 Remove the filters from the unit, they are protected inside a plastic wrap
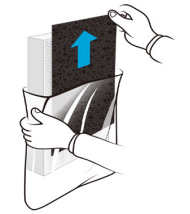
3 Remove filters from protective plastic wrap.
•Operating the unit without removing filters from plastic wrap may cause abnormal noise, deformation, or fire as a result of overheating.
INSTALLING FILTERS
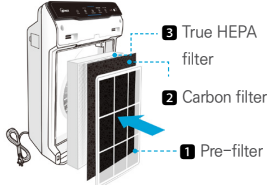
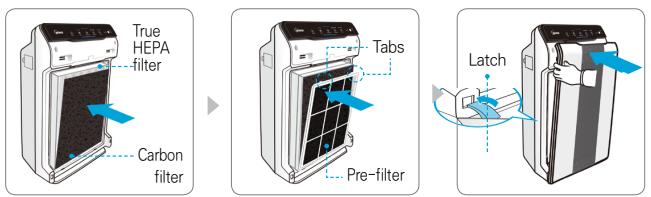
4 Install the filters until they fit securely in place.
Filters must be installed in this order:
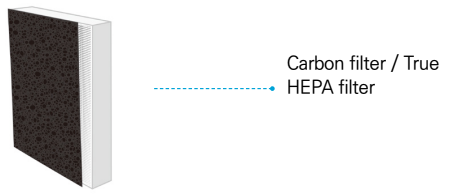
3 True HEPA filter (rear)
2 Carbon filter (middle)
1 Pre-filter (front)
•To install the Pre-filter, insert bottom tabs into the slots on either side of the lower part of the unit, then rotate upward to insert the upper tabs into the slots at the top part of the unit until sides audibly click into place.
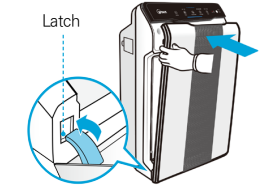
5 Replace the front panel by first inserting the latch at the bottom edge into the base of the unit, then rotate the panel upward toward the top of the unit until the magnets pull the lid closed.
6 When to service and replace filters:
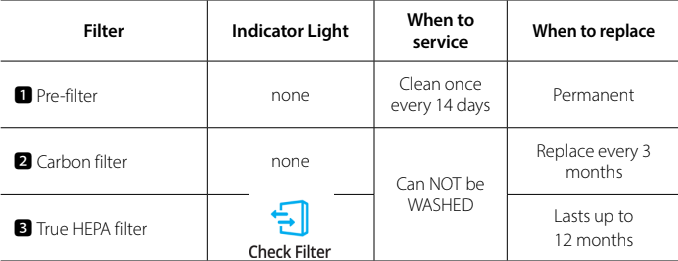
※ Intervals between filter replacement may vary depending on environment.
※ For optimal use, Pre-filter can be cleaned once every 14 days which can extend the life of other filters.
SAFETY AND CAUTIONS
Before operating this equipment, carefully read and follow these safety cautions
Ensure filters are inserted before running unit. Running unit without filters can shorten the units life and cause electric shock or injury.
Be sure foreign objects are NOT inserted into the vents on the unit. Objects can include pins, rods, and coins.
Do not touch any part of the interior of the unit with wet hands. The high voltage may cause electric shock.
Ensure unit intake and outlet vents do not become blocked. Blockage may lead to increased internal temperatures causing product failure and deformation.
Do not use the unit as a step stool or place heavy objects on it. Personal injury may occur or product failure and deformation.
WARNING: Follow these instructions to reduce the risk of serious injury or death and to reduce risk of damaging the unit.
- Do not pull on the power cord when unplugging the unit
- Do not touch the plug with wet hands Do not plug additional appliances into the same outlet or power supply
- Unplug unit when not in operation for extended periods of time
- Do not tie or knot power cord when unit is in operation
- Do not unplug or move the unit while in operation
- If the unit becomes submerged in water, unplug it and contact customer service
- Cord can become damaged by forcefully bending, pulling, twisting, bundling, pinching or placing heavy objects on it
OPERATION
INITIAL OPERATION
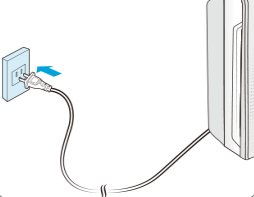
1 Insert the power cord into an electrical outlet.
2 Press the ‘Power’ button.
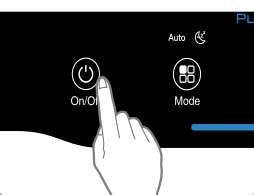
Note •During the first 30 seconds of power up, the Air Quality Indicator will cycle through Blue, Yellow and Red colors. The Smart Sensors take approximately 4 minutes to gauge the air quality in the environment, after which normal operation will begin.
3 By default, when the unit first powers on, the mode will be set to Auto with Plasma Wave® enabled.
•When in Auto mode, the fan speed will be automatically adjusted according to the environments air quality.
•Plasma Wave® works to remove harmful airborne contaminants.
•In Auto mode, as the indoor air quality improves, the fan speed will automatically be reduced to Low.
•When the unit is running, you may hear a chirping or buzzing sound. The sound is from large particles passing through Plasma Wave®, it is normal and does not signify product failure. To disable Plasma Wave®.
AUTO & SLEEP
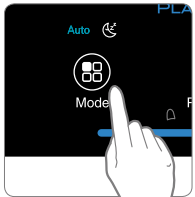
1.Auto Mode
Enables auto operation based on the unit’s air quality Smart Sensors.
1 Press the Mode button to select Auto mode.
•The LED ‘Auto’ light will indicate when Auto mode is activated, and operation will begin.
Note •When in Auto mode the fan speed is automically adjusted according to the indoor air quality. As the indoor air quality improves, the fan speed will automatically be reduced. If the indoor air quality decreases, the fan speed will automatically increase.
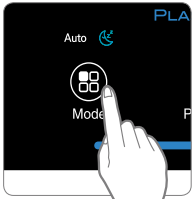
2.Sleep Mode
Press the Mode button to select Sleep mode.
•The LED “Sleep” light will indicate when Sleep mode is activated, and operation will begin.
Note •When Sleep mode is selected, the fan speed is automatically set to Low. The fan speed can be manually changed by pressing the Fan Speed button, changing the unit into manual mode.
•When Sleep Mode is activated, the Air Quality Indicator LED light is disabled.
MANUAL & TIMER
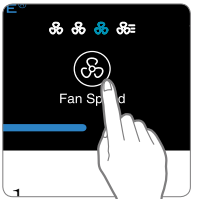
3.Manual Mode (setting fan speed)
Users can opt to manually set the fan speed to Low, Medium, High, or Turbo.
1 Press the Fan Speed button to set the desired fan speed.
Note •When Manual Mode is selected, Auto Mode is automatically disabled.
4.Timer
The timer can be set to let the unit run for a specified period of time.
1 Press the Timer button to select the desired length of time.
•When the Timer LED light will indicate the selected length of operation.
•Every time the Timer button is pressed, The Timer LED light will cycle through the settings, (1hr, 4hr, 8hr, [NO TIMER]).

PLASMAWAVE® & AIR QUALITY INDICATOR
5.PlasmaWave®
By default, PlasmaWave® is enabled whenever the unit is powered on.
1 Press the Plasmawave button, when the unit is on, to enable or disable this feature.

Note •In Auto mode, as the indoor air quality improves, the fan speed will automatically be reduced to Low.
•When the unit is running, you may hear a chirping or buzzing sound. The sound is from large particles passing through PlasmaWave®, it is normal and does not signify product failure.
6. Air Quality Indicator
When on, the LED light will indicate the current indoor air quality according to three levels: BLUE (good), AMBER (fair), RED (poor).
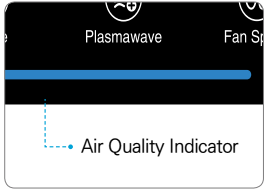
Note •Air quality level is displayed on the indicator, based on the Smart Sensors. Depending on the immediate environment, the indicator may change frequently in color or stay the same for lengthy periods of time.
care and maintenance
FILTER CARE
1.Know The Filters
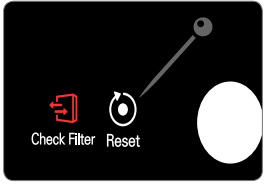
When the Check Filter indicator LED is on, it is time to replace the True HEPA filter.
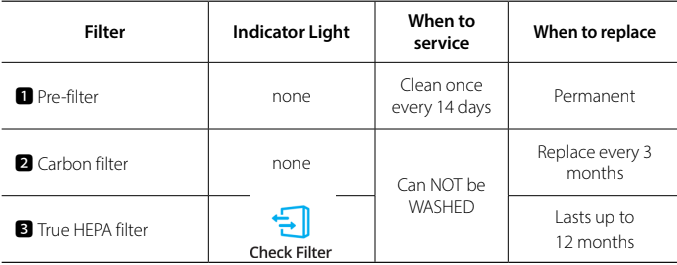
※ Intervals between filter replacement may vary depending on environment.
※ For optimal use, Pre-filter can be cleaned once every 14 days which can extend the life of other filters.
Note •The filters’ life varies depending on the level of pollutants in the air. The more dust present in the environment, the more dust accumulates in the filters, shortening the life.
•If the filters are heavily soiled or have a bad odor, or if the fan strength is significantly weakened, replace filters even if the Change Filter indicator has not yet turned on.
2.Removing Filters
Turn the unit power off before removing filters.
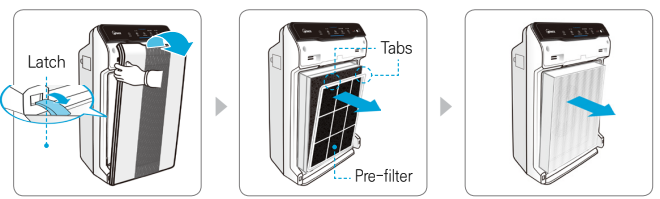
1 Remove the front panel by grasping its upper edge and gently pulling forward.
2 Press on the Pre-filter tabs near the top of the filter, release and remove.
3 Pull out the Carbon filter and True HEPA filter.
3.Preparing New Filters
1 Remove replacement filters from protective plastic wrap.
•Operating the unit without removing filters from plastic wrap may cause abnormal noise, deformation, or fire as a result of overheating.
•For optimal performance, only Winix filters should be used with this unit.
4.Replacing Filters
1 Insert the True HEPA filter first, then the Carbon filter.
2 Insert the Pre-filter.
•Insert bottom tabs of the Pre-filter into the slots on either side of the lower part of the unit, then rotate upward to insert the upper tabs into the slots at the
top part of the unit until sides audibly click into place.
3 Replace the front panel by first inserting the latch at the bottom edge into the base of the unit, then rotate the panel upward toward the top of the unit until the magnets pull the lid closed.
5.Resetting The Unit
1 After replacing the filters, turn the power onto the unit and then use a thin object, such as a paper clip, to press the RESET switch for 5 seconds.
6.Cleaning the filters
Intervals between filter cleaning may vary depending on the air quality.
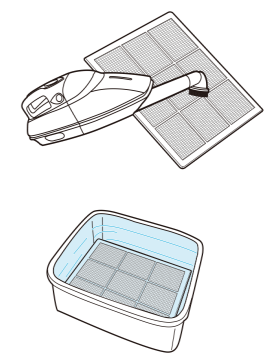
2 Use a vacuum cleaner or soft brush to clean the Pre-filter. If it is excessively soiled, rinse in room temperature water.
•Do not use detergent or soap.
•Allow the filter to dry for 24 hours or more before using.
If the pre-filter becomes damaged or in any way needs replacement:
•Do not use benzene, alcohol, or other volatile fluids, which may cause damage or discoloration.
•The Pre-filter is resusable after cleaning, ensuring it is completely dry.
•Do not use hot water over 104o F or volatile fluids such as paint thinner.
•After washing the filter, allow it to dry completely in a well ventilated area. Otherwise, it may develop a bad odor.
CLEANING CARE
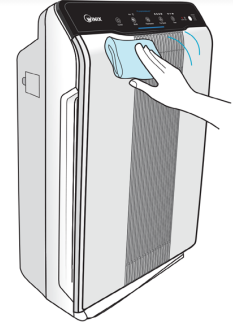
2.Cleaning the Exterior & Interior
1 Wipe with a soft damp cloth using room temperature water. Afterwards, wipe it down with a clean dry cloth.
•To keep unit in peak condition, clean every 1-2 months.
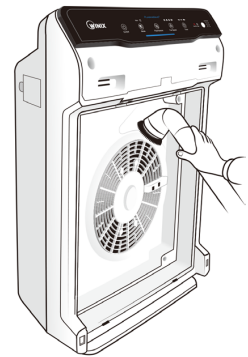
1 Open the front panel and clean the interior with a vacuum cleaner.
•For optimal performance, clean every 1-2 months.
NOTICE •When cleaning the unit, always unplug the power cord first and then wait until the unit has cooled down.
•Never disassemble, repair, or modify this unit yourself.
•Do not use flammable sprays or liquid detergents.
•Do not allow children to clean or maintain the unit.
•Before cleaning or maintaining, ensure unit is unplugged.
Troubleshooting
FREQUENTLY ASKED QUESTIONS
| Problem | Check / Actions to take |
| It does not turn on at all. | •Is the plug securely attached to the outlet? Make sure the outlet has power going to it, and ensure the plug is secured. •Is there a power outage? Check to see if other lights and electrical equipment are working and try again. |
| It doesn’t work in Auto Mode. | •Has Auto Mode been selected? Press the Mode button until Auto Mode is selected. •Is the sensor blocked or clogged? Wipe Odor Sensor with wet cloth, then dry. |
| It vibrates and makes a lot of noise. | •Is it running on a slanted or uneven surface? Move the unit to a hard, flat, even area of the floor. |
| The power plug and outlet feel hot. | •Is the plug securely plugged in? Make sure the plug is properly plugged into the outlet. |
| There is a strange smell. | •Is it being used in a place with a lot of smoke, dust, or odors? Clean the air intakes on either side and clean the pre-filter. Replace the Carbon and True HEPA filter. |
| The fan strength is weak. The unit is not purifying the air. | •Is the Check Filter indicator light on? Change the filters as required. |
| The display panel is dim. | •Is the Light Sensor blocked by debris? When Auto Mode is on, Sleep Mode is automatically activated when the Light Sensor detects that the room is dark. |
UNIT SPECIFICATIONS
| Model Name | 5300-2 |
| Power Voltage | AC120V/60Hz |
| Power Rate | 70W |
| Room Area Served | 360ft2 |
| Dimensions | 14.9 in(W) x 7.8 in(D) x 23.6 in(H) |
| Weight | 17.6 lbs |
| Replacement Filter | Filter A / Item: 115115 |
| Pre-Filter | Part #: 4521-0012-03 |
※ The exterior, design, and product specifications may be changed without prior notice to improve product performance.
❖ Information regarding ENERGY EFFICIENCY RATING LABEL
The energy costs indicated on the ENERGY EFFICIENCY RATING LABEL may differ from your actual energy costs, depending on your energy consumption, usage
hours, and billing changes, such as utility price increases.
Warning: Change or modifications to this unit not expressly approved by the party responsible for compliance could void the user’s authority to operate the equipment.
Note: This equipment has been tested and found to comply with the limits for a Class B digital device, pursuant to Part 15 of the FCC Rules. These limits are designed to provide reasonable protection against harmful interference in a residential installation. This equipment generates, uses and can radiate radio
frequency energy and, if not installed and used in accordance with the instructions, and may cause harmful interference to radio communications. However, there is no guarantee that interference will not occur in a particular installation. If this equipment does cause harmful interference to radio or television reception, which can be dteremined by turning the equipment off and on, the user is encouraged to try to correct the interference by one or more of the following measures.
x Reorient or relocate the receiving antenna.
x Increase the separation between the equipment and receiver.
x Connect the equipment into an outlet on a circuit different from that to which the receiver is connected.
x Consult the dealer or on experienced radio/TV technician for help.
This device complies with Industry Canada’s license-exempt RSSs. Operation is subject to the following two conditions:
x This device may not cause interference; and
x This device must accept any interference, including interference that may cause undesired operation of the device.
SAFETY INSTRUCTIONS
Thank you for purchasing a Winix air purifier. This product is for household use only.
IMPORTANT CAUTIONS FOR USING YOUR AIR PURIFIER
WARNING: Follow the instructions in this manual to reduce the risk of electric shock, short circuit, and/or fire.
- Do not repair or modify the unit unless specifically recommended in this manual. All other repairs should be completed by a qualified technician.
- The plug for this unit is polarized with one blade wider than the other. Do not force the plug into an electrical outlet. Do not alter the plug in any way. If the does
- not fit into the outlet, reverse the plug. If it still does not fit, contact a qualified technician to install a proper outlet.
- Do not use if the power cord or plug is damaged or the connection to the wall outlet is loose.
- Use AC 120V only.
- Do not damage, break, forcefully bend, pull, twist, bundle, coat, pinch, or place heavy objects on the power cord.
- Periodically remove dust from the power plug. This will reduce the risk of shock due to humidity build up.
- If the power plug is damaged, it must be replaced by the manufacturer or a qualified technician.
- Remove the power plug from the outlet before cleaning the unit. When removing the power plug, grasp by holding the plug itself, never hold by the cord.
- Remove the power plug from the outlet when not in use.
- Do not handle the power plug with wet hands.
- Do not operate the unit when using indoor smoke-generating insecticides.
- Do not clean unit with benzene or paint thinner. Do not spray insecticides on the unit.
- Do not use the unit where it is humid or where the unit may become wet, such as the bathroom.
- Do not insert fingers or foreign objects into air intake or outlet.
- Do not use use the unit near flammable gases. Do not use near cigarettes, incense, or other spark-creating items.
- Unit will not remove carbon monoxide emitted from heating appliances or other sources.
IMPORTANT PRECAUTIONS FOR USING YOUR AIR PURIFIER
- Do not block the intake or outlet vents.
- Do not use near hot objects, such as a stove.
- Do not use where the unit may come into contact with steam.
- Do not use the unit on its side.
- Keep away from products that generate oily residue, such as a deep fryer.
- Do not use detergent to clean the unit.
- Do not operate without a filter.
- Do not wash and reuse the True HEPA or Carbon filter.
- Hold the handle on the back of the unit to transport.
- Do not hold by the front panel.
WARNING: This product contains chemicals known to the State of California to cause cancer and birth defects or other reproductive harm.
PRODUCT WARRANTY
The terms of the warranty are as follows.
- This product is manufactured under stringent quality control and inspections.
- Warranty void if product failure is a result of negligence or misuse by the consumer, shipping and service fees may be incurred even during the
warranty period. - The warranty must be presented upon bringing the product for service.
- Store the warranty in a safe place, as it cannot be reissued.
- This warranty is valid only in the USA and Canada.
| Product Name | Air Purifier |
| Model Name | 5300-2 |
| Purchase Date | |
| Warranty period | One (1) year |
| Place of purchase | |
| Place of purchase Tel. | |
| Customer Address Name Tel. | |
After purchase, be sure to complete all of the above information.
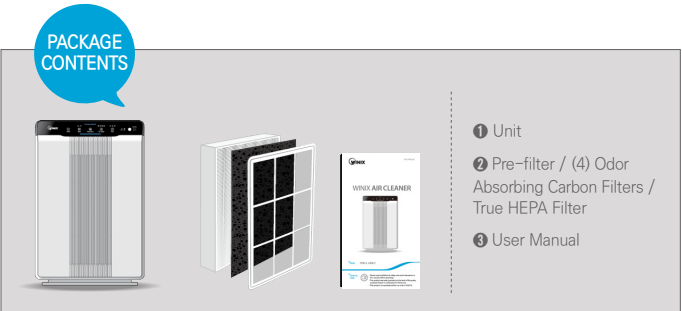
You can download the PDF version of the WINIX AIR CLEANER USER’S MANUAL here.