
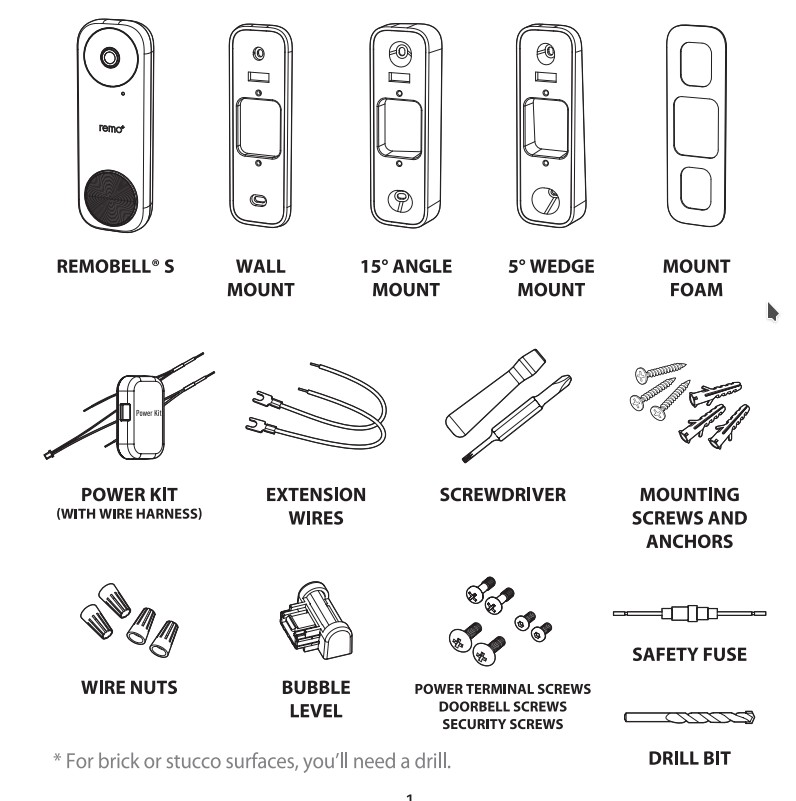
What’s in the Box
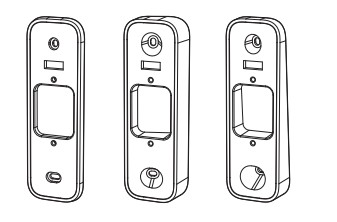
Meet Remobell S
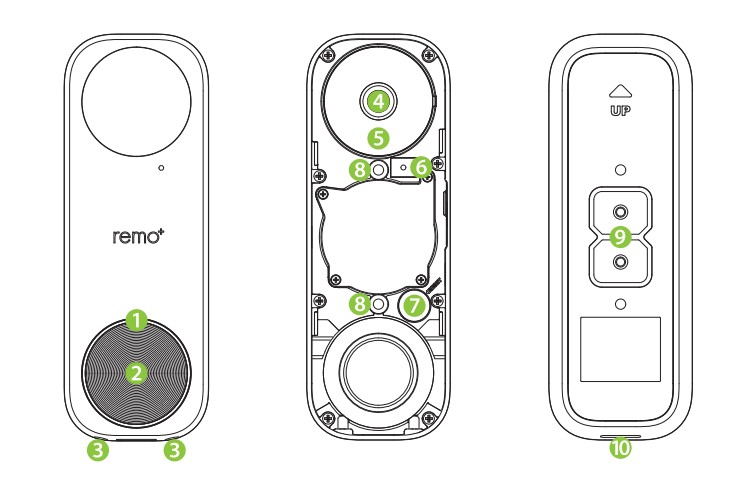
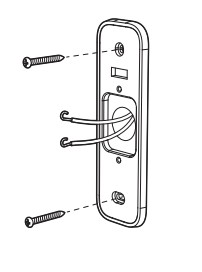
FACEPLATE
- LED Indicator 4.Camera lens 9.Power terminal
- Bell button 5.IRLED 10.Speaker
- Security screw holes 6.Mic
BODY
- Camera Lens
- IRLED
- Mic
- Reset button
- Mounting holes
BACK
- Power terminal
- Speaker
* Remove the protective film before use
Before you Begin
Check your doorbell voltage and chime.
RemoBell® S only works with a voltage of 16-24VAC.
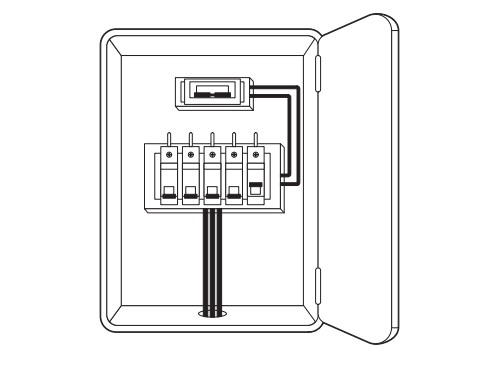
Go to your breaker box and turn off the power to your doorbell.
WARNING: If you are not sure how to turn off the power to your doorbell from your breaker box, please consult a licensed electrician.
- If you have a mechanical chime, start POWER KIT INSTALLATION.
- If you have an electronic chime, please refer to its manual for instructions.
- If you do not have chime, skip POWER KIT INSTALLATION and follow OPTION B in the doorbell installation step #6
Power Kit Installation
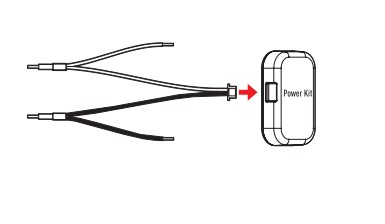
- Insert one end of the Wire Harness into the Power Kit.
- Remove the cover of your mechanical chime.
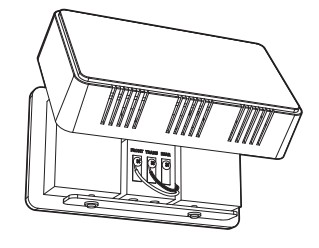
- Take a picture of the wiring for reference during installation.
- Loosen the screws and remove wires. Then straighten the exposed end of the wires.
- Place your Power Kit so that it doesn’t interfere with moving parts or muffle the chime. You can use the adhesive backing to hold it in place. Put the chime cover back on.
Doorbell Mounting
- Remove your existing doorbell and disconnect the wires.
- Based on your doorbell location, select the appropriate Mount type to optimize the camera’s viewing angle.
(Optional) For hard surfaces like brick or stucco, paste the Mount Foam to the back of your Mount.
- Insert the Bubble Level into the Mount to straighten the Mount. When the bubble is in the middle, mark the drill points on the wall. You can remove the Bubble Level after the drill points are marked.
- Drill holes according to your drill points and insert Anchors.
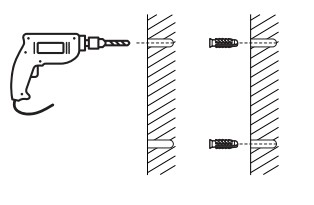
- Secure the Mount onto the wall using Screwdriver and Mounting Screws.
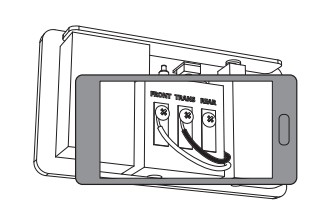
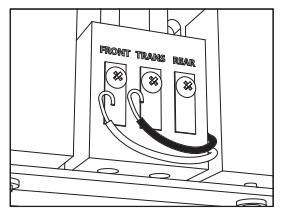
- If a Power Kit is installed, follow Option A. If you do not have chime, follow Option B.
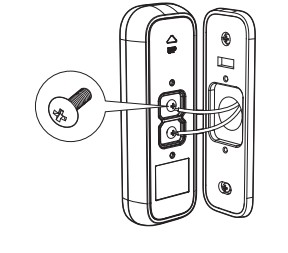
Option A: Connect the RemoBell® with your existing doorbell wires.
Option B: Connect the Safety Fuse Wire with your existing doorbell wires.
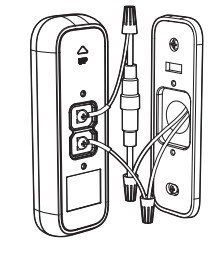
Insert an exposed end of the Safety Fuse Wire and one chime wire into the Wire Nut, and twist it tightly.
Repeat with remaining wires.
Push the Safety Fuse Wire and the Extension Wire into the wall to secure the Doorbell to the mount.
WARNING: If no safety fuse is connected when there is no chime, the doorbell may malfunction or cause a fire. If you do not know your chime system, please consult a licensed electrician.
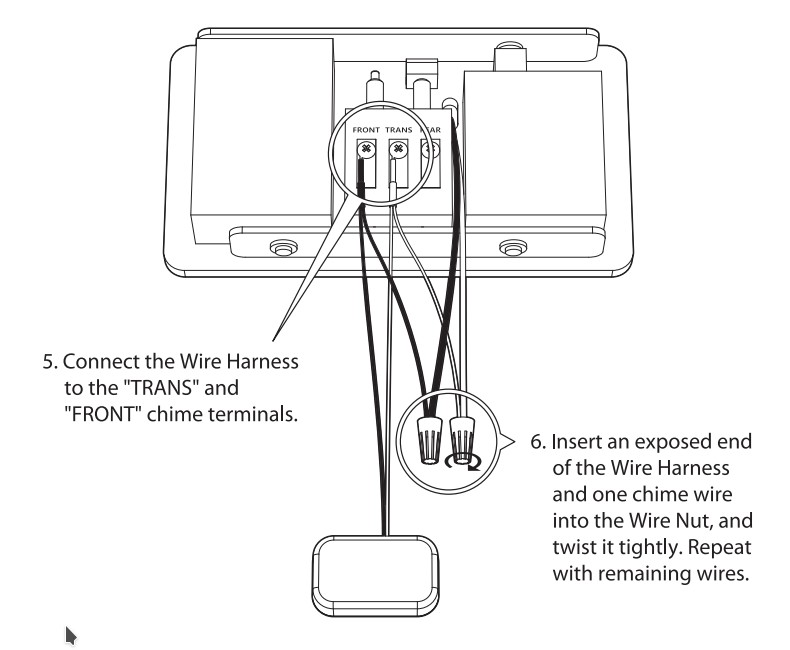
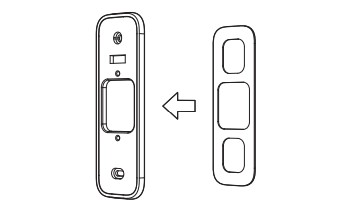
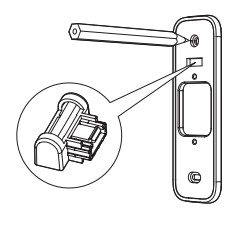
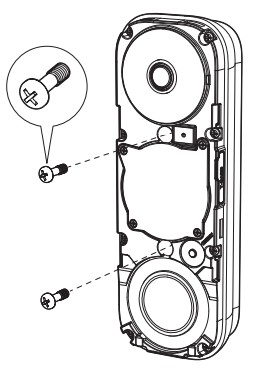
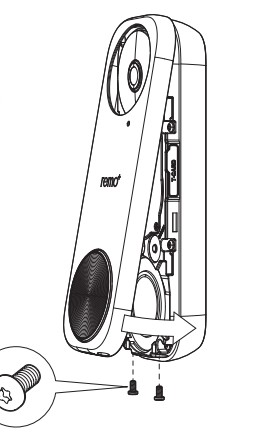
7.Remove the Faceplate. Fixate the RemoBell® S to the Mount by inserting the Doorbell Screws.
- Restore power on the breaker box. If the LED Indicator flashes blue, then proceed to DoorBell Setup . If not, turn off your power and check the doorbell wiring.
Doorbell Setup
Create an Account
- Make sure your mobile device is connected to your home 2.4GHz Wi-Fi. (5GHz not supported)
- Download and launch the connected to your home remo*app.
- Press SIGN UP at the bottom of the login page.
- Enter your email and create a password. Then press sign up. For Help, press the (!) at the top right corner.
Register REMOBELL® S
- Have your Wi-Fi network password available.
- After logging into the remo” app, press “+” on the home screen to add your device, and select your time zone.
- Enter the password for the displayed Wi-Fi network and proceed to the QR code scan page.
*If you want to use a different network, go to your phone’s Wi-Fi settings and connect to that network first.
- Scan the QR code on the RemoBell® S or the cover of this QSG when the LED Indicator flashes blue.
- Switch to your phone’s Wi-Fi settings, leaving remo app open. Please DO NOT CLOSE THE APP.
- Connect to the network RemoBellS_xxxxxx. If you see “internet is unavailable,” tap “okay.”
- Once you’re connected to the RemoBellS_xxxxxx network, switch back to the remo* app and press continue. Your app will then complete the registration. This may take up to 3 minutes.
- Put the Faceplate back on and insert two Security Screws into the Security Screw Holes to secure the Faceplate.
LED Indicator
Blue Light
- Flashing Fast: Doorbell is in AP mode
- Flashing Slowly: Doorbell is connecting to router
- Steady: Doorbell is running
Red Light
- Flashing: Doorbell is not connected
- Steady: Doorbell is powering on
FAQ
Forgot your password?
- Press “forgot password” on the login page.
- Enter your account email and click SEND.
- Check your email (including spam folder) for the temporary password.
- Open the remc*app and log in using your account email and the temporary password.
- Create a new password.
How many users can access the RemoBell®s?
You can view RemoBell® S from up to 5 iOS/Android devices:
- Open the remo+ app from your choice of device.
- Log in using the same account email and password.
- Enter a different profile name (this will show in the Viewers list).
Is a Cloud plan required?
The Cloud plan is not required. You will still be able to receive alerts, see and communicate with your visitors, and access your activity log.
We do, however, highly recommend the Cloud plan. Without the plan, all activity MUST be viewed in real time. Videos will not be saved and cannot be accessed by the user or the Remo+ team. With the Cloud plan, you can save video recordings and refer to them in the future. Video recordings are protected with bank-level security.
Troubleshooting
Can’t see the videos on your Recent Activity?
For Android users, allow all permissions to the
remo+ app:
Settings > Applications Manager >
Permissions > Storage
Check your Settings:
remo+ app > Menu > Devices > Your Devices >
Turn on Motion Sensor >
Turn on Save Videos to Cloud
Can’t find your home Wi-Fi during the setup process?
If you cannot get past step 3 on “REGISTER REMOBELL® S”, make sure you connect to your home Wi-Fi and restart from Step 1.
How to reset your RemoBell® S
- Remove the Faceplate and hold the reset button on the Body of the device for 5 seconds.
- Wait until the LED Indicator flashes blue, then go back to the app to delete your registered device.
- Follow the instructions on “REGISTER REMOBELL® S” (Page 11) to re-register your RemoBell® S.
Experiencing false motion alarms?
Adjust the motion sensitivity of your RemoBell S:
remo* app > Menu > Devices > Your Devices > Motion Sensitivity >
Adjust settings
Define Motion Zones to cut out unwanted motion:
(ex. Trees blowing in the wind, busy roadways)
remo* app > Menu > Devices > Your Devices > Motion Zone >
Adjust Motion Zone
Electrical Shock Warning:
DO TURN OFF POWER on the breaker box before RemoBell® S installation. Serious electrical shock, injury, or death may occur if left on.
DO NOT TURN ON POWER until RemoBell® $ installation is complete. Contact a licensed electrician if you need any assistance with power or wiring.
Support
We’re happy to help!
support@remoplus.co
(888)-985-1849
Mon-Fri 8am to 5pm PT (except holidays)
Limited Warranty
1. LISCENSOR DOES NOT WARRANT THAT THE FUNCTIONS CONTAINED IN THE LICENSED PRODUCT AND HARDWARE WILL MEET LICENSEE’S REQUIREMENTS OR THAT THE OPERATION OF THE SOFTWARE AND HARDWARE WILL BE UNINTERRUPTED OR ERROR-FREE. LICENSOR DOES WARRANT THAT THE MEDIA ON WHICH THE SOFTWARE IS FURNISHED AND THE HARDWARE WILL BE FREE FROM DEFECTS IN MATERIAL AND WORKMANSHIP UNDER NORMAL USE FOR A PERIOD OF ONE YEAR FROM THE DATE OF DELIVERY (“WARRANTY PERIOD”). THIS LIMITED WARRANTY IS VOID IF FAILURE OF THE MEDIA ON WHICH THE PRODUCT OR SOFTWARE IS FURNISHED HAS RESULTED FROM ACCIDENT, ABUSE, OR MISAPPLICATIONS.
2. EXCEPT AS PROVIDED ABOVE, THE LICENSED PRODUCT IS PROVIDED “AS IS” WITHOUT WARRANTY OF ANY KIND, EITHER EXPRESS OR IMPLIED INCLUDING, BUT NOT LIMITED TO, IMPLIED WARRANTIES OF MERCHANTABILITY AND FITNESS FOR A PARTICULAR PURPOSE. THE ENTIRE RISK AS TO THE QUALITY AND PERFORMANCE OF THE LICENSED PRODUCT AND HARDWARE IS WITH LICENSE.
RF Exposure Warning Statement
The antenna used for this transmitter must be installed at least 8 inches (20cm) from all persons and must not be co-located or operating in conjunction with any other antenna or transmitter.
FCC Compliance Statement
You are cautioned that changes or modifications not expressly approved by the part responsible for compliance could void the user’s authority to operate the equipment.
This device complies with Part 15 of the FCC Rules. Operation is subject to the following two conditions: (1) this device may not cause harmful interference, and (2) this device must accept any interference received, including interference that may cause undesired operation of the device.
Note: This equipment has been tested and found to comply with the limits for a Class B digital device, pursuant to part 15 of the FCC rules. These limits are designed to provide reasonable protection against harmful interference in a residential installation. This equipment generates, uses, and can radiate radio frequency energy and, if not installed and used in accordance with the instructions, may cause harmful interference to radio communications. However, there is no guarantee that interference will not occur in a particular installation. If this equipment does cause harmful interference to radio or
television reception, which can be determined by turning the equipment off and on, the user is encouraged to try to correct the interference by one or more of the following measures:
- Reorient or relocate the receiving antenna.
- Increase the separation between the equipment and receiver.
- Connect the equipment into an outlet on a circuit different from that to which the receiver is connected.
- Consult the dealer or an experienced radio/TV technician for help.
FCC Grant of Equipment Authorizations of this device and transmitters installed in this device can be found at FCC website by entering the FCC ID number on the device.
Please take attention that changes or modification not expressly approved by the party responsible for compliance could void the user’s authority to operate the equipment.
This equipment complies with FCC radiation exposure limits set forth for an uncontrolled environment. This equipment should be installed and operated with minimum distance 20cm between the radiator & your body.
You can download the PDF version of the Remobell S Quick Start Guide here