Montgomery Ward Customer Service
1112 7th Avenue, Monroe, WI 53566
8:00 am to Midnight, Monday through Friday
Wards.com 1•888•557•3848
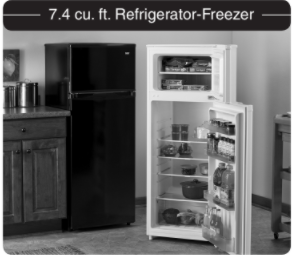
Thank you for purchasing your 7.4 cu. ft. Refrigerator-Freezer by Montgomery Ward®. We guarantee that it will perform to the highest standard, time after time, with all the convenience, easy cleanup and durability you rely on from Wards.
Your new apartment-size fridge is great for studios, converted basement or man cave, or as overflow cold storage for bulk shopping. Ample storage space, from door and compartment shelves, crisper drawer and a separate freezer compartment, ensures you have extra room for food whether you’re hosting a family get-together, garage party or watching the big game.
PLEASE SAVE THESE INSTRUCTIONS
THIS APPLIANCE IS FOR HOUSEHOLD USE ONLY
© 2015 Montgomery Ward, Inc. All rights reserved.
READ ALSO: Samsung Refrigerator User Manual
Important Safeguards
PLEASE READ THESE INSTRUCTIONS BEFORE USE
TO REDUCE THE RISK OF FIRE, ELECTRICAL SHOCK OR INJURY WHEN USING THE REFRIGERATOR, FOLLOW BASIC SAFETY PRECAUTIONS, INCLUD ING THE FOLLOWING:
1. Plug into a grounded 3-prong outlet. Do NOT remove the grounding plug, do NOT use an adapter and do NOT use an extension cord.
2. It is recommended that a separate circuit, serving only your refrigerator be provided. Use outlets that cannot be turned off by a switch or pull chain.
3. NEVER clean refrigerator parts with flammable fluids. These fumes can create a fire hazard or explosion.
4. Do NOT store or use gasoline or other flammable vapors and liquids in the vicinity of this or any other appliance. The fumes can create a fire hazard or explosion.
5. Before proceeding with cleaning and maintenance operations, make sure the power line of the unit is disconnected.
6. Do NOT connect or disconnect the electric plug when your hands are wet. 7. Unplug the refrigerator or disconnect power before cleaning or servicing. Failure to do so can result in electrical shock or death.
8. Do NOT attempt to repair or replace any part of your refrigerator unless it is specifically recommended in this manual. All other servicing should be referred to a qualified technician.
9. Use 2 or more people to move and install this refrigerator. Failure to do so can result in back or other injuries.
10. To ensure proper ventilation for your refrigerator, the front of the unit must be completely unobstructed. Choose a well-ventilated area with temperatures above 60° F and below 90° F.
11. This unit must be installed in an area protected from the elements, such as wind, rain, water spray and drips.
12. The refrigerator should not be located next to ovens, grills or other sources of high heat.
13. The refrigerator must be installed with all electrical connections in accordance with state and local codes. A standard electrical supply (115V AC only, 60Hz) properly grounded in accordance with the National Electrical code and local codes and ordinances is required.
14. Do NOT kink or pinch the power supply cord of the refrigerator.
15. The fuse (or circuit breaker) size should be 15 amps.
16. It is important for the refrigerator to be level in order to work properly. You may need to make several adjustments to level it.
17. Make certain that the pipes are not pinched or kinked, or damaged during installation
18. Check for leaks after connection.
19. NEVER allow children to operate, play with or crawl inside the refrigerator.
20. Do NOT use solvent-based cleaning agents or abrasives on the interior. These cleaners may damage or discolor the interior.
21. Do NOT use this appliance for other than its intended purpose.
DANGER: Risk of child entrapment
- • Child entrapment and suffocation are not problems of the past. Junked or abandoned appliances are still dangerous (even if they will “just sit in the garage for a few days”).
- • Before you throw away your old refrigerator or freezer: Take off the doors and leave the shelves in place so that children may not easily climb inside.
- • NEVER allow children to operate, play with or climb inside the appliance.
Installation Instructions
Before using your appliance:
- • Remove the exterior and interior packaging.
- • Make sure you have all of the correct parts.
- • Before connecting the appliance to the power source, let it stand upright for approximately 2 hours. This will reduce the possibility of a malfunction in the cooling system from handling during transportation.
- • Clean the interior surface with lukewarm water using a soft cloth.
- • In case the interior accessories are not correctly placed, rearrange them as described in “Parts & Features” on the next page.
Installation of your appliance:
- • Place your appliance on a floor that is strong enough to support the appliance when it is fully loaded. To level your appliance, adjust the legs at the front of the appliance.
- • Allow 5 inches of space between the back and sides of the appliance, to ensure proper air circulation to cool the compressor.
- • Install the appliance away from direct sunlight and sources of heat (stove, heater, radiator, etc.). Direct sunlight may affect the coating and heat sources may increase electrical consumption. Extreme cold ambient temperatures may also cause the appliance not to perform properly.
- • Avoid installing the appliance in moist areas. Too much moisture in the air will cause frost to form quickly on the evaporator requiring more frequent defrosting of the appliance.
Parts and Features

- 1. Freezer Compartment
- 2. Freezer Shelf (1 total)
- 3. Fresh Food Compartment
- 4. Temperature Control
- 5. Light Switch
- 6. Refrigerator Shelf (3 total)
- 7. Crisper with Glass Cover
- 8. Leveling Leg
- 9. Top Hinge
- 10. Freezer Door
- 11. Refrigerator Door
- 12. Door Bins (3 total)
- 13. 2-Liter Bottle Door Bin
Electrical Connection
WARNING: Improper use of the grounded plug can result in the risk of electrical shock. If the power cord is damaged, have it replaced by an authorized service technician.
- • This appliance should be properly grounded for your safety. The power cord of this appliance is equipped with a three-prong plug. Do NOT, under any circumstances, cut or remove the third ground prong from the power cord supplied.
- • The cord should be secured behind the appliance and not left exposed or dan gling to prevent accidental injury.
- • This appliance should always be plugged into its own individual electrical outlet which has a voltage rating that matches the rating label on the appliance. This provides the best performance and also prevents overloading house wiring circuits that could cause a fire hazard from overheating.
- • NEVER unplug the appliance by pulling the power cord. Repair or replace immediately all power cords that have become frayed or otherwise damaged. Do NOT use a cord that shows cracks or abrasion damage along its length or at either end.
Extension cord:
Because of potential safety hazards under certain conditions, it is strongly recom mended that you do NOT use an extension cord with this appliance. However, if you must use an extension cord, it is absolutely necessary that it be a UL/CUL-listed, 3-wire grounding type appliance extension cord having a grounded type plug and outlet. The electrical rating of the cord must be 115 volts and at least 10 amps.
Surge protector:
- • Most electrical appliances use a series of electric control boards to operate. These boards are very susceptible to power surges and could be damaged or destroyed. If the appliance is going to be used in an area or if your city/country is prone to power surges or outages, it is suggested that you use a power surge protector for all electrical devices or appliances you use.
- • The surge protector that you select must have a surge block high enough to pro tect the appliance it is connected to. If you have any questions regarding the type and size of surge protector needed, contact a licensed electrician in your area.
- • Damages due to power surges are not considered a manufacturer covered defect and will void your product warranty.
Reversing Swing of the door
The side at which the door opens can be changed from the left hand side (as sup plied) to the right hand side, if the installation site requires. Should you require the reversal of the door opening direction, please follow these instructions.
Before reversing the door swing, ensure the appliance is unplugged and empty. Provide additional support for the doors while the hinges are being removed.
- • Do NOT depend on the door magnets to hold the door in place. It is recommended that two people perform this task.
- • Do NOT lay the appliance completely flat as this may damage the coolant system.
1. Tilt the unit slightly towards the rear and prop it securely. Two people are required to tilt the unit during the door reversal process.
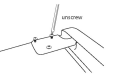
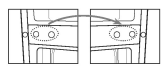
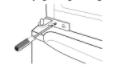
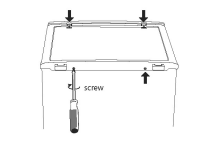
2. Remove the two screw covers on the top of the refrigerator and the 2 screws on the back.


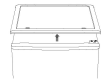
3. Lift the top cover away from the fridge.
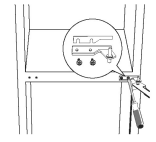
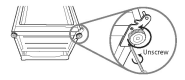
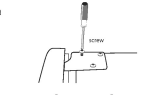
4. Remove the three screws on the upper hinge, then remove the freezer door and place it on a padded surface to prevent it from being scratched.
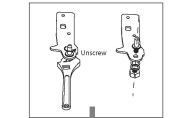
5. Remove the bolt from the hinge bracket with a screwdriver. Flip the hinge bracket and reattach the bolt.

6. Remove the screws from the upper hinge of the refrigerator door.
7. Move the hinge hole cover of the refrigerator door from the left to the right side.
8. Remove the screws and the bottom hinge. Then remove the adjustable feet from both sides.
9. Unscrew and remove the bottom hinge pin, turn the bracket over and replace it.
10. Replace the bracket of the bottom hinge pin. Replace both adjustable feet, then place the refrigerator door to the proper position.
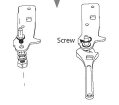
11. Reverse the middle hinge and place on the left side of the refrigerator, making sure that the middle hinge pin is in the upper hole of the refrigerator door, then tighten the bolts.

NOTE: Ensure that the freezer door is aligned horizontally and vertically so that the seals are closed on all sides before finally tightening the hinge.
12. Place the freezer door back on the refrigerator. Ensure the door is aligned horizontally and vertically so that the seals are closed on all sides before tightening the top hinge.
13. Insert the hinge bracket in the door and screw it to the top of the unit.
 14. Use a spanner to tighten if necessary.
15. Put the top cover back on and replace the rear screws.
 16. With the doors closed, check that the doors are aligned horizontally and vertically so that the seals are closed on all sides before finally tightening the bottom hinge of the refrigerator door. Readjust the levelling feet as needed.
How to use
Temperature control:
- • Your refrigerator has one control for regulating the temperature in the fresh food and the freezer compartment. The temperature control is located on the upper right-hand side of the fresh food section.
- • The range of the temperatures control is from “1” (warmest) to “7” (coldest).
- • The first time you turn the unit on, set the temperature control to “7”.
- • After 24 to 48 hours, adjust the temperature control to the setting that best suits your needs, which is normally “4” or “5”.
- • Changes of the ambient temperature affect temperature in the interior of the appliance.
- • To turn the thermostat off, turn temperature control to “0”.
NOTE: Turning the temperature control to “0” stops the cooling cycle but does not shut off the power to the appliance.
NOTE: If the unit is unplugged or power is lost or turned off, you must wait 3–5 minutes before restarting the unit. If you attempt to restart before this time delay, the appliance will not start.
Defrosting your appliance:
• WHEN?
For the most efficient operation and minimum energy consumption, defrost the freezer compartment when the frost on the appliance walls is excessive or 1/4″ thick. There is no need to defrost the refrigerator because of ice deposits on the inner back wall; it will be defrosted automatically.
Ice is deposited on the inner back wall during compressor operation. When the compressor is not operating, ice is defrosted and the water collects and is drained through the outlet in the inner back wall into the drain pan (situated above the compressor).
• HOW?
DO NOT USE BOILING WATER. It may damage the plastic parts. In addition, never use a sharp or metallic instrument to remove frost as it may damage the cooling coils and will void the warranty. We recommend using a plastic scraper.
- • Reset the thermostat to “0” and disconnect the power supply.
- • Remove the frozen food from the appliance and place it in a cooler to protect the food.
- • Leave the door open for a while so that you can easily scrape off the frost.
- • Use a plastic scraper but be careful not to damage the inner surfaces of the freezer.
- • Wipe up the scraped frost and ice before it is completely defrosted.
Freezer compartment:
- • Proper use of the appliance, adequately packed food, correct temperature and taking into account hygienic precautions will substantially influence the quality of frozen foods.
- • Carefully select the food you intend to freeze. It should be of adequate quality and suitable for freezing.
- • Use correct packaging and wrap it correctly.
- • The packaging should be airtight and shouldn’t leak since this could cause substantial vitamin loss and dehydration of foods.
- • Foils and bags should be soft enough to tightly wrap around the foods.
- • When preparing foods to be frozen, consider sanitary precautions.
- • Mark packages with the following data: kind and amount of food and the date.
- • It is most important that the food is frozen as quickly as possible.
- • If the amount of food is too large, the quality of freezing is reduced which affects the quality of the frozen food.
Interior light:
• When you open the door, the light will automatically turn ON. When you close the door, the light will turn OFF.
Care & Maintenance
Maintenance of your appliance
Changing the light bulb:
- • Unplug the AC power cord from the wall.
- • Remove the screw that holds the cover over the light bulb and remove the cover. • Unscrew the bulb.
- • Replace with a 10-watt bulb of the same size and shape.
- • Replace the light bulb cover.
Power failure:
• Most power failures are corrected within a few hours and should not affect the temperature of your appliance if you minimize the number of times the door is opened. If the power is going to be off for a longer period of time, you need to take the proper steps to protect your food.
Vacation time:
During long absences, remove all of the food. Unplug and clean your appliance and leave the door slightly open to avoid possible formation of condensation, mold or odors.
Moving your appliance:
- • Remove all of the food.
- • Securely tape down all loose items inside your appliance.
- • Turn the leveling screws up to the base to avoid damage.
- • Tape the doors shut.
- • Be sure the appliance stays in the upright position during transportation.
Cleaning your appliance:
- • Turn the temperature control to “0”, unplug the appliance and remove the food, shelves and trays.
- • Wash the inside with warm water and baking soda solution. The solution should be about 2 tablespoons of baking soda to a quart of water.
- • Wash the shelves and trays with a mild detergent solution. Plastic parts CANNOT be washed in a dishwasher.
- • The outside of the appliance should be cleaned with mild detergent and warm water.
- • The condenser coils should be vacuumed when they are dusty or dirty. • Clean the drain pan on the refrigerator compressor. Do NOT remove the drain pan.
- • After cleaning, connect the appliance to the power supply and reload with trays, shelves and food.
READ ALSO: ILLY X1 IPERESPRESSO USER’S MANUAL
Energy Saving Tips
- • The appliance should be located in the coolest area of the room, away from heat producing appliances or heating ducts, and out of direct sunlight.
- • Let hot foods cool to room temperature before placing in the appliance.
- • Overloading the appliance forces the compressor to run longer. Foods that freeze too slowly may lose quality or spoil.
- • Be sure to wrap foods properly, and wipe containers dry before placing them in the appliance. This will help reduce frost buildup inside the appliance.
- • The storage drawers should not be lined with aluminum foil, wax paper or paper towel. Liners interfere with cold air circulation, making the appliance less efficient.
- • Organize and label food to reduce door openings and extended searches. Remove as many items as needed at one time and close the door as soon as possible.
- • Try not to open the door too often, especially when the weather is wet and hot.
- • Every so often, check if the appliance is sufficiently ventilated.
- • Ice and frost layer increase energy consumption, so clean the appliance as soon as the layer is 1/4″ thick.
Troubleshooting
You can solve many common appliance problems easily, saving you the cost of a possible service call. Try the suggestions below to see if you can solve the problem before calling a technician.
| PROBLEM | POSSIBLE CAUSE(S) |
| Appliance does not operate. | Not plugged in. The circuit breaker is tripped or blown fuse. |
| Appliance does not cool. | The appliance temperature control is set at “0”. |
| Compressor turns on and off frequently. | Condenser coil at the back of the unit is dirty. The room temperature is hotter than normal. A large amount of food has been placed in the unit. The door is opened too often. The door is not closed completely. The temperature control is not set correctly. The door gasket does not seal properly. The appliance does not have the correct clearances (5″ on each side and back of unit) |
| The light does not work. | The home circuit breaker or fuse has tripped. The appliance is unplugged. The bulb has burned out (see p. 11 for the replacement procedure). |
| Vibrations | Check to ensure that the appliance is level. |
| The appliance seems to make too much noise. | The rattling noise may come from the flow of the refrigerant, which is normal. As each cycle ends, you may hear gurgling sounds caused by the flow of refrigerant. Contraction and expansion of the inside walls may cause popping and crackling noises. The appliance is not level. |
| The door will not close properly. | The appliance is not level. The doors were reversed and not properly installed. The gasket is dirty. The shelves, bins or baskets are out of position. |
Returns
If any item, for any reason, does not meet your expectations, just return it to us. We’ll gladly either:
- • Refund your merchandise amount
- • Credit your account
- • Send a replacement
You can return any unused item in its original packaging within 60 days of its receipt for a full refund of the purchase price (excluding shipping and handling charges).
Please send returns to:
Montgomery Ward, Inc.
Attn: Customer Returns
2000 Harrison Suite 100
Clinton, IA 52732-6676
When returning an item:
- • Use the original packaging and pack it securely.
- • Please adequately insure your item in case you need to make a claim with the carrier you choose for returning your item.
- • Include your order number and reason for return.
- • We recommend keeping the receipt for 4 weeks.
1 Year Limited Warranty
Montgomery Ward, Inc. warrants this product to be free from defects in material and workmanship for one year from provable date of purchase.
Within this warranty period, Montgomery Ward will repair or replace, at its option, defective parts of this product at no charge, provided the product is returned, freight prepaid with proof of purchase to Montgomery Ward. Allow 2-4 weeks for return shipping.
This warranty does not cover improper installation, misuse, abuse or neglect on part of the owner. Warranty is also invalid in any case that the product is taken apart or serviced by an unauthorized service station.
This warranty gives you specific legal rights and they may vary from state to state.
THE FOREGOING WARRANTIES ARE IN LIEU OF ALL OTHER WARRANTIES AND CONDITIONS, EXPRESS OR IMPLIED, INCLUDING BUT NOT LIMITED TO THOSE OF MERCHANTIBILITY OR FITNESS FOR A PARTICULAR PURPOSE.
You can download PDF version of Montgomery Ward 7.4 cu. ft. Refrigerator-Freezer Instruction Manual (MODEL: FR75W, FR75B) here.