(Manual applies to the following model number(s) MB20040221). These numbers are located on the rating label of the grill.
IMPORTANT
Please record this information immediately and keep in a safe place for future use.
Two people recommend for assembly
WARNING
• This manual contains important information necessary for the proper assembly and safe use of the appliance.
• Read and follow all warnings and instructions before assembling and using the appliance.
• Keep this manual for future reference.
Failure to follow these instructions could result in fire, explosion or burn hazard which could cause property damage, personal injury, or death.
CARBON MONOXIDE HAZARD
• Burning wood chips, wood chunks, wood pellets, charcoal and propane gives off carbon monoxide, which has no odor and can cause death.
• DO NOT burn wood chips, wood chunks, wood pellets, charcoal or propane inside homes, vehicles, tents, garages or any enclosed areas.
• USE ONLY OUTDOORS where it is well ventilated.
WARNINGS AND IMPORTANT SAFEGUARDS
READ ALL INSTRUCTIONS
• Always use grill in accordance with all applicable local, state, and federal fire codes.
• Before each use check all nuts, screws, and bolts to make sure they are tight and secure.
• Never operate grill under combustible overhead construction such as roof coverings, carports, awnings, or overhangs.
• Grill is for OUTDOOR HOUSEHOLD USE ONLY.
• Never use inside enclosed areas such as patios, garages, buildings, or tents.
• Never use inside or on recreational vehicles or boats.
• Maintain a minimum distance of 10ft (3m) from overhead construction, walls, rails or other structures.
• Keep a minimum 10ft (3m) clearance of all combustible materials such as wood, dry plants, grass, brush, paper, or canvas.
• Never use grill for anything other than its intended use. This grill is NOT for commercial use.
• Accessory attachments not supplied by Masterbuilt Manufacturing, LLC are NOT recommended and may cause injury.
• Use of alcohol, prescription, or non-prescription drugs may impair user’s ability to properly assemble or safely operate grill.
• Keep a fire extinguisher accessible at all times while operating grill.
• When cooking with oil or grease, have a type BC or ABC fire extinguisher readily available.
• In the event of an oil or grease fire do not attempt to extinguish with water. Immediately call the fire department. A type BC or ABC fire extinguisher may, in some circumstances, contain the fire.
• Use grill on a level, non-combustible, stable surface such as dirt, concrete, brick, or rock. An asphalt surface (blacktop) may not be acceptable for this purpose.
• Grill MUST be on the ground. Do not place grill on tables or counters. DO NOT move grill across uneven surfaces.
• Do not use grill on wooden or flammable surfaces.
• Keep grill clear and free from combustible materials such as gasoline and other flammable vapors and liquids.
• Do not leave grill unattended.
• Keep children and pets away from grill at all times. Do NOT allow children to use grill. Close supervision is necessary when children or pets are in the area where grill is being used.
• Do NOT allow anyone to conduct activities around grill during or following its use until it has cooled.
• Never use glass, plastic, or ceramic cookware in grill. Never place empty cookware in grill while in use.
• Never move grill when in use. Allow grill to cool completely (below 115°F (45°C)) before moving or storing.
• Do not store grill with hot ashes or charcoal inside grill/hopper. Store only when fire is completely out and all surfaces are cold.
• Never use grill as a heater (READ CARBON MONOXIDE HAZARD).
• The grill and hopper heat shields are HOT while in use and will remain HOT for a period of time afterwards and during cooling process. Use CAUTION. Wear protective gloves/mitts.
• Be careful when removing food from grill. All surfaces are HOT and may cause burns. Use protective gloves/mitts or long, sturdy, cooking tools for protection from hot surfaces or splatter from cooking liquids.
• DO NOT bump or impact the grill to prevent personal harm, damage to grill, or spillage/splashing of hot cooking liquid.
• Do not touch HOT surfaces
• Grill is hot during use. To avoid burns, keep face and body away from door(s) and vents. Steam and hot air are expelled during use.
• Hopper heat shield, hopper lid and latch, hopper ash door and latch are HOT while the grill is in use and during cooling. Wear protective gloves when working with and around these components.
• Grill has an open flame. Keep hands, hair, and face away from flame. Do NOT lean over grill when lighting. Loose hair and clothing may catch fire.
• DO NOT obstruct flow of combustion and ventilation.
• Do not cover cooking grates with metal foil. This will trap heat and may cause damage to the grill.
• Never leave HOT coals or ashes unattended.
• Do not remove ashes while ashes and charcoal are HOT.
• Keep hands, hair, and face away from the burning charcoal. Be careful of loose hair and clothing during operation as they could catch fire.
• Use protective gloves when handling this grill or working with fire. Use protective gloves or long, sturdy fireplace tools when adding wood or charcoal.
• Never use charcoal lighting fluid, gasoline, alcohol or other highly volatile fluids to ignite charcoal. These fluids can explode causing injury or death. Always follow specific lighting instructions for this grill.
• Never overfill charcoal hopper. This can cause serious injury as well as damage to the grill.
• Dispose of cold ashes by placing them in aluminum foil, soaking with water, and discarding in a non-combustible container.
• When using electrical appliances, basic safety precautions should always be followed including the following: 1) Do not plug in the appliance until fully assembled and ready for use. 2) Use only approved grounded electrical outlet. 3) Do not use during an electrical storm. 4) Do not expose appliance to rain or water at any time.
• To protect against electrical shock do not immerse cord, plug or control panel in water or other liquid.
• Do not operate any appliance with a damaged cord or plug, or after appliance malfunctions or has been damaged in any manner.
• Extension cords may be used if care is exercised in their use.• If an extension cord is used: 1) The marked electrical rating of the extension cord should be at least as great as the electrical rating of the appliance; and 2) the cord should be arranged so that it will not drape over the counter top or tabletop where it can be pulled by children or tripped over unintentionally.
• The extension cord must be a grounding-type 3-wire cord.
• Outdoor extension cords must be used with outdoor use products and are marked with suffix “W” and with the statement “Suitable for Use with Outdoor Appliances.”
• CAUTION – To reduce the risk of electric shock, keep extension cord connection dry and off the ground.
• Do not let cord hang on or touch hot surfaces.
• Do not place cord on or near a gas or electric burner or in a heated oven.
• To disconnect, turn controller “OFF” then remove plug from outlet.
• Unplug from outlet when not in use and before cleaning. Allow appliance to cool completely before adding/removing internal components.
• Do not clean this product with a water sprayer or the like.
• Grill should only be rolled on smooth surface.
• Grill should never be rolled up/down stairs or uneven surface.
• Potential damage to grill or harm to user may result from failure to follow warnings.
• Never open hopper during use. If it is necessary to refill charcoal during use follow the specific reload instructions for this grill and always wear protective gloves.
• Never operate the grill with the temperature probe removed. This can cause the grill to overheat and cause serious personal injury and/or damage to the grill.
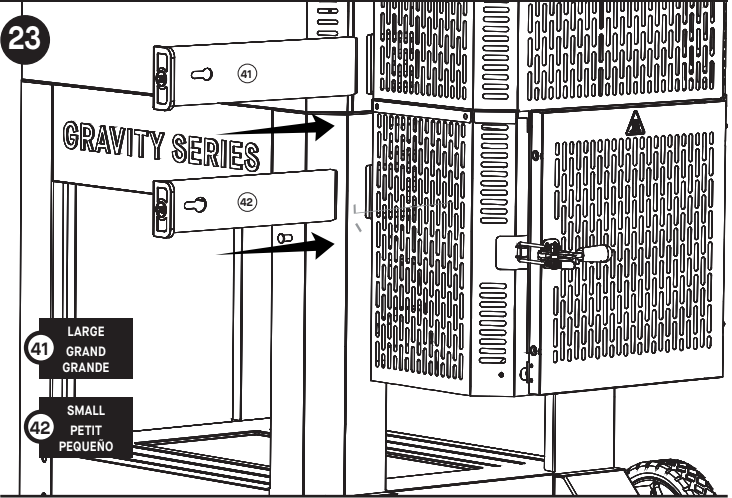
• Install heat intake and air intake slides after every use.
• Remove heat intake and air intake slides before every use.
• Never operate the grill with the heat intake and air intake slides installed in the grill. This can damage the grill.
• Do not use indoors!
• WARNING! Do not use spirit or petrol for lighting or re-lighting! Use only firelighters complying to EN1860-3!
This device complies with Industry Canada licence-exempt RSS standard(s). Operation is subject to the following two conditions:
(1) This device may not cause interference
(2) This device must accept any interference, including interference that may cause undesired operation of the device.
This equipment complies with IC radiation exposure limits set forth for an uncontrolled environment. This equipment should be installed and operated with minimum distance 20cm between the radiator & your body.
SAFETY FEATURES
Lid Switch – Prevents grill from overheating.
• If the set temperature is above 500°F (260°C) the controller will regulate the grill temperature to 500°F (260°C) when the grill lid is opened. Once the lid is closed the grill will return to the set temperature.
• If the set temperature is below 500°F (260°C) the controller will continue to regulate the grill at the set temperature when the grill lid is opened.
Hopper Switches – Reduces chimney effect when hopper is opened.
- Hopper Lid Switch: The fan will stop when the hopper lid is opened. The fan will restart when the hopper lid is closed.
- Hopper Ash Door Switch: The fan will stop when the hopper ash door is opened. The fan will restart when the hopper ash door is closed.
SAVE THESE INSTRUCTIONS
This product does not come with charcoal or wood chunks.
Firebricks
Metal Plates
The metal plates in the lower portion of the hopper hold the firebrick in place and protect it during the manufacturing and shipping processes. These burn out and drop into the ash pan. They are not necessary for the grill to function; therefore, we do not offer these metal plates as replacement parts. Running the grill at higher temperatures will degrade the metal plates faster than lower temperatures.
Firebrick
In the Gravity Series Hopper, your fire is contained to a 6” – 12” area that is reinforced with a food-safe soft ceramic firebrick to handle the higher temps in the lower portion of the hopper. The ingredients in the food-safe ceramic are approved by the FDA for use in food or as an indirect additive used in food contact.
The firebrick takes the heat from the charcoal fire and is to be replaced only once a hole burns in it that is more than 0.5” deep and 5” in diameter. These firebricks are warrantied parts and will also be available for purchase post-warranty as a full set (4 firebricks with temporary metal plates). Some initial firebrick degradation during burn-in and initial usage is likely, but degradation tends to stabilize.
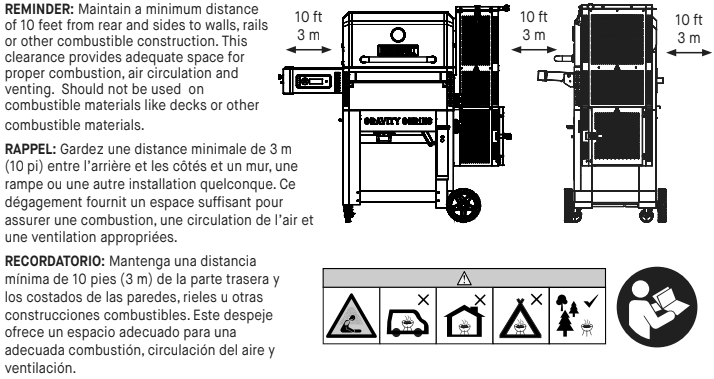
Structural Proximity and Safe Usage Recommendations
REMINDER: Maintain a minimum distance of 10 feet from rear and sides to walls, rails or other combustible construction. This clearance provides adequate space for proper combustion, air circulation and venting. Should not be used on combustible materials like decks or other combustible materials.
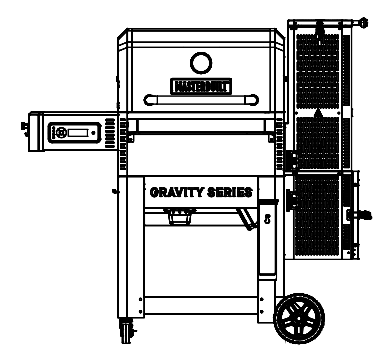
Parts Diagram
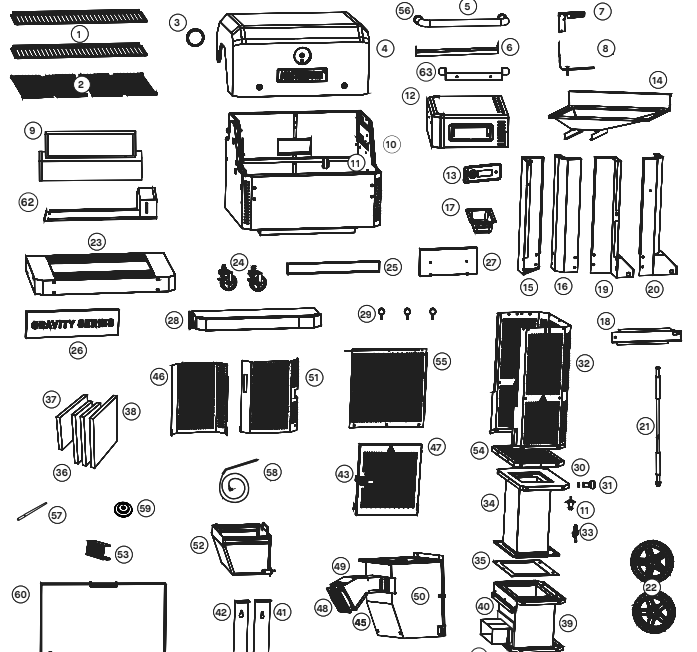

Parts List

| 1 | 2 | Smoking/Warming Racks | 33 | 1 | Hopper Lid Latch |
| 2 | 2 | Smoke + Sear Grates | 34 | 1 | Hopper Assembly – Top |
| 3 | 1 | Temperature Gauge | 35 | 2 | Hopper Gasket |
| 4 | 1 | Lid Assembly | 36 | 2 | Front/Rear Fire Brick |
| 5 | 1 | Handle Tube | 37 | 1 | Left Fire Brick |
| 6 | 1 | Heat Manifold Support | 38 | 1 | Right Fire Brick |
| 7 | 1 | Temperature Probe Bracket | 39 | 1 | Hopper Assembly – Middle |
| 8 | 1 | Temperature Probe | 40 | 1 | Grill Heat Intake Fiber Spacer |
| 9 | 1 | Heat Manifold (Griddle) | 41 | 1 | Heat Intake Slide (Large) |
| 10 | 1 | Body Assembly | 42 | 1 | Air Intake Slide (Small) |
| 11 | 3 | Lid/Door Switch | 43 | 1 | Hopper Door Latch |
| 12 | 1 | Side Shelf Assembly | 44 | 1 | Charcoal Grate Assembly |
| 13 | 1 | Controller Assembly | 45 | 1 | Fan Brace |
| 14 | 1 | Bottom Tray Assembly | 46 | 1 | Hopper Heat Shield – Bottom Rear |
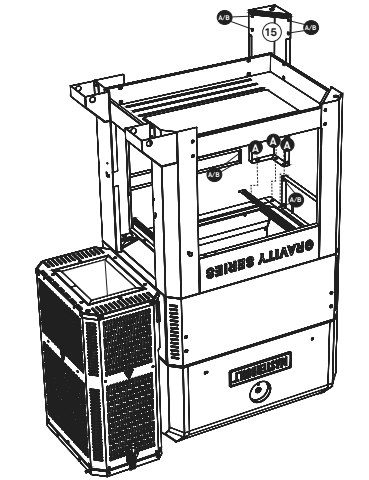
| 15 | 1 | Left Rear Leg Assembly | 47 | 1 | Hopper Door Assembly |
| 16 | 1 | Left Front Leg Assembly | 48 | 1 | Fan |
| 17 | 1 | Grease Tray | 49 | 1 | Fan Guard |
| 18 | 1 | Side RH Leg Brace | 50 | 1 | Hopper Assembly – Bottom |
| 19 | 1 | Right Rear Leg | 51 | 1 | Hopper Heat Shield – Bottom Front |
| 20 | 1 | Right Front Leg | 52 | 1 | Ash Tray Assembly |
| 21 | 1 | Wheel Axle with Lock Nut / 3 Washers / 2 Bushings | 53 | 1 | Manifold Ash Grate |
| 22 | 2 | 8” Wheel | 54 | 1 | Hopper Lid Assembly |
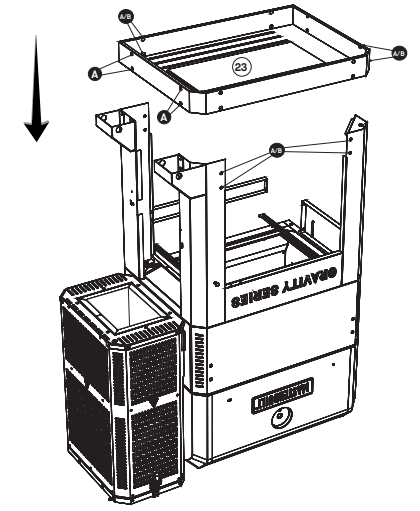
| 23 | 1 | Bottom Shelf Assembly | 55 | 1 | Hopper Shrouding |
| 24 | 2 | 3” Caster | 56 | 2 | Lid Handle Base |
| 25 | 1 | Back Leg Brace | 57 | 1 | Antenna |
| 26 | 1 | Front Leg Cross Brace | 58 | 1 | Meat Probe |
| 27 | 1 | Side LH Leg Brace | 59 | 2 | Lid Handle Washer |
| 28 | 1 | Front Shelf Assembly | 60 | 1 | Griddle |
| 29 | 3 | Tool Hanger | 61 | 1 | Heat Manifold (Grill) |
| 30 | 1 | Hopper Lid Handle Washer | 62 | 1 | Heat Manifold Base |
| 31 | 1 | Hopper Lid Handle | 63 | 1 | Cord Managment Bracket |
| 32 | 1 | Hopper Heat Shield – Top | 1 | Power Cord / 3 Piece Plug – Not Shown |
BEFORE ASSEMBLY READ ALL INSTRUCTIONS CAREFULLY.
• Assemble on a clean flat surface.
• Recommend assembling on cardboard to avoid oil residue on floors or scratches.
• Gloves recommended for assembly. Hopper gasket is fiberglass and will irritate skin.
• Tools needed: Phillips head screwdriver, adjustable wrench, 19mm socket wrench.
• Approximate assembly time: 1 hour, 45 minutes.
• Recommend two people assemble to increase ease and reduce assembly time.
• Actual product may differ from picture shown.
• It is possible that some assembly steps have been completed in the factory.
• Remove all printed labels from the grill and hopper before use.

DO NOT RETURN TO RETAILER for assembly assistance, missing or damaged parts. Please contact MASTERBUILT Customer Service at www.masterbuilt.com/pages/support. Please have the model number and serial number available. These numbers are located on the silver rating
label on the grill.
Hardware
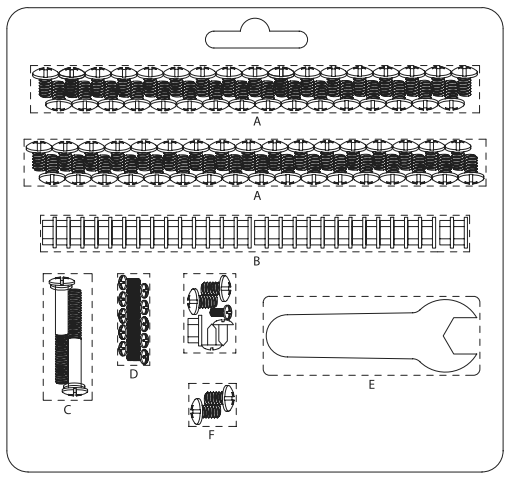
KEY QTY. DESCRIPTION
| A | 67 | M6x12 Screw |
| B | 30 | M6 Hex Nut |
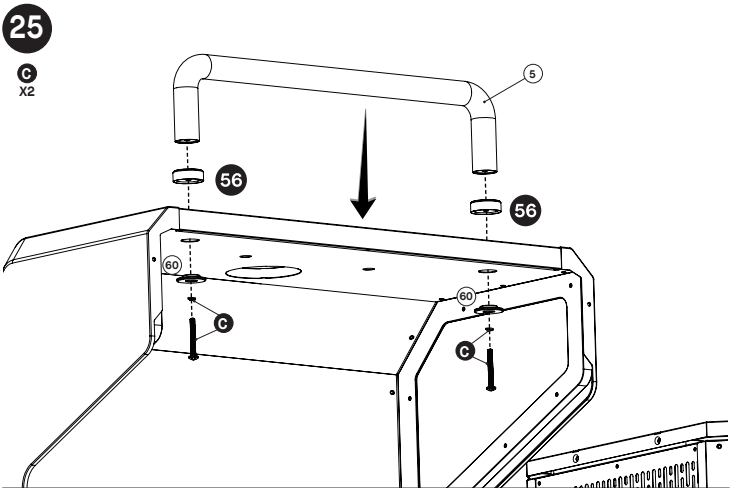
| C | 2 | M6x48 Screw with lock washer |
| D | 10 | M4x10 Screw |
| E | 1 | Tool |
| F | 2 | M6x12 |
Assembly
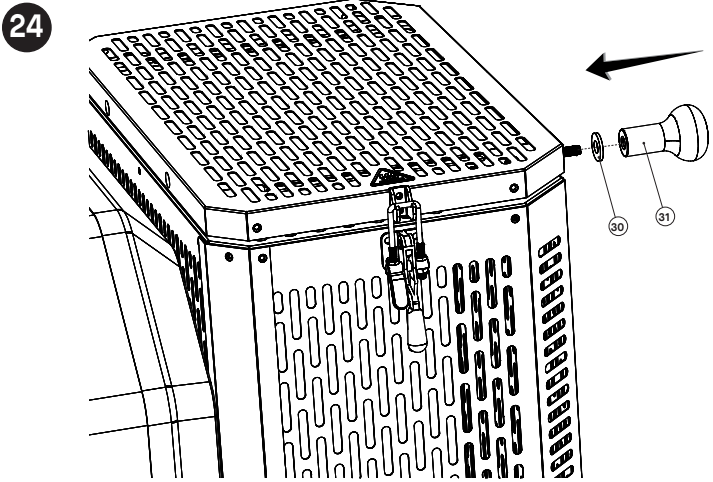
- Keep hopper lid closed and latched for remainder of assembly. Do not add hopper lid handle until step 24.
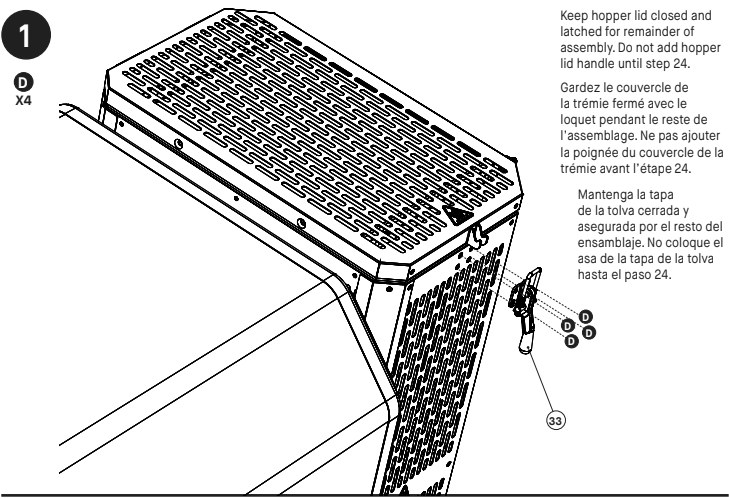
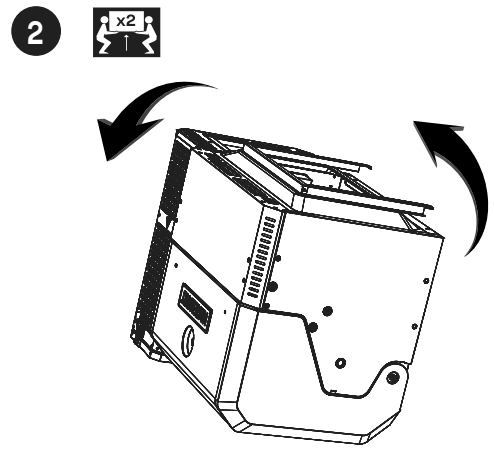
2. To avoid personal injury and damage to grill, have someone help you lift the grill on its lid onto cardboard to avoid scratches.
3. Do not fully tighten screws.
4. Do not fully tighten screws.

5. Do not fully tighten screws.
6. Do not fully tighten screws.
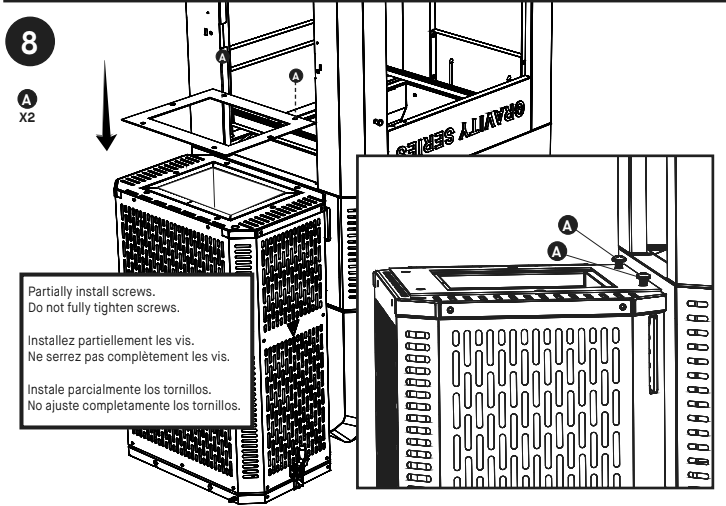
7. Do not fully tighten screws.
Partially install screws. Do not fully tighten screws.
9. On the hopper, bend the circled piece up away from the fan toward the hopper. Note: Only bend this piece as necessary. Bending it too many times could damage it.
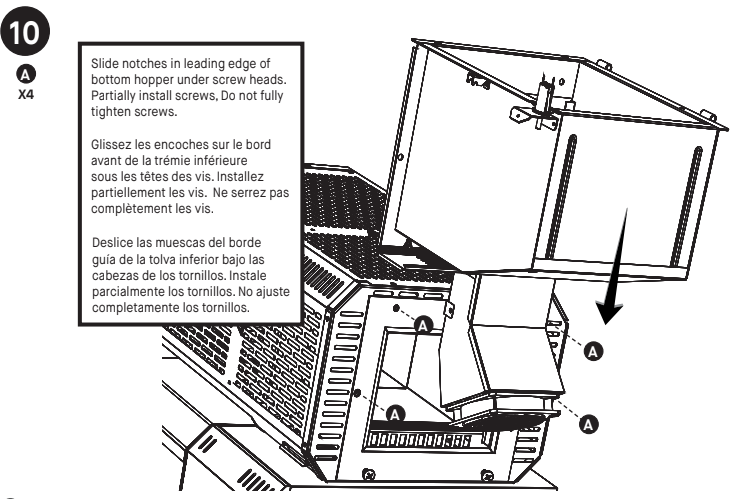
10. Slide notches in leading edge of bottom hopper under screw heads.
Partially install screws, Do not fully tighten screws.
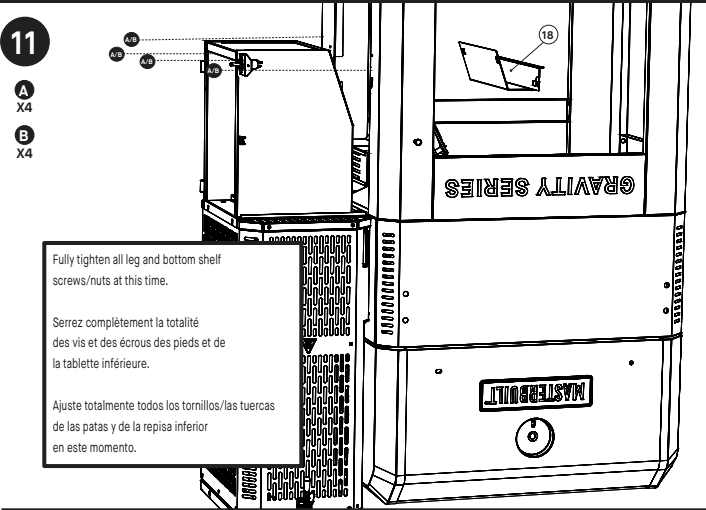
11. Fully tighten all leg and bottom shelf screws/nuts at this time.
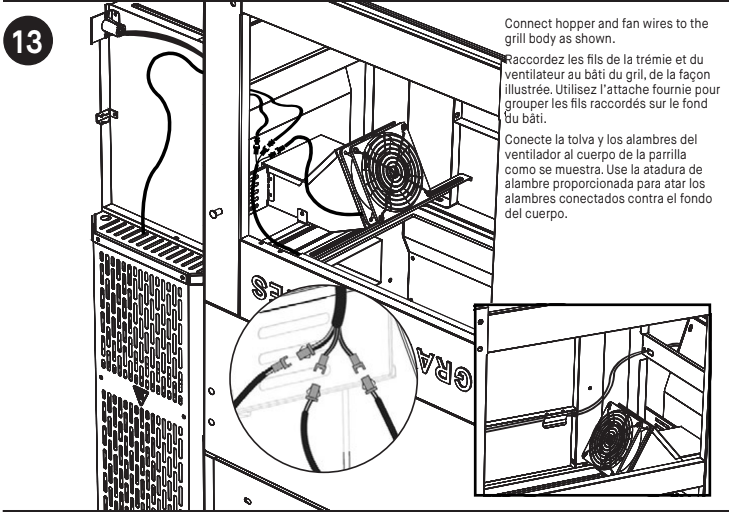
13. Connect hopper and fan wires to the grill body as shown.
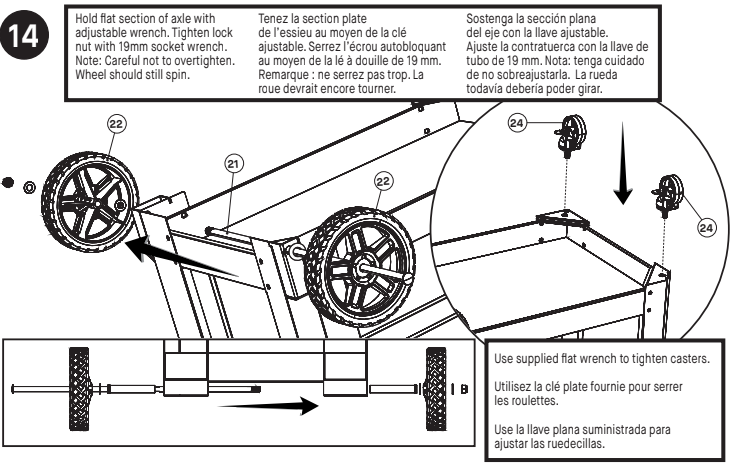
14. Hold flat section of axle with adjustable wrench. Tighten lock nut with 19mm socket wrench.
Note: Careful not to overtighten.
Wheel should still spin.
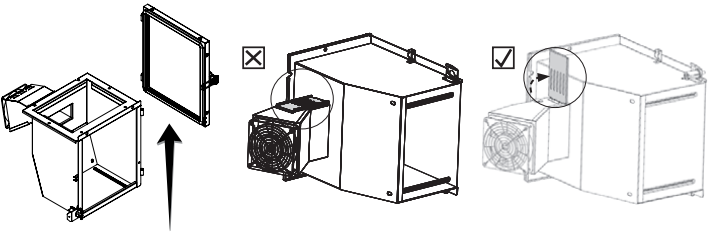
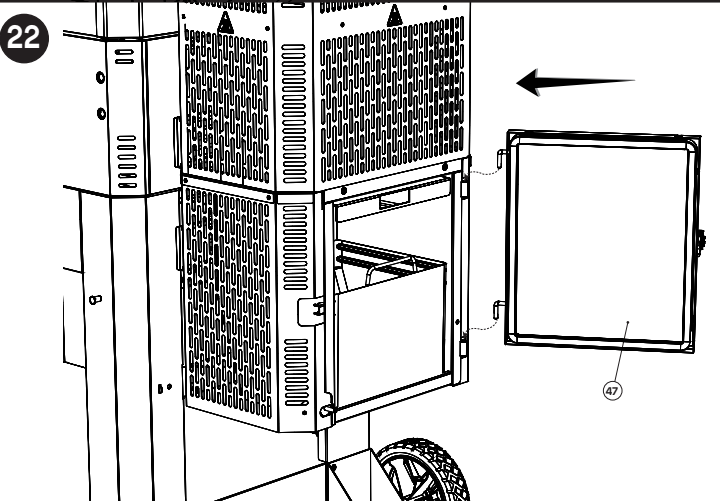
15. Outer flange fits BEHIND rim of hopper opening.
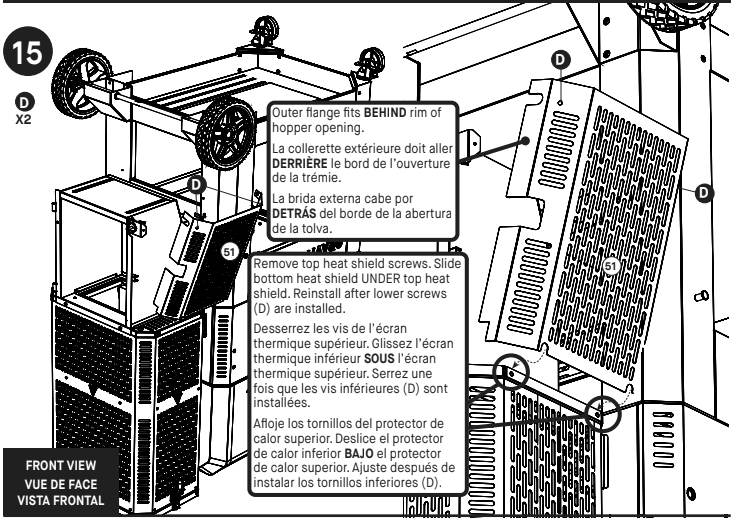
Remove top heat shield screws. Slide bottom heat shield UNDER top heat shield. Reinstall after lower screws (D) are installed.
16. Remove top heat shield screws.
Slide bottom heat shield UNDER top heat shield. Reinstall after lower screws (D) are installed.
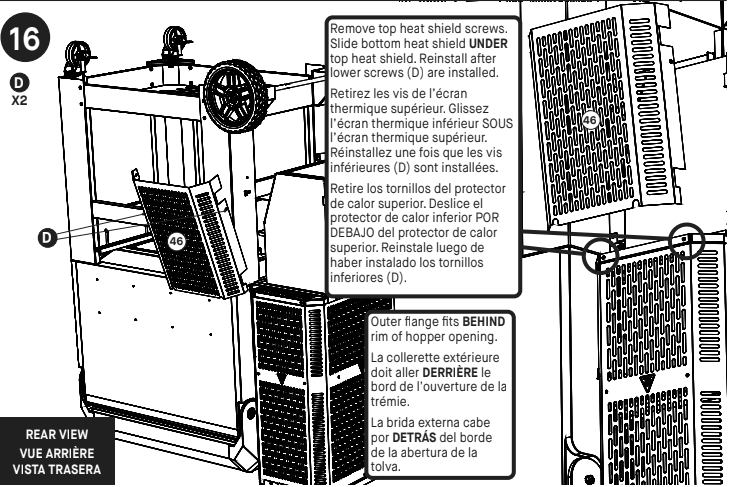
Outer flange fits BEHIND rim of hopper opening.
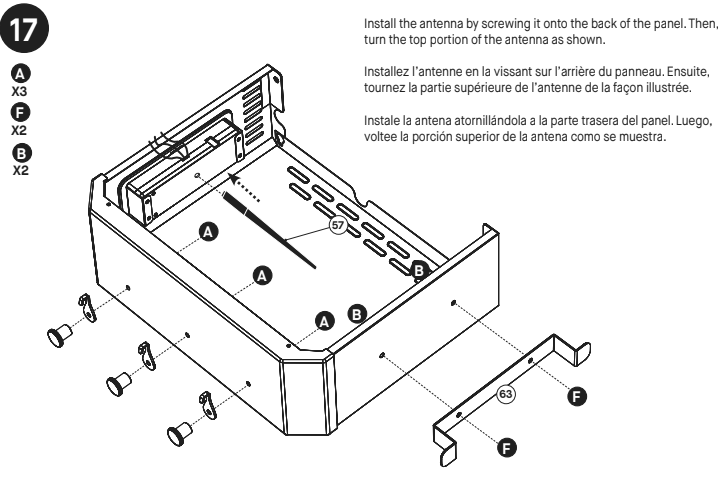
17. Install the antenna by screwing it onto the back of the panel. Then, turn the top portion of the antenna as shown.
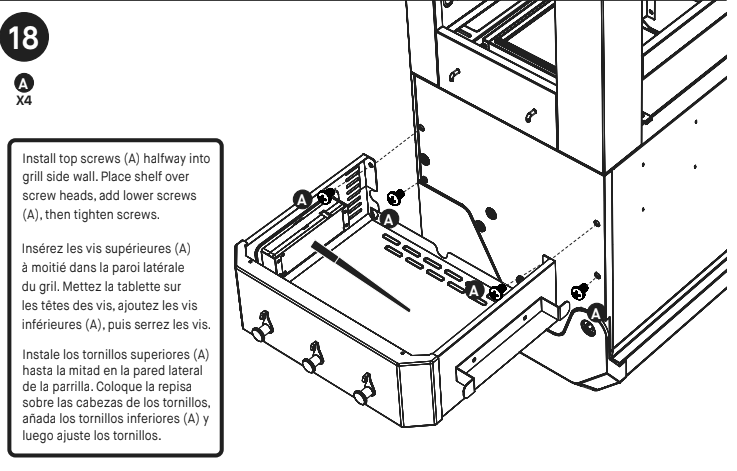
18. Install top screws (A) halfway into grill side wall. Place shelf over screw heads, add lower screws (A), then tighten screws.
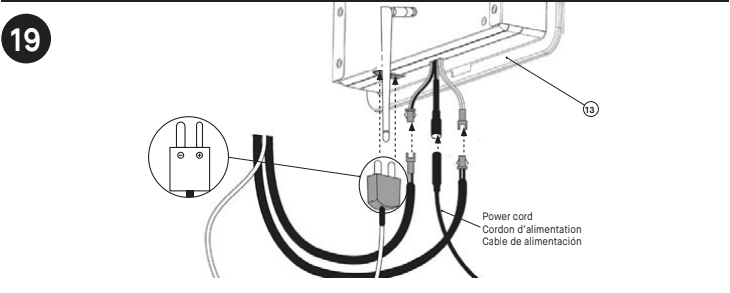
19. Connect the three cords from inside the grill to the digital control panel. Note that the prongs of the circled plug differ in size, with the larger one being the negative charge and the smaller one being the positive charge. Make sure to match the size of the prong with the size of the slot when plugging it into the control panel. This should not require much force. Connect the power cord last.
20. Stand grill upright and lock both casters for stability.
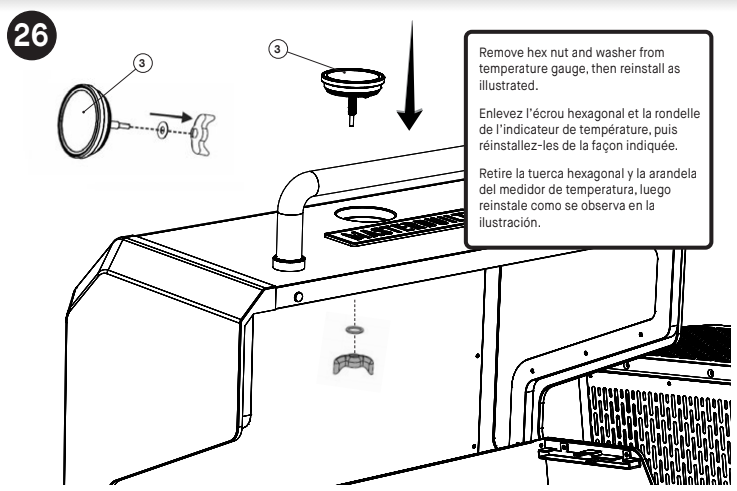
26. Remove hex nut and washer from temperature gauge, then reinstall as illustrated.
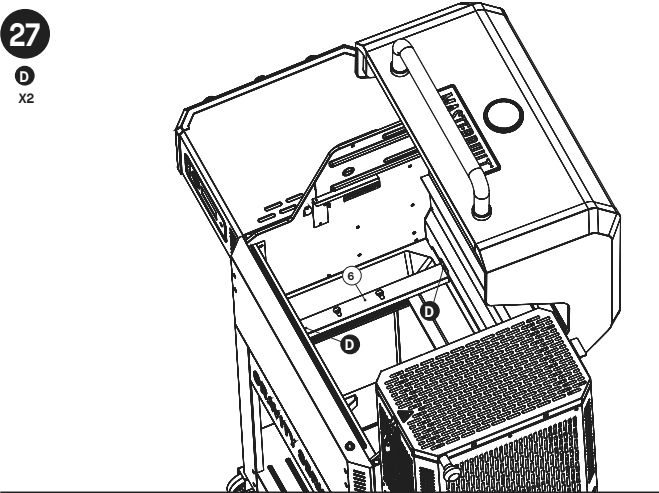
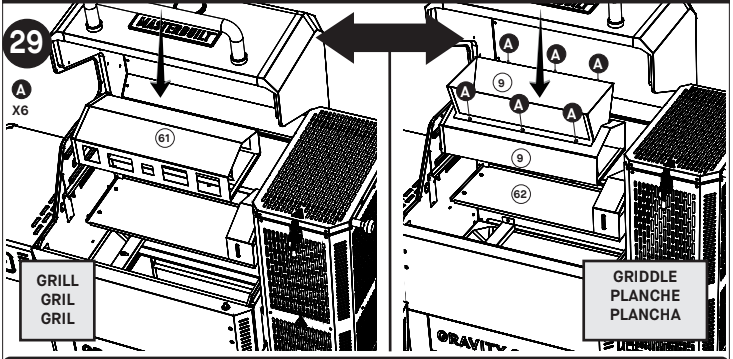
29. Insert screw heads on bottom of heat manifold (9) into manifold support. Slide manifold toward hopper. Tighten screws beneath manifold.
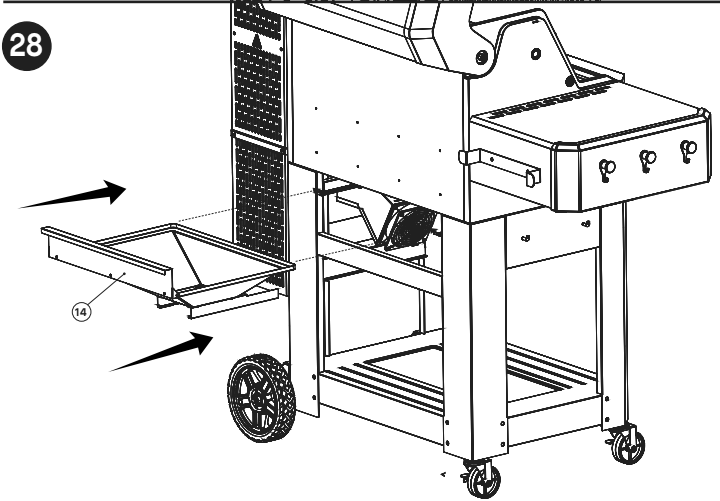
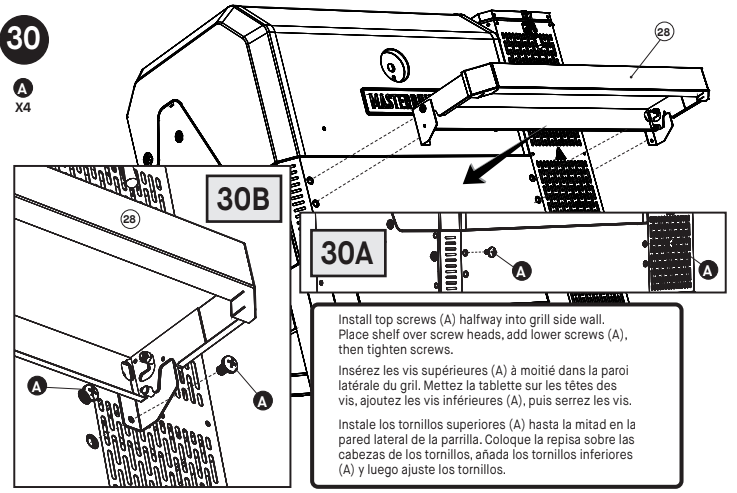
30. Install top screws (A) halfway into grill side wall.
Place shelf over screw heads, add lower screws (A), then tighten screws.
Operating Instructions
ASSEMBLY IS DONE. LET’S HAVE SOME FUN!
PRE-SEASONING
Pre-seasoning will rid your grill of chemicals and oils left over by the manufacturing process, allowing them to burn off. PRE-SEASON GRILL PRIOR TO FIRST USE.
- Fill the hopper with charcoal approximately 1/4–1/2 full.
- Start grill following the START-UP instructions and set the temperature to 250°F (121°C) for 60 minutes.
- Set the temperature to 400°F (204°C) for 30 minutes.
- Shut down the grill following the SHUTDOWN instructions.
- Allow grill to cool COMPLETELY.
- Using a napkin or cloth, rub a light coat of cooking oil on smoke + sear grates, warming/smoking racks, charcoal grate and the grill lid and bodY.
- Repeat steps 3-6 at 350°F
GRIDDLE-SEASONING
- Wipe griddle top of all debris.
- Ignite grill and set temperature to 250F. Run for approximately 10–15 minutes until your griddle top becomes hot.
- Pour a light amount of cooking oil on griddle top.
- Spread the cooking oil over surface of griddle top using paper towels. Use spatula or heat resistant gloves to hold folded paper towels. Be sure to cover every part of griddle top.
- Allow griddle to heat to 400°F (204°C). Smoking will occur as the oil begins to bond with the surface of griddle.
- After smoke dissipates. Repeat steps 3–5 at 350°F
Frequent seasoning prevents rusting. If rusting occurs, clean with a steel brush, apply vegetable shortening and heat as indicated above.
START-UP
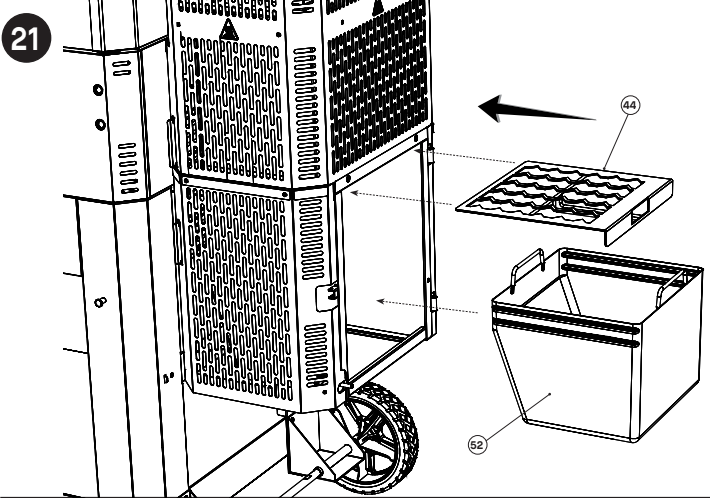
- REMOVE heat intake and air intake slides. (Refer to assembly step 21.)
- Open hopper lid and hopper ash door.
• There is a safety switch at each of these doors that will prevent the fan from running when these doors are opened.
• If charcoal remains from a previous cook, shake the charcoal grate to ensure all ash falls through to the ash tray.
• Discard any ash from the ash tray.
- Fill hopper with charcoal.
• Approximately 16 lbs. of charcoal briquettes.
• Approximately 10 lbs. of lump charcoal.
• Never use fast light charcoal or lighting fluid.
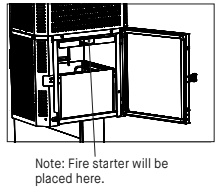
• If charcoal slips through charcoal grate into ash can, remove before starting. - Place fire starter in charcoal grate and light.
• Use a food safe fire starter block or twisted paper towel/paper.
• Place in charcoal grate on the fire starter support bars.
• Use caution and wear protective gloves.
• Light with match stick or lighter.
- Turn on controller and set to desired temperature.
• Wait 1–2 minutes after lighting fire starter to ensure fire starter is fully lit. - Close hopper lid and ash door.
• This will activate the fan. - Wait for grill to reach desired set temperature.
• Approximately 13 minutes to reach 700°F (370°C).
• Approximately 7 minutes to reach 225°F (105°C).
RELOAD
If it is necessary to refill the hopper while cooking, follow the safe reloading instructions below.
• DO NOT add charcoal when grill is in excess of 250°.
• The fan will turn off if you open the hopper lid or ash door. This reduces the chimney effect created when these doors are opened.
• Gravity fed technology works by maintaining a completely sealed hopper. When the hopper lid is opened the flame will rise from the top of the hopper like a torch. Closing the hopper lid and ash door will return the flame to the normal operating level.
• The amount of charcoal in the hopper determines how quickly the flame will rise when the hopper lid is opened.
Adding charcoal:
- Open hopper lid.
• Use caution and wear protective gloves. Hopper lid will be hot.
• Flame will rise from hopper after a short time depending on the charcoal level. - Pour charcoal into hopper.
- Close hopper lid.
SHUTDOWN
- Turn controller off.
- Close grill lid, hopper lid and ash door.
- Install heat intake and air intake slides.
• The grill is designed to starve the charcoal of oxygen when shut down. This allows a percentage of unused charcoal to be saved for the next cook. - Failure to install slides when shutting down may cause damage to grill.
ADDING SMOKE/FLAVOR
Option 1: Place wood chunks or charcoal in the ash tray to add flavor before setting temperature. As the charcoal in the hopper burns, the hot embers will fall onto the wood/charcoal in the tray, causing it to burn at a slower rate and release more flavor into the grill.
- NOTE: Never add more than 1⁄2 lbs at a time. Additional chunks or charcoal should not be added until any previously added have ceased generating smoke.
Option 2: Mix wood chunks in the hopper with charcoal. - NOTE: Never use more than 1.5 lbs of wood chunks throughout the hopper.
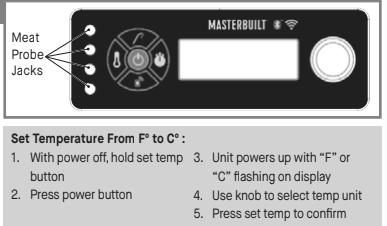
CONTROL PANEL

Power ON/Off Controller:
- Press button to power controller ON.
- Press and hold button to power controller OFF.

Set Temperature:
- Press button.
- Turn knob to desired temperature.
- Press button again to set temperature (Time will automatically set after 3 seconds.)

Set Time:
• Countdown Timer
- Press button.
- Turn knob to desired hours.
- Press button to set hours.
- Turn knob to desired minutes.
- Press button to set minutes. The timer will start.
- Press button to pause and resume timer.
- Press and hold button to reset timer.
• Count Up Timer
- Press and hold button.
- Timer will begin counting up from 00:00. Timer will count by Minutes :Seconds and then Hours: Minutes.
- Press button to pause and resume timer.
- Press and hold button to reset timer.
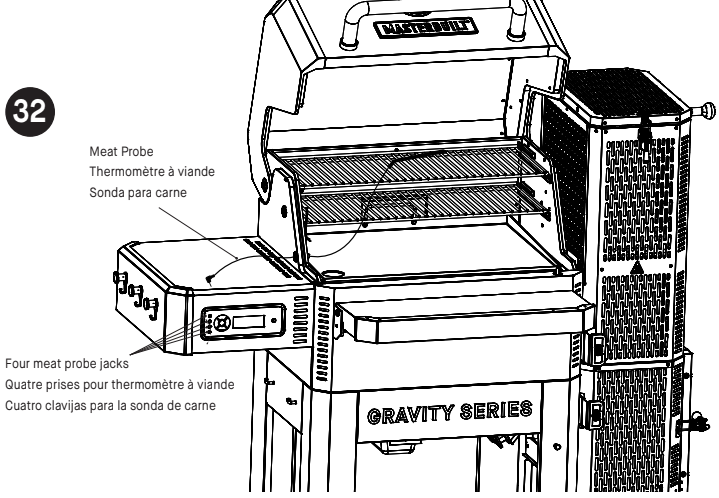
Set Meat Probe Temperatures:

- Press button and turn knob to select meat probe (MP1, MP2, MP3, MP4).
- Press temperature button.
- Turn knob to desired temperature.
- Press temperature button again to set the temperature. (If meat probe reaches 300°F, an alarm will sound and the meat probe must be removed from heat
and given time to cool. Meat probe will be damaged if left at this temperature.)
- NOTE: Meat probe icon will flash while in setting mode.
5.Once set temperature is reached, alarm will sound. Press any button to clear.
Viewing Information on Display:
• Turning the knob will advance the display through grill temperature, timer and meat probes; MP1, MP2, MP3 and MP4.
BLUETOOTH + WiFi
Pairing Grill with Smart Device(s):

- Download the Masterbuilt app from the Apple App Store or Google Play Store onto your smart device(s). For more information go to masterbuilt.com/pages/app-device-requirements.
- Once the download is complete, open the Masterbuilt app and follow the instructions for pairing your Bluetooth + WIFI grill and smart device(s).
BLUETOOTH

Pairing Grill with Smart Device(s):
- Download the Masterbuilt app from the Apple App Store or Google Play Store onto your smart device(s). For more information go to masterbuilt.com/pages/app-device-requirements.
- Once the download is complete, open the Masterbuilt app and follow the instruction for pairing your Bluetooth grill and smart device(s).
This device complies with Part 15 of the FCC Rules. Operation is subject to the following two conditions: - This device may not cause harmful interference, and
- This device must accept any interference received, including interference that may cause undesired operation.
FCC Warning
Warning: Changes or modifications to this smoker not expressly approved by the party responsible for compliance could void the user’s authority to operate the equipment.
FCC Statement
This equipment has been tested and found to comply with the limits for a Class B digital device, pursuant to Part 15 of the FCC Rules. These limits are designed to provide reasonable protection against harmful interference in a residential installation. This equipment generates, uses and can radiate radio frequency energy and if not installed and used in accordance with the instructions, may cause harmful interference to radio communications.
However, there is no guarantee that interference will not occur in a particular installation. If this equipment does cause harmful interference to radio or television reception, which can be determined by turning the equipment off and on, the user is encouraged to try to correct the interference by one or more of the following measures:
- Reorient or relocate the receiving antenna.
- Increase the separation between the equipment and receiver.
- Connect the equipment into an outlet on a circuit different from that to which the receiver is connected.
- Consult the dealer or an experienced radio/TV technician for help.
Note: If you lose connection, smoker will continue as programmed. Smoker can be operated from the control panel if pairing or connection fails.
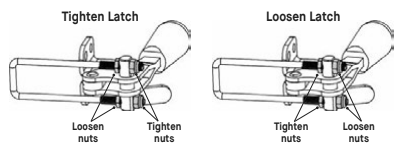
LATCH ADJUSTMENT
The hopper lid and door latches may require adjustment to ensure a proper seal and to prevent excessive smoke leakage. Loosen the latches slightly if they require excessive pressure to close. Tighten the latches slightly if there is excessive smoke leakage.
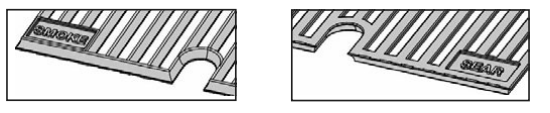
SMOKE + SEAR GRATES
Your grill features Smoke + Sear cast-iron cooking grates for low and slow smoking or high-heat searing. Simply flip the grates to the side that coincides with your method of cooking.
Note: Never flip while grill is on or hot.
CLEANING AND STORAGE
ALWAYS MAKE SURE GRILL IS COOL TO THE TOUCH BEFORE CLEANING AND STORING.
• Inspect hardware and assembled parts on a regular basis to ensure grill is in safe working condition.
• Clean grill and cooking/smoking grates with mild dish detergent. Wipe outside of grill with a damp rag.
DO NOT use oven cleaner or other cleaning agents. Make sure to dry thoroughly.
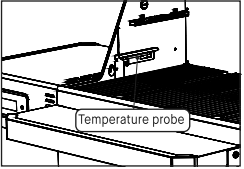
• Clean the temperature probe (pictured) periodically with mild dish detergent to ensure accurate grill temperature readings. Make
sure to dry thoroughly.
• After ashes are cold, clean ash tray and inside of bottom hopper after every use to remove ash buildup, residue and dust.
• Always empty the ash tray after each use once ashes have completely cooled. This will help prolong the life of the ash tray.
• Dispose of cold ashes by placing them in aluminum foil, soaking with water and discarding in a non-combustible container.
• Always cover and store grill in a protected DRY AREA. Store only when fire is out and all surfaces are cold. Store meat probes inside the home.
• When grill is not in frequent use, even when using a grill cover, remember to check your grill periodically to avoid possible rust and corrosion due to moisture buildup.
Troubleshooting
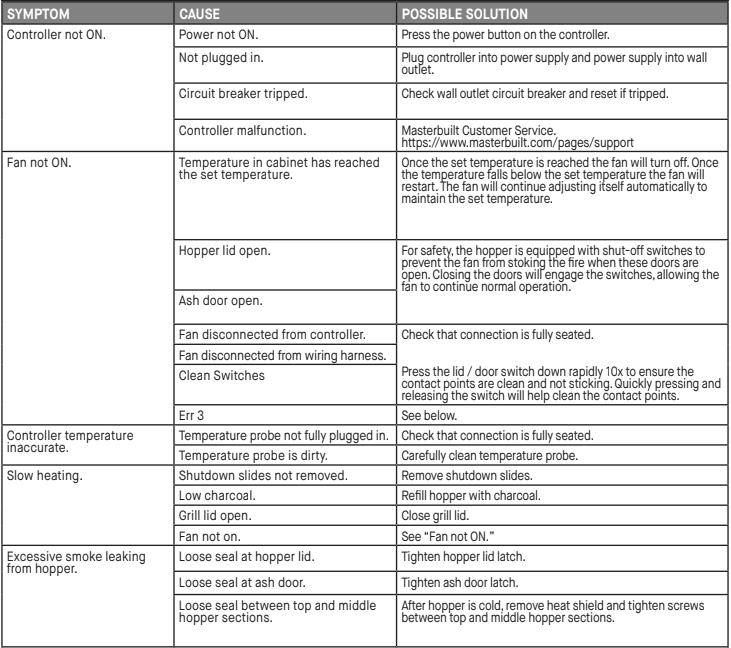
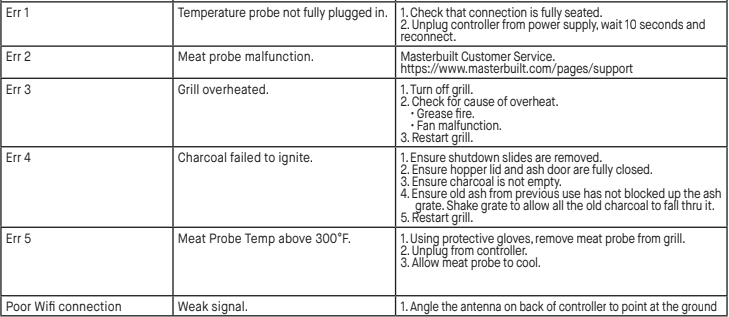
You can download the PDF version of the MASTERBUILT GRAVITY SERIES 800 GRIDDLETM Digital Charcoal Grill + Smoker User Manual here.