WARNING: This manual contains information on limitations regarding product use, function and information on the limitation as to liability of the manufacturer. The entire manual should be carefully read.
Safety Notes
This manual shall be used in conjunction with the Neo User Manual for the compatible alarm control panel: HS2016, HS2032, HS2064, HS2064 E, HS2128, HS2128 E. Refer to part #: 29009879R002 (International) or to part #: 29009883R002 (North American).
Always ensure you obtain the latest version of the User Guide. Updated versions of this User Guide are available by contacting your distributor.
Warning: Read and save these instructions! Follow all warnings and instructions specified within this document and/or on the equipment.
READ ALSO: PHILIPS ANDROID TV USER’S MANUAL (Televisions 5604 series 65PFL5604)
Important Safety Instructions
T o reduce the risk of fire, electric shock and/or injury, observe the following:
- Do not spill any type of liquid on the equipment.
- Do not attempt to service this product yourself. Opening or removing the cover may expose you to dangerous voltage or other risk. Refer servicing to qualified service personnel. Never open the device yourself.
- Do not touch the equipment and its connected cables during an electrical storm; there may be a risk of electric shock.
- Do not use the Alarm System to report a gas leak if the system is near a leak.
Regular Maintenance and Troubleshooting
Keep your HS2TCHP Touchscreen keypad in optimal condition by following all the instructions that are included within this manual and/or marked on the product.
Handling Precautions
Do not apply excessive force to the display surface or the adjoining areas since this may cause the color tone to vary.
Cleaning
- If the display surface is contaminated, breathe on the surface and gently wipe it with a soft, dry cloth. If still not completely clean, moisten cloth with isopropyl alcohol.
- Do not use abrasives, water, thinners, solvents or aerosol cleaners (spray polish), any aromatic solvents, ketones etc. that may enter through holes in the HS2TCHP Touchscreen keypad and cause damage.
Troubleshooting
Occasionally, you may have a problem with your system. If this happens, your Alarm Controller will display an error message. Refer to the provided list when you see an error message on the display. If additional help is required, contact your distributor for service.
Warning: This equipment, HS2TCHP Touchscreen keypad shall be installed and used within an environment that provides the pollution degree max 2 and over-voltages category II non-hazardous locations, indoor only. It is designed to be installed, serviced and/or repaired by service persons only [service person is defined as a person having the appropriate technical training and experience necessary to be aware of hazards to which that person may be exposed in performing a task and of measures to minimize the risks to that person or other persons]. There are no parts replaceable by the end-user within this equipment.
Warning: Never obstruct the access to the Alarm controller to which this equipment is connected. These safety instructions should not prevent you from contacting the distributor and/or the manufacturer to obtain any further clarification and/or answers to your concerns.
Quick Start
| Arming | ||
| Away Arm | Description: Method: Indications: | Arms all interior and exterior sensors Press anywhere on the top banner of the home page The Armed ( ) LED lights. Top banner turns red and displays “Armed”. Exit delay timer starts. |
| Stay Arm | Description: Method: Indications: | Arms all exterior sensors. Does not arm interior sensors Press Stay Arm button Armed ( ) LED lights. Top banner turns red and displays “Armed” |
| Disarm | Description: Method: Indications: | Deactivates all interior and exterior sensors Press anywhere on the top banner of the home page Ready ( ) LED lights. Top banner turns green and displays “Disarmed” |
| Bypass | Description: Method: Indications: | Excludes selected zones from activating the alarm when the system is armed Press Zone Status to display available zones, then press the Bypass button beside a zone The Bypass button changes to Unbypass |
| Common Functions | ||
| View Alarms | Description: Method: Indications: | View which zones have triggered alarms Press the ! button (visible if an alarm has occurred) The ! button is displayed at the top, right side of the screen |
| View Troubles | Description: Method: Indications: | View system troubles Press the ! button (visible if an alarm has occurred) The ! button is displayed at the top, right side of the screen |
| Perform System Test | Description: Method: Indications: | Tests the keypad sounder, siren, status lights and backup battery Options + User Functions + [Access Code] + System Test Sounder and siren activate for 2 seconds, all lights turn on, Ready, Armed and Trouble lights flash for duration of test |
| Set Time/Date | Description: Method: Indications: | Adjusts the time and date displayed on the home page Options + User Functions + [access code] + Time & Date. Press the section you want to change (e.g., Hrs) then use the arrow keys to change the value. Press Save Changes are displayed in the top, right corner of the home page |
| Turn Chime On/Off | Description: Method: Indications: | Turns the door chime function on/off Press Chime On: sounder emits 3 short beeps. Chime icon displays a checkmark. Off: sounder emits 1 long beep. Chime icon displays an X. |
| Change screen brightness | Description: Method: Indications: | Adjusts the brightness and contrast of the touchscreen Options + User Functions + [Access Code] + Keypad Config + Display Options Use the sliders to increase or decrease the screen brightness Screen brightness adjusts as the slider is moved |
| Change Buzzer Volume | Description: Method: Indications: | Adjusts the level of the keypad buzzer Options + User Functions + [Access Code] + Keypad Config + Buzzer Control Use the slider to increase or decrease the buzzer volume The buzzer beeps at the selected volume level |
Introduction
Figure 1- Controls and Indicators
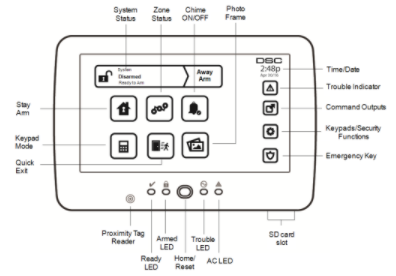
The HS2TCHP Touchscreen is an interactive touch-sensitive color LCD that can be used on any PowerSeries Neo control panel. Due to the custom requirements of individual installations, some of the features described here may perform differently than described. Consult your installer for the details of your specific installation and to the User Manual for general security system information.
Testing
To ensure that your system continues to function as intended, you must test it weekly. Please refer to the “Testing your System” section in this manual. If your system does not function properly, call your installing company for service.
Monitoring
This system is capable of transmitting alarms, troubles and emergency information to a central station. If you initiate an alarm by mistake, immediately call the central station to prevent an unnecessary response.
Using Your System
This section provides additional information about how to use your alarm system.
When Alarm Sounds
The system can generate 3 different alarm sounds:
- Temporal/pulsed siren = Fire Alarm
- 4 beeps, 5-second pause, 4 beeps = Carbon Monoxide Alarm
- Continuous siren = Intrusion (Burglary Alarm)
Note: The priority of signals is fire alarm, carbon monoxide alarm and medical alarm, then burglary alarm.
Note: Medical alarm is silent. It only results in an alarm transmission to the monitoring station.
Intrusion (Burglary) Alarm Continuous Siren
If you are unsure of the source of the alarm, approach with caution! If the alarm was accidental, enter your Access Code to silence the alarm. Call your central station to avoid a dispatch.
If the Intrusion Alarm was Accidental
- Enter your Access Code to silence the alarm. If the code is entered within 30s (or the programmed value of the alarm transmission delay) the transmission of the alarm to the monitoring station will be canceled.
- Call your central station to avoid a dispatch.
Fire Alarm Pulsed Siren
Follow your emergency evacuation plan immediately!
If the fire alarm was accidental (e.g., burned toast, bathroom steam, etc.), enter your Access Code to silence the alarm. Call your central station to avoid a dispatch. Ask your alarm company if your system has been equipped with fire detection. To reset the detectors, see the Sensor Reset section.
Wireless Carbon Monoxide Alarm
Activation of your CO alarm indicates the presence of carbon monoxide (CO), which can be fatal. During an alarm, the red LED on the CO detector flashes rapidly and the buzzer sounds with a repeating cadence of: 4 quick beeps, 5-second pause, 4 quick beeps. Also, during an alarm, the siren connected to the control panel produces a repeating cadence of 4 quick beeps, 5-second pause, 4 quick beeps. The keypad will also provide audible and visual indication of the CO alarm.
If an Alarm Sounds:
- Operate silence button.
- Call emergency services or your fire department.
- Immediately move outdoors or to an open door/window.
Warning: Carefully review your Carbon Monoxide Installation/User Guide to determine the necessary actions required to ensure your safety and ensure that the equipment is operating correctly. Incorporate the steps outlined in the guide into your evacuation plan.
Note: Fire and CO alarms are silenced by entering a valid access code. A message “Bell Silenced” is displayed on an LCD or touch screen keypad. The message is cleared once all the Fire zones or CO zones have been restored on system.
Troubles
When a trouble condition is detected, the Trouble ( ) or System indicator will turn on, and the keypad will beep every 10 seconds. Press the ( ) key to silence the beeps. Press ( ) to view the trouble condition. The Trouble ( ) or System indicator will flash. The corresponding trouble will light up.
| Troubles | Comments | Action |
| Service Required (Press for more details) | Low Battery General System Supervision Bell Circuit RF Jam Detected General System Trouble Panel Low Battery General System Tamper Panel AC Loss | Call for service |
| AC Loss | If the building and/or neighborhood has lost electrical power, the system will continue to operate on battery for several hours. | Call for service |
| Phone Trouble | The system has detected that the telephone line is disconnected. | Call for service |
| Communication Failure | The system attempted to communicate with the monitoring station, but failed. This may be due to Telephone Line Fault. | Call for service |
| Zone Fault | The system is experiencing difficulties with one or more sensors on the system. Press to display the zone. | Call for service |
| Zone Tamper | The system has detected a tamper condition with one or more sensors on the system. Press to display the zone. | Call for service |
| Wireless Low Battery | The system has detected a low battery condition with one or more modules/sensors on the system. Press to display the zone, keypad, wireless key(s) and RF Delinquency low battery conditions. Press again to see zone troubles. | Call for service |
| Loss of Clock | If complete power was lost (AC and Battery), the time and date will need to be reprogrammed. | Reprogram Time & Date |
Note: For UL installations, Access Code Required for [][2] must be enabled by the installer. When enabled, trouble beeps are silenced when the [][2] menu has been entered and exited.
Note: If the wireless fire or CO low battery/tamper troubles are not removed, trouble beeps restart every 4 hours after being silenced.
Additional Functions
Photos
You can create a slideshow of photos to View on the keypad. Photos are added using an SD card (32x24x2.1 mm. Not supplied). See online user manual for details.
Quick Exit
If the system is armed and you need to exit, use the quick exit function to avoid disarming and rearming the system. To activate this function, tap the Quick Exit icon. You have 2 minutes to leave the premises through your exit door. When the door is closed again the remaining exit time is canceled.
Time & Date Programming
Tap on Options. Select User Functions [Master Code] and then select Time & Date. Tap on the section you would like to change and use the up/down arrows to change time/date. Once done, press Save.
Keypad Mode
This option allows the HS2TCHP Touchscreen to function as a traditional DSC keypad.
Door Chime (Chime enable/disable)
The keypad indicates the current state of the door chime function (Enabled or Disabled). To choose the opposite function, tap the ‘Chime’ icon. Three beeps indicate that the chime is ON (Enabled). One long beep indicates that chime is OFF (Disabled).
Note: The door chime feature should be used in Disarmed mode only.
Zone Status
This screen allows you to view the status of the zones on the system.
Zone Status Indicators


Options Menu
Access the following functions by pressing Options on the right side of the home page. See the online HS2TCHP
User Manual for more information.
- Access Codes
- Installer Menu
- User Functions
- Chime Enabled/Disabled
- Partition Status
- Keypad Mode
Access Codes
For more information, see the online HS2TCHP User Manual.
User Functions
Access the following user functions by pressing Options + User Functions + [Access Code]. For more information, see the online HS2TCHP User Manual.
Keypad Configuration
The following options can be configured:
Display Options: sets the brightness and screen timeout of the Touchscreen, as well as screen saver options.
Buzzer Control: sets the buzzer volume of the Touchscreen. Note: For SIA CP-01, the buzzer volume shall not be placed at the minimum setting.
Note: For UL/ULC installations, the buzzer level shall not be changed from the default level.
Picture Frame: selects the pictures that will be displayed on the slideshow.
Calibration: calibrates the Touchscreen.
Clock Mode: displays the digital clock.
Clean Mode: allows the user to touch (i.e., clean) the screen without enabling or disabling any functions. The screen will remain in this mode for 30 seconds, then return to the Keypad Configuration screen.
Home Page: can be configured in one of two different views, Classic (square buttons) and Contemporary (rondel).
Chime Enabled/Disabled
Door Chime: To turn the door chime function On/Off, tap the Chime icon. 3 beeps indicate that the chime is ON. 1 long beep indicates the Chime is OFF.
Partition Status
To view the partition status, press Options, User Functions, then Partition Status. The keypad shows basic status for up to 8 partitions, depending on the configuration of your system. Each partition is identified along with its current status.
Keypad Mode
This option allows the HS2TCHP Touchscreen to function as a traditional DSC keypad.
Emergency Keys
When the emergency key is pressed, a new screen is displayed with:
| Fire | Fire Assistance Required. Press and hold for 2 seconds to activate. |
| Medical | Medical Assistance Required. Press and hold for 2 seconds to activate. |
| Panic | Police Assistance Required. Press and hold for 2 seconds to activate. |
Important: The Medical and Panic keys are ON by default. The Fire key will not function unless programmed by the Installer. Please ask your installer if the Fire, Medical and Panic keys are enabled.
Testing Your System
Note: If you are going to perform a System Test, call your Monitoring Station to inform them when you begin and also when you end the test.
Testing Your Keypad Sounder and Siren
The System Test performs a two-second check of the keypad sounder and bell or siren, in addition to testing the keypad status lights and the panel backup battery.
- Press Options, User Functions [Master Code], then System Test. The following will occur:
- The system activates all keypad sounders and bells or sirens for 2 seconds. All keypad lights turn ON.
- The Ready, Armed, and Trouble LEDs will flash for the duration of the test.
2. To exit the function menu, press [#].
Testing Your Entire System
All smoke detectors in this installation must be tested by your smoke detector installer or dealer once a year to ensure they are functioning correctly.
Note: Should the system fail to function properly, call your installation company for service immediately.
- Prior to testing, ensure that the system is disarmed and the Ready light is on.
- Close all zones to return the system to the Ready state.
- Perform a System Test by following the steps in the “Testing Your Keypad Sounder and Siren” section.
- To test the zones, activate each detector in turn (e.g., open each door/window or walk in motion detector areas).
Note: Some features described above will not be functional unless enabled by your installer. Ask your installer which features are functional on your system.
On an HS2TCHP keypad, the following message will be displayed when each zone (detector) is activated:
“Ready to Force,” “Not Ready”. Use the zone status button to view which zones are open. The message will disappear when the zones are closed.
Note: If your system has PIR cameras enrolled, two images from each PIR camera are sent to the monitoring station during a system test.
Walk Test Mode
The installer can initiate a Walk Test mode for the system. While in Walk Test mode, the Ready, Armed, and Trouble LEDs will flash to indicate that Walk Test is active. When the system automatically terminates the Walk Test mode, it will annunciate with an audible warning (5 beeps every 10 seconds), beginning five minutes prior to the termination of the test.
License Agreement
IMPORTANT – READ CAREFULLY: DSC Software purchased with or without Products and Components is copyrighted and is purchased under the following license
terms:
- This End-User License Agreement (“EULA”) is a legal agreement between You (the company, individual or entity who acquired the Software and any related Hardware) and Digital Security Controls, a division of Tyco Safety Products Canada Ltd. (“DSC”), the manufacturer of the integrated security systems and the developer of the software and any related products or components (“HARDWARE”) which You acquired.
- If the DSC software product (“SOFTWARE PRODUCT” or “SOFTWARE”) is intended to be accompanied by HARDWARE, and is NOT accompanied by new
HARDWARE, You may not use, copy or install the SOFTWARE PRODUCT. The SOFTWARE PRODUCT includes computer software, and may include associated
media, printed materials, and “online” or electronic documentation. - Any software provided along with the Software Product that is associated with a separate end-user license agreement is licensed to You under the terms of that license agreement.
- By installing, copying, downloading, storing, accessing or otherwise using the Software Product, You agree unconditionally to be bound by the terms of this EULA, even if this EULA is deemed to be a modification of any previous arrangement or contract. If You do not agree to the terms of this EULA, DSC is unwilling to license the Software Product to You, and You have no right to use it.
READ ALSO: Element ELEFW328 32″ HD Digital LED TV INSTRUCTION MANUAL
SOFTWARE PRODUCT LICENSE
The SOFTWARE PRODUCT is protected by copyright laws and international copyright treaties, as well as other intellectual property laws and treaties. The
SOFTWARE PRODUCT is licensed, not sold.
- GRANT OF LICENSE This EULA grants You the following rights:
(a)Software Installation and Use – For each license You acquire, You may have only one copy of the SOFTWARE PRODUCT installed.
(b)Storage/Network Use – The SOFTWARE PRODUCT may not be installed, accessed, displayed, run, shared or used concurrently on or from different computers, including a workstation, terminal or other digital electronic device (“Device”). In other words, if You have several workstations, You will have to acquire a license for each workstation where the SOFTWARE will be used.
(c)Backup Copy – You may make back-up copies of the SOFTWARE PRODUCT, but You may only have one copy per license installed at any given time. You may use
the back-up copy solely for archival purposes. Except as expressly provided in this EULA, You may not otherwise make copies of the SOFTWARE PRODUCT, including the printed materials accompanying the SOFTWARE.
- DESCRIPTION OF OTHER RIGHTS AND LIMITATIONS
(a) Limitations on Reverse Engineering, Decompilation and Disassembly – You may not reverse engineer, decompile, or disassemble the SOFTWARE PRODUCT, except and only to the extent that such activity is expressly permitted by applicable law notwithstanding this limitation. You may not make any changes or modifications to the Software, without the written permission of an officer of DSC. You may not remove any proprietary notices, marks or labels from the Software Product. You shall institute reasonable measures to ensure compliance with the terms and conditions of this EULA.
(b) Separation of Components – The Software Product is licensed as a single product. Its component parts may not be separated for use on more than one HARDWARE unit.
(c) Single INTEGRATED PRODUCT – If You acquired this SOFTWARE with HARDWARE, then the SOFTWARE PRODUCT is licensed with the HARDWARE as a single integrated product. In this case, the SOFTWARE PRODUCT may only be used with the HARDWARE as set forth in this EULA.
(d) Rental – You may not rent, lease or lend the SOFTWARE PRODUCT. You may not make it available to others or post it on a server or web site.
(e) Software Product Transfer – You may transfer all of Your rights under this EULA only as part of a permanent sale or transfer of the HARDWARE, provided You retain no copies, You transfer all of the SOFTWARE PRODUCT (including all component parts, the media and printed materials, any upgrades and this EULA), and provided the recipient agrees to the terms of this EULA. If the SOFTWARE PRODUCT is an upgrade, any transfer must also include all prior versions of the SOFTWARE PRODUCT.
(f) Termination – Without prejudice to any other rights, DSC may terminate this EULA if You fail to comply with the terms and conditions of this EULA. In such event,
You must destroy all copies of the SOFTWARE PRODUCT and all of its component parts.
(g) Trademarks – This EULA does not grant You any rights in connection with any trademarks or service marks of DSC or its suppliers.
- COPYRIGHT
All title and intellectual property rights in and to the SOFTWARE PRODUCT (including but not limited to any images, photographs, and text incorporated into the SOFTWARE PRODUCT), the accompanying printed materials, and any copies of the SOFTWARE PRODUCT, are owned by DSC or its suppliers. You may not copy the printed materials accompanying the SOFTWARE PRODUCT. All title and intellectual property rights in and to the content which may be accessed through use of the SOFTWARE PRODUCT are the property of the respective content owner and may be protected by applicable copyright or other intellectual property laws and treaties.
This EULA grants You no rights to use such content. All rights not expressly granted under this EULA are reserved by DSC and its suppliers. - EXPORT RESTRICTIONS
You agree that You will not export or re-export the SOFTWARE PRODUCT to any country, person, or entity subject to Canadian export restrictions. - CHOICE OF LAW
This Software License Agreement is governed by the laws of the Province of Ontario, Canada. - ARBITRATION
All disputes arising in connection with this Agreement shall be determined by final and binding arbitration in accordance with the Arbitration Act, and the parties agree to
be bound by the arbitrator’s decision. The place of arbitration shall be Toronto, Canada, and the language of the arbitration shall be English. - LIMITED WARRANTY
(a) NO WARRANTY – DSC PROVIDES THE SOFTWARE “AS IS” WITHOUT WARRANTY. DSC DOES NOT WARRANT THAT THE SOFTWARE WILL MEET YOUR REQUIREMENTS OR THAT OPERATION OF THE SOFTWARE WILL BE UNINTERRUPTED OR ERROR-FREE.
(b) CHANGES IN OPERATING ENVIRONMENT – DSC shall not be responsible for problems caused by changes in the operating characteristics of the HARDWARE, or for problems in the interaction of the SOFTWARE PRODUCT with non-DSC-SOFTWARE or HARDWARE PRODUCTS.
(c) LIMITATION OF LIABILITY – WARRANTY REFLECTS ALLOCATION OF RISK – IN ANY EVENT, IF ANY STATUTE IMPLIES WARRANTIES OR CONDITIONS NOT STATED IN THIS LICENSE AGREEMENT, DSC’S ENTIRE LIABILITY UNDER ANY PROVISION OF THIS LICENSE AGREEMENT SHALL BE LIMITED TO THE GREATER OF THE AMOUNT ACTUALLY PAID BY YOU TO LICENSE THE SOFTWARE PRODUCT AND FIVE CANADIAN DOLLARS (CAD$5.00). BECAUSE SOME JURISDICTIONS DO NOT ALLOW THE EXCLUSION OR LIMITATION OF LIABILITY FOR CONSEQUENTIAL OR INCIDENTAL DAMAGES, THE ABOVE LIMITATION MAY NOT APPLY TO YOU.
(d) DISCLAIMER OF WARRANTIES – THIS WARRANTY CONTAINS THE ENTIRE WARRANTY AND SHALL BE IN LIEU OF ANY AND ALL OTHER WARRANTIES, WHETHER EXPRESSED OR IMPLIED (INCLUDING ALL IMPLIED WARRANTIES OF MERCHANTABILITY OR FITNESS FOR A PARTICULAR PURPOSE) AND OF ALL OTHER OBLIGATIONS OR LIABILITIES ON THE PART OF DSC. DSC MAKES NO OTHER WARRANTIES. DSCNEITHER ASSUMES NOR AUTHORIZES ANY OTHER PERSON PURPORTING TO ACT ON ITS BEHALF TO MODIFY OR TO CHANGE THISWARRANTY, NOR TO ASSUME FOR IT ANY OTHER WARRANTY OR LIABILITY CONCERNING THIS SOFTWARE PRODUCT.
(e) EXCLUSIVE REMEDY AND LIMITATION OF WARRANTY – UNDER NO CIRCUMSTANCES SHALL DSC BE LIABLE FOR ANY SPECIAL,INCIDENTAL, CONSEQUENTIAL OR INDIRECT DAMAGES BASED UPON BREACH OF WARRANTY, BREACH OF CONTRACT, NEGLIGENCE, STRICTLIABILITY, OR ANY OTHER LEGAL THEORY. SUCH DAMAGES INCLUDE, BUT ARE NOT LIMITED TO, LOSS OF PROFITS, LOSS OF THESOFTWARE PRODUCT OR ANY ASSOCIATED EQUIPMENT, COST OF CAPITAL, COST OF SUBSTITUTE OR REPLACEMENT EQUIPMENT,FACILITIES OR SERVICES, DOWN TIME, PURCHASERS TIME, THE CLAIMS OF THIRD PARTIES, INCLUDING CUSTOMERS, AND INJURY TOPROPERTY.
FCC Compliance Statement-
CAUTION: Changes or modifications not expressly approved by DSC could void your authority to use this equipment.
This equipment generates and uses radio frequency energy and if not installed and used properly, in strict accordance with the manufacturer’s instructions, may cause interference to radio and television reception. It has been type tested and found to comply with the limits for Class B device in accordance with the specifications in Subpart “B” of Part 15 of FCC Rules, which are designed to provide reasonable protection against such interference in any residential installation. However, there is no guarantee that interference will not occur in a particular installation. If this equipment does cause interference to television or radio reception, which can be determined by turning the equipment off and on, the user is encouraged to try to correct the interference by one or more of the following measures:
- Re-orient the receiving antenna
- Relocate the alarm control with respect to the receiver
- Move the alarm control away from the receiver
- Connect the alarm control into a different outlet so that alarm control and receiver are on different circuits.
If necessary, the user should consult the dealer or an experienced radio/television technician for additional suggestions. The user may find the following booklet prepared by the FCC helpful: “How to Identify and Resolve Radio/ Television Interference Problems”. This booklet is available from the U.S. Government Printing Office, Washington, D.C. 20402, Stock # 004-000-00345-4.
This Class B digital apparatus complies with CAN ICES-3(b)/nmb-3(b).
EN50131-1 Grade2/Class II
The Model HS2TCHP Keypad has been certified by Telefication according to EN50131-1:2006 + A1:2009, EN50131-3:2009 for Grade 2, Class II.
Note: For EN50131 compliant installations the following functions (initiated from the keypad emergency buttons) have to be disabled:
- Fire Alarm function
- Auxiliary (Medical) Alarm function
- Panic Alarm function
© 2017 Tyco Security Products. All Rights Reserved Toronto, Canada • www.dsc.com
The trademarks, logos, and service marks displayed on this document are registered in the United States [or other countries]. Any misuse of the trademarks is strictly prohibited and Tyco will aggressively enforce its intellectual property rights to the fullest extent of the law, including pursuit of criminal prosecution wherever necessary. All trademarks not owned by Tyco are the property of their respective owners, and are used with permission or allowed under applicable laws. Product offerings and specifications are subject to change without notice.
Actual products may vary from photos. Not all products include all features. Availability varies by region; contact your sales representative.
You can download the PDF version of HS2TCHP Touchscreen User Guide here.