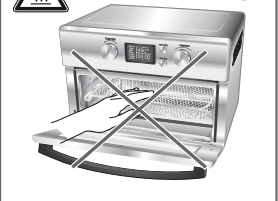
IMPORTANT SAFEGUARDS
When using electrical appliances, basic safety precautions should always be followed, including the following:
Read all instructions before use.
• Do not touch hot surfaces. Use handles or knobs.
• WARNING – to protect against electric shock, fire and personal injury:
- Do not immerse cord, plug or appliance in water or other liquids;
- Do not immerse the appliance or any electrical components in water or any other liquids;
- Always switch off and unplug the appliance before cleaning.
- Close supervision is necessary when any appliance is used by or near children.
- Never leave the appliance unattended during operation.
- Unplug from wall outlet when the appliance is not in use, before putting on or taking off parts, and before cleaning. Allow to cool before handling, putting on or taking off parts, and before cleaning the appliance.
- Do not operate any appliance with a damaged cord or plug, or after the appliance malfunctions or has been damaged in any manner. Call our toll-free customer assistance number for information on examination, repair, or adjustment.
- The use of accessory attachments not recommended by the appliance manufacturer may result in fire, electric shock or injuries to persons.
- Do not use outdoors or in a damp area.
- Do not place the appliance close to the edge of the countertop.
- Do not let power cord hang over edge of table or counter, or touch hot surfaces.
- Do not place on or near a hot gas or electric burner or in a heated oven.
- Do not use appliance for other than intended use.
- Do not clean with metal scouring pads. Pieces can break off the pad and touch electrical parts involving a risk of electric shock.
- Do not use metal utensils to remove lodged food, as this may result in personal injuries or damages.
- To turn off and disconnect, press the START/CANCEL Button to stop the cooking process if necessary, wait for 30 seconds until the LCD Display turns off and then remove plug from wall outlet.
- Extreme caution must be used when moving an appliance containing hot oil or other hot liquids.
- Do not store any materials, other than manufacturers recommended accessories, in this appliance when not in use.
- Do not place any object made of the following materials in the appliance: paper, cardboard, plastic, wood, rubber, foam and cloth.
- Extreme caution should be exercised when using containers constructed of other than metal or glass.
- Oversized foods, metal foil packages, or metal utensils must not be inserted in the appliance as they may create a fire or risk of electric shock.
- Ensure a minimum distance around the appliance of at least 8 inches to other objects, cupboards and walls.
- A fire may occur if the appliance is covered or touching flammable material, including curtains, draperies, walls and the like, when in operation. Do not store any items on top of the appliance when in operation.
- Do not cover crumb tray or any part of the appliance with metal foil. This will cause overheating of the appliance.
- Use extreme caution when disposing of hot grease or removing the Cooking Basket, Crumb/Drip Tray, Cooking Rack or Cooking Pan. Always use oven mitts.
- CAUTION – To ensure continued protection against risk of electric shock, connect to properly grounded outlets only (if the appliance is of the grounded type).
- Always use the appliance in a well-ventilated area.
- Do not place any object on top of the appliance.
- Do not fill the cooking vessel with oil or liquid of any kind. This appliance cooks with hot air only.
- The outer surfaces of the appliance may become hot during use. The accessories will be hot. Always wear oven mitts when removing or handling hot components.
- Immediately switch off and unplug the appliance if you see dark smoke coming out of the appliance. Wait for the smoke emission to stop before you remove the Cooking Basket, Crumb/Drip Tray, Cooking Rack or Cooking Pan from the appliance.
- This appliance has important markings on the plug blade. The attachment plug or entire cord set is not suitable for replacement. If damaged, the appliance shall be replaced.
- Always place the appliance on a level, heat resistant and stable surface.
- Let the appliance cool down for approximately 30 minutes before handling or cleaning it.
ADDITIONAL SAFEGUARDS
This appliance is for HOUSEHOLD USE ONLY.
WARNING: DO NOT OPERATE THIS APPLIANCE, IF THE POWER CORD SHOWS DAMAGE OR IF APPLIANCE WORKS INTERMITTENTLY OR STOPS WORKING ENTIRELY.
- A short power-supply cord is provided to reduce the risk resulting from becoming entangled in or tripping over a longer cord.
- Longer extension cords are available and may be used if care is exercised in their use.
- If an extension cord is used:
- The marked electrical rating of the extension cord should be at least as great as the electrical rating of the appliance.
- The appliance is of the grounded type, the extension cord should be a grounding 3-wire cord; and
- The longer cord should be arranged so that it does not drape over the countertop or table top where it can be pulled on by children or
tripped over unintentionally.
Grounding instructions
This appliance must be grounded while in use. Do not remove or ignore the grounding pin during use.
WARNING: To ensure continued protection against risk of electric shock, connect to properly grounded outlets only.
- Do not let children handle or put the electrical cord into their mouths
PARTS
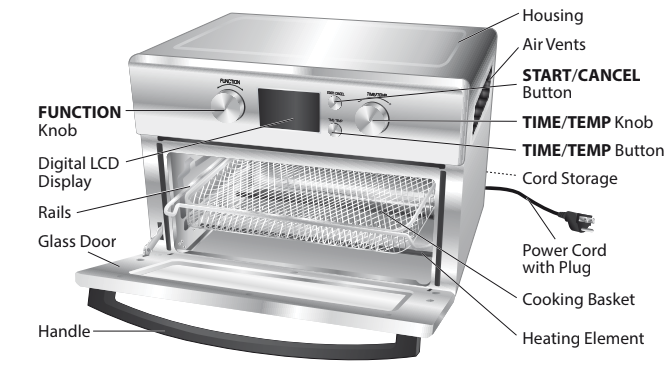
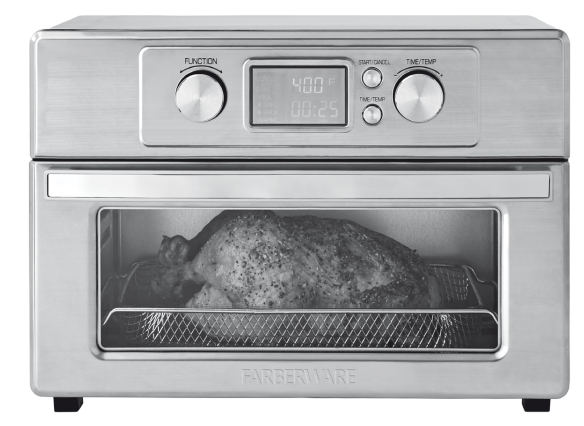
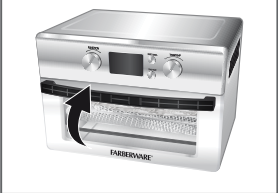
KNOW YOUR AIR FRYER TOASTER OVEN
Prepare your favorite foods and snacks in a quick, healthy, and easy way with your new Farberware Air Fryer Toaster Oven. The Air Fryer Toaster Oven is a versatile oven that uses rapid hot air technology to rapidly and evenly cook all your favorite foods when used on the air frying setting.
This Air Fryer Toaster Oven features:
• 7 preset functions (AIR FRY, BAKE, BROIL, CONVECTION BAKE, CONVECTION BROIL, TOAST, WARM).
• Versatile control of the cooking time and temperature.
• A temperature control range of 150°F – 450°F (65°C – 232°C) (different range according to different setting).
• A timer range from 1 to 120 minutes (different range according to different setting), which is equipped with an auto shut-off feature. Once the timer reaches 00:00, the appliance will beep 3 times and turn itself off.
Other great advantages provided by your Air Fryer Toaster Oven include:
• Fast cooking, with little to no preheating required.
• Quick and easy clean-up: the accessories are dishwasher safe.
• Versatility – with its frying, baking, grilling, and roasting capabilities, this appliance serves as a great cooking tool for a busy kitchen.
OPERATION
WARNING: Always wear oven mitts to prevent burns when handling the appliance. Escaping steam can burn and the appliance Housing is hot.
Before first use
• Remove all packaging materials and/or other transportation means.
• Remove all accessories from the appliance.
• Check package content to verify it is complete and undamaged. Do not operate the appliance if the content is incomplete or appears damaged. Return it immediately to Walmart.
Danger of suffocation!
- Packaging materials are not toys. Always keep plastic bags, foils and foam parts away from babies and children. Packaging material could block airways and prevent breathing.
NOTE:
- Always use the appliance with the Crumb/Drip Tray and Cooking Basket / Cooking Rack / Cooking Pan.
- The appliance may produce an odor and emit smoke when switched on for the first time, as residues from the production process are eliminated. This is normal and does not indicate a defect or hazard.
• When using the appliance for the first time, it is recommended to operate it for at least 15 minutes on its highest temperature setting with the Glass Door open, until no odor or smoke is present. During use, ensure ample ventilation.
• Let the appliance cool completely.
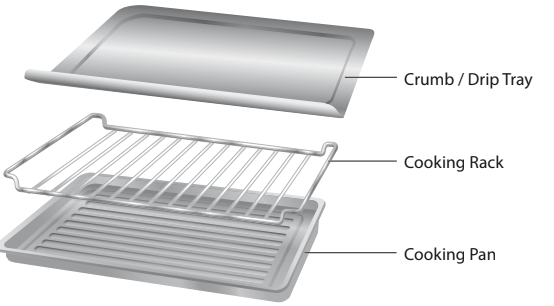
Accessories
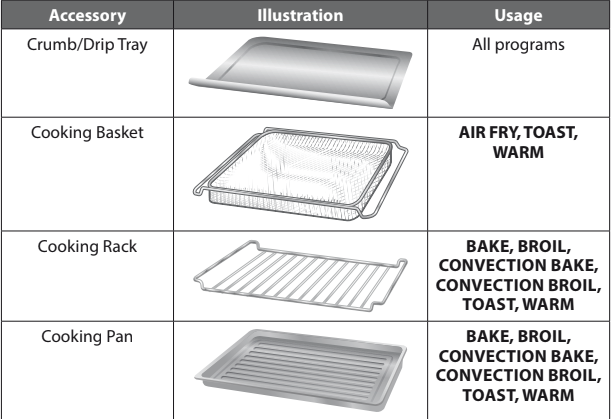
Cooking programs
The appliance is equipped with several pre-set cooking programs. The cooking times and temperatures can be adjusted to suit your own taste, food quantities and food manufacturers’ instructions. (According to different setting)
WARNING: Always use the appliance with the Crumb/Drip Tray in place under the lower Heating Elements.
| Cooking program | Display | Default time / Time range (min.) | Default temperature / Temperature Range (°F) | Accessories | Rail position |
| Air Fry | Air fry | 25 / 1~45 | 400 / 150~400 | Cooking Basket | Upper |
| Bake | Bake | 25 / 1~90 | 350 / 150~425 | Cooking Rack or Cooking Pan or Cooking Basket | Lower |
| Broil | Broil | 10 / 1~30 | 400 / 150~400 | Cooking Rack or Cooking Pan or Cooking Basket | |
| Convection Bake | Bake | 20 / 1~90 | 350 / 150~425 | Cooking Rack or Cooking Pan or Cooking Basket | |
| Convection Broil | Broil | 10 / 1~30 | 400 / 150~400 | Cooking Rack or Cooking Pan or Cooking Basket | |
| Toast | Toast | 4’35” | 450 | Cooking Basket or Cooking Rack or Cooking Pan | Upper |
| Warm | Warm | 30 / 1~120 | 150 | Cooking Basket or Cooking Rack or Cooking Pan |
USING THE APPLIANCE
This appliance can be used for preparing fries and potatoes, meat and poultry, snacks and baking, toasting, broiling, roasting, defrosting frozen food or reheating or keeping cooked food warm ( Recommended cooking times and temperatures).
When using the air frying setting, this appliance uses a combination of hot air, high speed air circulation and a top Heating Element to cook food from all sides. It is an alternative way to cook food and snacks in a quick, healthy and easy way.
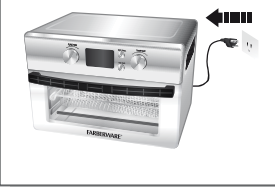
NOTE: The appliance has a rated power of 1800W. Before plugging it into the wall outlet, ensure that the electrical circuit is not overloaded with other appliances. This appliance should always be operated on a separate 120V ~ 60Hz wall outlet.
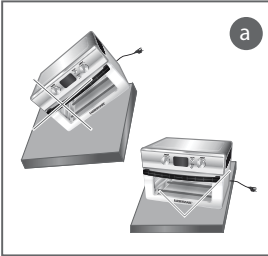
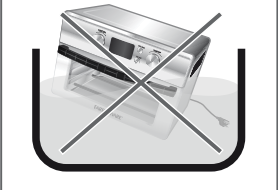
• Place the appliance on a clean, flat and heat resistant surface (ill. a ).
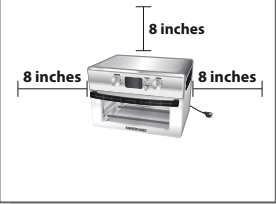
• When using the appliance ensure a minimum distance around the appliance of at least 8 inches to other objects, cupboards and walls (ill. b ).
a.
b.
WARNING
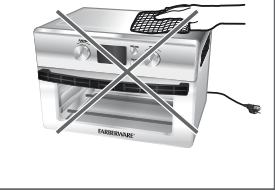
- Only use accessories recommended by the manufacturer. Do not place any other accessories in the appliance.
- Do not cover or insert any objects into the Air Vents.
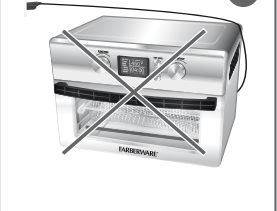
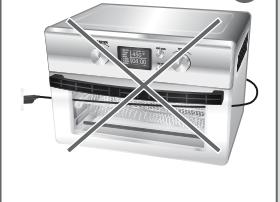
- Never let the Power Cord come in contact with the Housing of the appliance during use (ill. c ) or allow it to be trapped by the Glass Door
(ill. d ).
c.
d.
Danger of burns!
- Always pay special attention when placing or removing accessories and food from the appliance. Never place your bare hand inside the appliance to remove accessories (ill. e ) or touch the Housing / Glass Door (ill. f ) when the appliance is plugged in and switched on. Always use oven mitts when inserting or removing items from the appliance.
e.
f.
- Escaping steam can burn, use caution.
- Never place the hot Cooking Basket, Crumb / Drip Tray, Cooking Rack or Cooking Pan directly on a table or counter top to avoid damage to surfaces. It is recommended to use a heat resistant trivet or cutting board.
WARNING:
- Always use the appliance with the Crumb/Drip Tray and Cooking Basket / Cooking Rack / Cooking Pan.
- To prevent any food from contacting the Heating Element, do not overfill the Cooking Basket / Cooking Rack / Cooking Pan. Check the distance between food and the top Heating Element when using the Cooking Basket / Cooking Rack / Cooking Pan. If the food is too close to the Heating Element, use the lower rack position.
- Do not cover the air inlet on both sides and the air outlet on rear side during use.
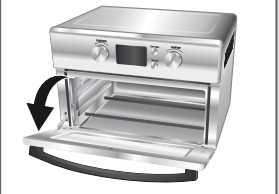
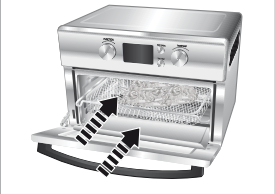
• Hold the Handle and open the Glass Door (ill. g ).
• Make sure the Crumb/Drip Tray is free of food residues and place it on the bottom Rails (ill. h ).
• Insert the Cooking Basket / Cooking Rack / Cooking Pan into the appliance and then place the food to be cooked on the Cooking Basket / Cooking Rack / Cooking Pan (ill. h ).
g.
h.
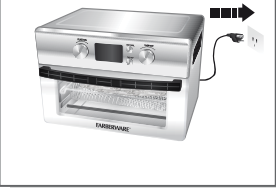
• Close the Glass Door and insert the plug into a wall outlet (ill. i , j ). The LCD Display will turn on with one audible tone.
• The functions display in turn and then stops at AIR FRY. The temperature shows 400°F and the cooking time shows 00:25.
i.
j.
Control Panel
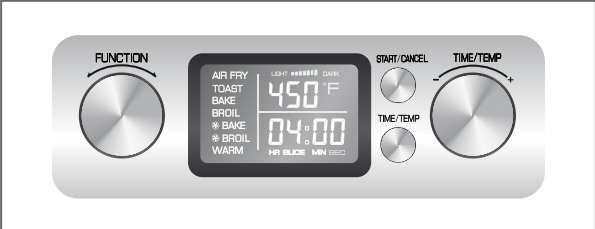
| Button | Function | Possible settings |
| START/ CANCEL Button | Starting or cancelling an operation | – |
| TIME/TEMP Knob | Increasing / decreasing operating time and temperature; setting browning level / slice quantity | 1 – 7 minutes / 450°F, browning level: / slice quantity: 1 – 6 (TOAST function only) |
| TIME/TEMP Button | Activating setting of operating time and temperature / slice quantity | TIME: 1 to 120 minutes TEMP: 150°F to 450°F (65°C to 232°C) |
| FUNCTION Knob | Setting the operating function | AIR FRY / BAKE / BROIL / CONV. BAKE / CONV. BROIL / TOAST / WARM |
NOTE: During the cooking process, press the START/CANCEL Button to stop the cooking process and then re-set the the cooking programs, temperature and time.
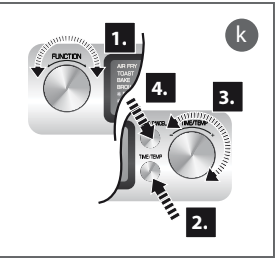
• Rotate the FUNCTION Knob to select the desired cooking function. The selected function will flash and the LCD Display will show the pre-set temperature and time.
• Press TIME/TEMP Button to activate temperature / time setting. Rotate the TIME/TEMP Knob to set the temperature / cooking time.
• Press the START/CANCEL Button to switch the appliance on (ill. k ). The appliance will start cooking process with one audible tone.
• Once the set time has passed, the appliance will beep 3 times, to indicate the cooking process has finished.
NOTE
- When selecting the TOAST function, the browning level bar will show on the LCD Display. Rotate the TIME/TEMP Knob to select the required browning level and time to show the respective cooking time of selected browning level. After pressing the TIME/TEMP Button, Timer will change to 6 SLICE and flash. Rotate the TIME/TEMP Knob to select required slice quantity from 1 – 6. After pressing the START/CANCEL Button to start the appliance, the respective toasting time will show on the display ( TOAST function).
- The cooking process can be stopped at any time by pressing the START/ CANCEL Button. The appliance stops operation with one audible tone.
- When the cooking time has passed, the appliance will beep 3 times. The LCD Display turns off automatically and the appliance switches to standby mode if there is no operation within 30 seconds. Scroll any knobs or press any buttons to turn on the LCD Display.
Danger of burns!
- Always pay special attention when placing or removing Cooking Basket / Cooking Rack / Cooking Pan and food from the appliance. Never place your bare hands inside the appliance or use them to remove Cooking Basket / Cooking Rack / Cooking Pan. Always use oven mitts when inserting or removing items from the appliance.
- Escaping steam can burn , use caution.
- The Cooking Basket / Cooking Rack / Cooking Pan and other metal parts become hot. Do not touch them while in use. Allow the appliance to cool at least 30 minutes before handling and cleaning.
• Hold the Handle and open the Glass Door.
• Carefully take the Cooking Basket / Cooking Rack / Cooking Pan out of the appliance and place it on a heat resistant trivet or cutting board.
• Continue using the appliance to prepare additional food, by repeating previous steps, if desired. Empty any oil or grease that has collected
between batches. If you have finished using the appliance, wait for 30 sec until the LCD Display turns off and then disconnect the plug from the wall outlet (ill. l ).
• Allow the appliance to cool down completely before cleaning it ( Cleaning and Maintenance). Clean after every use.
l.
AIR FRY function
This function uses the 4 upper Heating Elements.
• Place the food on the Cooking Basket at the upper rail.
• Turn the FUNCTION Knob to the AIR FRY function.
• Press TIME/TEMP Button to activate temperature / time setting. Rotate the TIME/ TEMP Knob clockwise or counterclockwise to set the temperature (150°F – 400°F (65°C – 205°C)) and cooking time (1 – 45 minutes).
• Press the START/CANCEL Button to start the operation.
Making home-made fries
• Peel the potatoes and cut them into sticks.
• For best results, soak the potato sticks in water for 30 minutes.
• Rinse the potato sticks thoroughly and dry them with paper towels.
• Pour 1⁄2 tablespoon of canola oil in a bowl, put the sticks on top and mix until they are coated with oil.
• Remove the sticks from the bowl with your hands or a kitchen utensil so that excess oil stays behind in the bowl and shake off any excess oil. Place the sticks on a single layer in the Cooking Basket.
NOTE
- Do not tilt the bowl to pour the potato sticks onto the Cooking Basket. Transfer them with your hands or a kitchen utensil in smaller batches to prevent excess oil to be transferred.
- Air fry the potato sticks according to the instructions above. Cooking time and temperature are required to be adjusted depending on quantity.
BAKE function
The 2 lower Heating Elements turn on when using this function. The 2 upper Heating Elements may also turn on to help maintain the set temperature.
• Place the cooking tin with food on the Cooking Rack / Cooking Pan and the Cooking Rack / Cooking Pan at the lower rail.
• Turn the FUNCTION Knob to the BAKE Function.
• Press TIME/TEMP Button to activate temperature / time setting. Rotate the TIME/ TEMP Knob clockwise or counterclockwise to set the temperature (150°F – 425°F (65°C – 218°C)) and cooking time (1 – 90 minutes).
• Press the START/CANCEL Button to start the operation.
BROIL function
The 2 upper Heating Elements turn on when using this function. The 2 lower Heating Elements may also turn on to help maintain the set temperature.
• Place the oven-compatible dish with food on the Cooking Rack / Cooking Pan and the Cooking Rack / Cooking Pan at the upper rail.
• Turn the FUNCTION Knob to the BROIL Function.
• Press TIME/TEMP Button to activate temperature / time setting. Rotate the TIME/ TEMP Knob clockwise or counterclockwise to set the temperature (150°F – 400°F (65°C – 205°C)) and cooking time (1 – 30 minutes).
• Press the START/CANCEL Button to start the operation.
CONVECTION BAKE function
The 2 lower Heating Elements turn on when using this function. The 2 upper Heating Elements may also turn on to help maintain the set temperature.
• Place an oven-compatible dish with food on the Cooking Rack / Cooking Pan and the Cooking Rack / Cooking Pan at the lower or upper rail.
• Turn the FUNCTION Knob to the BAKE Function.
• Press TIME/TEMP Button to activate temperature / time setting. Rotate the TIME/ TEMP Knob clockwise or counterclockwise to set the temperature (150°F – 425°F (65°C – 218°C)) and cooking time (1 – 90 minutes).
• Press the START/CANCEL Button to start the operation.
CONVECTION BROIL function
The 2 upper Heating Elements turn on when using this function. The 2 lower Heating Elements may also turn on to help maintain the set temperature.
Place an oven-compatible dish with food on the Cooking Rack / Cooking Pan And The Cooking Rack / Cooking Pan at the lower or upper rail.
• Turn the FUNCTION Knob to the BROIL function.
• Press TIME/TEMP Button to activate temperature / time setting. Rotate the TIME/ TEMP Knob clockwise or counterclockwise to set the temperature (150°F – 400°F (65°C – 205°C)) and cooking time (1 – 30 minutes).
• Press the START/CANCEL Button to start the operation.
TOAST function
This function uses the 2 lower and 2 upper Heating Elements.
• Place the food on the Cooking Basket / Cooking Rack / Cooking Pan at the upper rail.
• Turn the FUNCTION Knob to the TOAST function.
• Rotate the TIME/TEMP Knob to select the desired browning level 1 – 7.
• Press the TIME/TEMP Button and rotate the TIME/TEMP Knob to select desired slice quantity from 1 – 6.
• Press the START/CANCEL Button to start the operation.
WARM function
This function uses the 2 lower Heating Elements.
• Place the Cooking Basket / Cooking Rack / Cooking Pan with food at the lower rail.
• Turn the FUNCTION Knob to the WARM function.
• Press TIME/TEMP Button to activate temperature / time setting. Rotate the TIME/TEMP Knob clockwise or counterclockwise to set the cooking time (1 – 120 minutes). The temperature is 150°F (65°C) and it cannot be adjusted.
• Press the START/CANCEL Button to start the operation.
RECIPES
Crispy Chicken Strips
Makes 4 servings
| Nonstick cooking spray | |
| 2 | boneless, skinless chicken breast halves |
| 1 cup | buttermilk |
| 1 | egg |
| 1½ cups | self-rising flour |
| 1 tbsp | Cajun seasoning spice |
| Salt and pepper, to taste | |
| Favorite dipping sauce |
• Spray the air fryer basket with nonstick cooking spray; set aside.
• Pound chicken breasts until even and thin. Cut each breast into 4 strips.
• In a shallow dish, whisk together the buttermilk and egg. Place chicken strips in milk mixture and submerge.
• In another shallow dish, whisk together flour, Cajun seasoning, salt and pepper. Coat each chicken strip with flour mixture and place on the prepared air fryer basket. Spray each chicken strip with nonstick spray.
• Set the temperature to 400°F, and select the AIR FRY setting. Cook for 10 minutes. Turn the chicken strips and spray with additional nonstick spray. Cook an additional 5 minutes or until crispy and fully-cooked. Serve warm with your favorite dipping sauce.
Air Fryer Roasted Chicken
Makes 4 to 6 servings
| Nonstick cooking spray | |
| 1 (3½ pound) | whole chicken, split lengthwise |
| 2 tbsp | olive oil |
| 1½ tsp | salt |
| 1 tsp | coarse black pepper |
| 1 tsp | paprika |
| 1 tsp | dried thyme leaves |
• Spray the air fryer basket with nonstick cooking spray; set aside.
• Rub chicken on all sides with olive oil. Combine salt, pepper, paprika and thyme; rub seasonings evenly over the chicken.
• Place the chicken halves, skin side up, on the prepared air fryer basket.
• Set the temperature to 350°F, and select the AIR FRY setting.
• Cook for 35 to 40 minutes or until a thermometer, inserted into the center of the breast reaches 165°F. Allow the chicken to stand 10 minutes, then slice into serving pieces.
“Fried” Shrimp
Makes 4 servings
| Nonstick cooking spray | |
| ½ cup | milk |
| ½ cup | buttermilk |
| 1/3 cup | cayenne pepper sauce |
| 1 cup | self-rising flour |
| 2 tbsp | cornmeal |
| 2 tsp | salt |
| ½ tsp | coarse black pepper |
| 1 pound | medium shrimp, peeled, deveined and patted dry with paper towels |
| Favorite dipping sauce or cocktail sauce |
• Spray the air fryer basket with nonstick cooking spray; set aside.
• Spray the air fryer basket with nonstick cooking spray; set aside.
• In a shallow dish, whisk together the milk, buttermilk and cayenne pepper sauce.
• In another shallow dish, whisk together flour, cornmeal, salt and pepper.
• Place the shrimp in the flour mixture coating well, then in the milk mixture and then back into the flour mixture, coating evenly. Place the coated shrimp on the prepared air fryer basket, not crowding the pieces of shrimp. Spray the shrimp with nonstick spray.
• Set the temperature to 400°F, and select the AIR FRY setting. Cook for 5 minutes. Turn shrimp and spray with additional nonstick spray. Cook an additional 5 minutes. Repeat with remaining shrimp.
• Serve with favorite dipping sauce or cocktail sauce.
Fish and Chips
Fish and Chips
| Nonstick cooking spray | |
| ½ pound | russet potatoes, cut into thin strips about ¼ inch thick |
| 2½ tsp | salt, or to taste |
| 1 tbsp | canola or vegetable oil |
| 16 ounces | cod fish fillets, cut into pieces about 1 x 3 to 4 inches |
| 1½ cups | finely crushed salt and vinegar potato chips (about 6 cups chips, finely crushed) |
| ½ tsp | salt |
| ½ tsp | coarse pepper |
| ¼ cup | all-purpose flour |
| 2 | egg whites |
| 2 tbsp | water |
• Spray the air fryer basket with nonstick cooking spray; set aside.
• Place the potato strips in a bowl, sprinkle with 11⁄2 teaspoons salt and cover with cold water; stir to dissolve salt. Allow to stand for 30 minutes. Drain and rinse well.
• Pat the potatoes dry with a paper towel. Return the potatoes to a bowl. Drizzle with oil and sprinkle with the remaining 1 teaspoon salt. Place the potatoes on the prepared air fryer basket, not crowding the pieces.
• Set the temperature to 400°F. and select the AIR FRY setting. Cook for 10 minutes. Carefully shake the basket and coat potatoes with nonstick spray. Cook for 8 minutes or until potatoes are golden and tender.
• Remove the potatoes from the basket and keep warm. Spray the air fryer basket with nonstick cooking spray.
• While potatoes are cooking, prepare the fish. Pat the fish dry with paper towels.
• In a shallow dish, combine the crushed potato chips, salt and pepper. Place the flour in another shallow dish. In another small bowl, whisk together the egg whites and water.
• Dip each piece of fish in flour, turning to coat evenly, then dip in egg, allowing all excess egg to drip back into the bowl. Coat each fish piece evenly, on all sides, with potato chip crumbs.
• Arrange the fish on the prepared air fry basket. (Use caution as the basket will be hot). Spray the fish with nonstick spray.
• Set the temperature to 400°F, and select the AIR FRY setting. Cook for 5 minutes. Carefully turn the fish over and spray with additional nonstick spray. Cook 5 minutes or until the fish is golden and tender. Serve the fish with the chips.
• Tip: If the potatoes have cooled off, arrange them on the air fry basket. Set the temperature to 400°F, and select the AIR FRY setting. Cook 2 to 3 minutes or until hot.
“Fried” Mushrooms
Makes about 12 mushrooms
| Nonstick cooking spray | |
| 8 ounces | whole button mushrooms |
| ¾ cup | all-purpose flour |
| ½ tsp | seasoned salt |
| ½ tsp | garlic salt |
| 2 | eggs |
| ¾ cup | Italian seasoned dry bread crumbs |
| Favorite dipping sauce |
• Spray the air fryer basket with nonstick cooking spray; set aside.
• Use a paper towel to wipe the mushrooms clean. If the stems are long, trim and discard the longer stems.
• In a shallow dish, whisk together the flour, seasoned salt and garlic salt. In another shallow dish, whisk the eggs until well blended. Place the bread crumbs in another small bowl.
• Coat each mushroom with flour mixture, then dip into the beaten egg, making sure to shake off the excess egg. Place mushrooms into the breadcrumbs and coat well. Place the coated mushrooms on the prepared air fryer basket, not crowding the mushrooms. Spray each mushroom with nonstick spray.
• Set the temperature to 400°F, and select the AIR FRY setting. Cook for 6 minutes. Carefully shake the basket, making sure there is room between the mushrooms and spray the mushrooms with additional nonstick spray. Bake an additional 6 minutes. Serve warm with your favorite dipping sauce.
“Fried” Dill Pickles
Makes 6 to 8 servings
| Nonstick cooking spray | |
| 1 (16-ounce) | jar hamburger dill slices |
| ½ cup | buttermilk |
| 1 | egg |
| 1½ cups | self-rising flour |
| ½ cup | cornmeal |
| 1 tsp | salt |
| ½ tsp | coarse ground pepper |
• Spray the air fryer basket with nonstick cooking spray; set aside.
• Reserve 2 tablespoons pickle juice from the jar and set aside. Drain remaining juice from pickles. In a shallow dish, whisk together the buttermilk, egg and reserved 2 tablespoons pickle juice. In another shallow dish, whisk together the flour, cornmeal, salt and pepper. Working in batches, submerge the dill pickles in the milk mixture then coat with the flour mixture.
• Place half of the pickles on the prepared air fry basket, not crowding the pickles.
• Set the temperature to 400°F, and select the AIR FRY setting. Cook for 10 minutes. Turn the pickles and spray with additional nonstick spray. Cook for 3 minutes.
• Repeat with another batch. Serve warm with your favorite dipping sauce.
Spicy Green Beans
Makes 4 servings
| Nonstick cooking spray | |
| 1 cup | all-purpose flour |
| 1 tsp | garlic powder |
| ½ tsp | onion powder |
| ½ tsp | paprika |
| ¾ tsp | salt |
| ¼ tsp | pepper |
| 1 cup | milk |
| 1 | medium head cauliflower, cut into bite-size florets |
| Favorite dipping sauce |
• Spray the air fryer basket with nonstick cooking spray; set aside.
• In a shallow dish, whisk together the flour, cayenne, salt, garlic powder and pepper. In another shallow dish, whisk together the eggs and buffalo sauce. Place the dry breadcrumbs in another shallow dish. Coat the green beans in the flour mixture, then dip in egg mixture making sure to shake off excess egg, then coat evenly with breadcrumbs. Place the green beans on the prepared air fryer basket, not crowding the pieces. Spray the green beans with nonstick spray.
• Set the temperature to 400°F, and select the AIR FRY setting. Cook for 5 minutes. Carefully shake the basket and coat the green beans with additional nonstick spray. Cook an additional 5 minutes. Repeat with remaining green beans. This will take two batches to complete. Serve warm with your favorite dipping sauce.
Pub Style “Fried” Cauliflower
Makes 4 to 6 servings
| Nonstick cooking spray | |
| 1 | medium head cauliflower, cut into bite-size florets |
| 2 tbsp | olive oil |
| 2 tbsp | sweet chili sauce |
| 2 tbsp | fresh lime juice |
| 1 tbsp | Sriracha sauce |
| Salt and pepper, to taste |
• Spray the air fryer basket with nonstick cooking spray; set aside.
• In a medium mixing bowl, whisk together the flour, garlic powder, onion powder, paprika, salt and pepper. Add the milk and whisk until blended and smooth. Dip the cauliflower florets in the batter, coating evenly and allowing excess batter to drip back into the bowl. Place the dipped cauliflower on the prepared air fryer basket, not crowding the pieces. Spray the cauliflower with nonstick spray.
• Set the temperature to 400°F, and select the AIR FRY setting. Cook for 10 minutes. Carefully turn the cauliflower and coat cauliflower with additional nonstick spray. Cook an additional 5 minutes. Serve warm with your favorite dipping sauce.
Bang Bang Cauliflower
Makes 4 to 6 servings
| Nonstick cooking spray | |
| 2 cups | trimmed vegetables, such as bite-size cauliflower or broccoli florets, zucchini slices about ½inch thick, trimmed green beans, or trimmed asparagus spears |
| ¾ cup | panko crumbs |
| 1/3 cup | finely shredded or grated Parmesan cheese |
| ½ tsp | garlic powder |
| Salt and pepper, to taste | |
| 2 | egg whites |
| Favorite dipping sauce |
• Spray the air fryer basket with nonstick cooking spray; set aside.
• Place cauliflower florets in a zip-top bag.
• In a small bowl, combine the olive oil, chili sauce, lime juice, and Sriracha sauce; whisk to combine. Drizzle the sauce over the cauliflower in the bag. Season with salt and pepper, to taste. Seal the bag and shake to coat the cauliflower evenly. • Place the florets on the prepared air fryer basket, not crowding the pieces. Spray the florets with nonstick spray.
• Set the temperature to 400°F, and select the AIR FRY setting. Cook for 8 minutes. Carefully shake the basket and coat cauliflower with additional nonstick spray. Cook an additional 6 minutes.
Garlic Parmesan “Fried” Vegetables
Makes 4 servings
| Nonstick cooking spray | |
| ¼ cup | butter, softened |
| ¼ cup | shredded Parmesan cheese |
| ½ tsp | garlic powder |
| Salt, to taste | |
| Minced fresh parsley, optional | |
| 10 to 12 | thin baguette slices, about ¼ to ½ inch thick |
• Spray the air fryer basket with nonstick cooking spray; set aside.
• In a shallow dish, whisk together the panko crumbs, Parmesan cheese, garlic powder, salt and pepper. In another shallow dish, whisk the egg whites until well blended.
• Dip the vegetables in the beaten egg, making sure to shake off the excess egg, then coat evenly with the panko mixture. Place the coated vegetables on the prepared air fryer basket, not crowding the pieces. Spray vegetables with nonstick spray.
• Set the temperature to 400°F, and select the AIR FRY setting. Cook for 6 minutes. Carefully shake the basket and coat the vegetables with additional nonstick spray. Cook an additional 5 minutes or until golden and tender. Serve warm with favorite dipping sauce.
Crispy Garlic Crostini
Makes 10 to 12 slices
| Nonstick cooking spray | |
| ¼ cup | butter, softened |
| ¼ cup | shredded Parmesan cheese |
| ½ tsp | garlic powder |
| Salt, to taste | |
| Minced fresh parsley, optional | |
| 10 to 12 | thin baguette slices, about ¼ to ½ inch thick |
• Spray the air fryer basket with nonstick cooking spray; set aside.
• In a small bowl, combine the butter, Parmesan cheese, garlic powder, salt and parsley. Blend until smooth and creamy. Spread the butter mixture lightly on one side of each slice of baguette.
• Place the bread slices, cheese side up, in a single layer in the air fryer basket.
• Set the temperature to 350°F, and select the AIR FRY setting. Cook for 2 to 3 minutes or until hot, crisp and the cheese is melted.
• Tip: To make crostini to serve with your preferred dip or topping, brush each baguette slice lightly with olive oil and arrange in the air fryer basket. Cook as directed. Top the crostini with desired toppings or serve with a dip.
Creamy Cheese Stuffed Mushrooms
Makes about 12 mushrooms
| Nonstick cooking spray | |
| 8 ounces | whole button mushrooms, stems removed |
| ½ cup | garlic-herb flavored spreadable French cheese, such as Boursin® |
| ¼ cup | Italian seasoned dry bread crumbs |
• Spray the air fryer basket with nonstick cooking spray; set aside.
• Use a paper towel to wipe the mushrooms clean. Place the mushrooms, in a single layer, stem-side down, in the prepared airy fryer basket. Spray the mushrooms with nonstick spray.
• Set the temperature to 380°F, and select the AIR FRY setting. Cook for 3 minutes.
• Using tongs, carefully turn the mushrooms over. Dollop about 2 teaspoons garlic herb flavored cheese into the center of each mushroom, filling the cap. Sprinkle the filled mushrooms lightly with the bread crumbs. Spray the mushrooms with additional nonstick spray.
• Cook for an additional 5 minutes or until the crumbs are toasted and cheese is melted. Allow to cool at room temperature 2 to 3 minutes before serving.
Sausage Cheese Bites
Makes about 20 appetizer bites
| Nonstick cooking spray | |
| ½ pound | bulk breakfast sausage |
| 1 cup | shredded sharp Cheddar cheese |
| ¼ cup | milk |
| 1 cup | baking mix |
| Salt and pepper to taste |
• Spray the air fryer basket with nonstick cooking spray; set aside.
• In a large mixing bowl, combine the sausage, cheese, milk, baking mix, salt and pepper. Using an electric mixer on medium speed, mix the sausage mixture until well combined, about 2 minutes. Form mixture into 1inch balls.
• Place the sausage balls in the prepared air fryer basket, not crowding the sausage balls. Spray the sausage balls with nonstick spray.
• Set the temperature to 350°F, and select the AIR FRY setting. Cook for 5 minutes. Turn the sausage balls and spray with additional nonstick spray. Cook for an additional 6 minutes or until fully cooked. Serve warm.
• Tip: This recipe can be doubled and prepared in 2 batches.
Breakfast Egg ‘n Toast Cups
| 3 tbsp | butter, melted |
| 4 | slices white sandwich bread, crusts removed |
| 2 | slices bacon, cooked until crisp and crumbed |
| 1/3 cup | shredded Cheddar cheese |
| 4 | eggs |
| Salt and pepper to taste |
• Brush the inside of 4 oven-proof ramekins (about 31⁄2 x 2 inches; 1 cup capacity) lightly with melted butter.
• Place a bread slice into each prepared ramekin, pressing gently to make a cup shape. Lightly brush the top of each bread slice with melted butter. Reserve the remaining melted butter.
• Set the temperature to 350°F, and select the AIR FRY setting. Set the toast filled ramekins on the air fry basket. Cook for 5 minutes.
• Carefully remove the basket with the toast cups. Divide the bacon evenly between the toast cups, then top the bacon in each cup with about 1 tablespoon of cheese. Crack an egg into a small bowl, then gently pour the egg into the cup over the cheese. Season with salt and pepper. Repeat with remaining eggs. Top the egg in each cup with about 1 teaspoon of the remaining cheese. Drizzle the top of each egg with about 1⁄2 teaspoon of the remaining melted butter, covering the yolk evenly. Cook for 9 minutes or until the egg is set as desired. (The egg will continue to cook and set up after removing from the oven so do not overcook). Allow to stand 2 to 3 minutes; serve warm.
Glazed Cinnamon Roll Bites
Makes 32 bites
| Nonstick cooking spray | |
| 1 (12.4 ounce) | tube refrigerated cinnamon rolls with cream cheese icing |
| ½ cup | sugar |
| 1 tbsp | ground cinnamon |
• Spray air fryer basket with nonstick spray; set aside.
• Cut each cinnamon roll in half and then in half again to get 4 bites from each cinnamon roll. Place the bites on the prepared air fry basket, not crowding the pieces. Spray the cinnamon roll bites with nonstick spray. Set the temperature to 380°F and select the AIR FRY setting. Cook for 4 minutes.
• Carefully shake the basket and separate the bites if need be so there is space between them. Cook an additional 3 minutes.
• In a medium bowl, combine the sugar and cinnamon. Add hot cinnamon roll bites to the sugar mixture and coat evenly. Place the bites on a serving platter. Stir the icing that was in the cinnamon roll tube and place into a zip-top bag. Snip the corner off the bag with scissors. Drizzle the icing over cinnamon roll bites. Serve warm.
• Tip: Place the cinnamon and sugar into a small brown paper lunch sack. Add half the bites and shake well to coat. Remove bites to platter and repeat with remaining bites.
Lazy Day Doughnuts
Makes 10 doughnuts
| Nonstick cooking spray | |
| 1 (12 ounce) tube refrigerated buttermilk biscuits (regular size biscuits, not grand) | |
| ½ cup | sugar |
| 1 tbsp | ground cinnamon |
• Spray the air fryer basket with nonstick cooking spray; set aside.
• Using a small circular cutter, cut a hole out of the center of each biscuit. Spray both sides of each biscuit with nonstick spray and place in prepared air fryer basket.
• Set the temperature to 380°F, and select the AIR FRY setting. Cook for 5 minutes. Turn biscuits and spray with additional nonstick spray. Cook an additional 4 minutes.
• While biscuits are cooking, combine sugar and cinnamon in a medium bowl. Remove hot biscuits and immediately toss with cinnamon-sugar. Serve warm.
Peach Turnovers
Makes 8 turnovers
| Nonstick cooking spray | |
| 2 sheets | frozen puff pastry, thawed |
| 1 (21 ounce) can | peach pie filling |
| ½ tsp | ground nutmeg |
| ¼ tsp | ground cinnamon |
| 1 | egg, beaten |
| 1 cup | confectioners’ sugar |
| 2 tbsp | milk |
• Spray the air fryer basket with nonstick cooking spray; set aside.
• Lightly flour a surface and roll each pastry sheet to a 10 x 10 inch piece. Cut each sheet into quarters.
• In a medium bowl combine the peach pie filling, nutmeg and cinnamon. Stir to blend well. Spoon a scant 1⁄4 cup of the peach filling placing it a bit off center in each square. Brush the perimeter of the pastry square with the beaten egg. Fold the pastry over, forming a triangle and using the tines of a fork, crimp the turnover edges together. Repeat with remaining pastry squares. • Place four turnovers on the prepared air fryer basket. Brush each turnover top lightly with the beaten egg.
• Set the temperature to 380°F, and select the AIR FRY setting. Cook for 7 minutes. Carefully turn each turnover over and cook an additional 7 minutes. Repeat with remaining turnovers. Allow the turnovers to cool 10 minutes.
• While the turnovers are baking, in a small bowl, whisk together confectioners’ sugar and milk until smooth. Pour the glaze into a zip-top bag and snip the corner.
• Drizzle the glaze over the peach turnovers. Serve warm or at room temperature.
• Tip: Of course, this recipe will be equally delicious with your favorite flavor of pie filling such as apple or blueberry.
Favorite Dipping Sauces Chipotle Mayonnaise Dip
Makes about 1 cup
| ¾ cup | mayonnaise |
| ¼ cup | sour cream |
| 1 to 2 | chipotle peppers in adobo sauce, finely minced |
| 2 tsp | fresh lime juice |
| Salt and pepper, to taste |
• In a small bowl, combine the mayonnaise, sour cream, chipotle peppers, lime juice, salt and pepper; stir to blend well.
• Tip: Chipotle peppers in adobo sauce are readily available canned. Use those you need for this recipe, then freeze the remaining chipotle peppers to use for another recipe.
Basil Pesto Mayonnaise
Makes about 1 cup
| ¾ cup | mayonnaise |
| ¼ cup | basil pesto |
| Fresh basil leaves |
• In a small bowl, combine the mayonnaise and pesto, stirring to blend well. Garnish with basil leaves.
Sriracha Ketchup Dipping Sauce
Makes about 2/3 cup
| ½ cup | ketchup |
| 2 tbsp | Sriracha sauce |
| 1 to 2 tbsp | honey |
• In a small bowl, combine the ketchup, sriracha and 1 tablespoon honey and stir to blend well. Taste and add additional honey, to taste, if desired.
Honey Mustard Dipping Sauce
Makes about 1⁄2 cup
| ½ cup | ketchup |
| 2 tbsp | Sriracha sauce |
| 1 to 2 tbsp | honey |
• In a small bowl, combine the sour cream, mustard, honey and hot pepper sauce; stir to blend well.
HINTS AND TIPS
- • This appliance can be used to cook almost any food that can also be prepared in a traditional oven.
- • Smaller quantities of food normally require a slightly shorter cooking time than larger quantities of food.
- • To reduce cooking time, defrost food prior to cooking. It is recommended to only cook defrosted food and cook from a fridge temperature.
- • It is recommended to always preheat the appliance (excluding BROIL function), as this will reduce cooking times.
NOTE: It is recommended that some foods should not be thawed/defrosted prior to cooking, such as frozen fish, and frozen French fries.
- • It is recommended to use a meat thermometer to check the cooking progress.
- • In the event of food flare-ups, keep the door closed, press the START/CANCEL Button and unplug the appliance.
- • When the food you are cooking requires flipping, it is recommended to set the time to half the required time. This will remind you to flip the food.
- • The optimal amount for cooking crispy fries is up to 1.2lb. of sliced potatoes.
- • Use pre-made dough to cook filled snacks quickly and easily. Pre-made dough also requires a shorter cooking time than home-made dough.
- • Use the appliance to keep food warm. Simply keep the previously cooked food on the Cooking Basket / Cooking Rack / Cooking Pan and select the WARM function.
- • It is recommended to only use nylon, heat-proof plastic or wooden cooking utensils. Always remove utensils from the appliance. Do not leave them in the appliance during use.
- • Place a baking tin or oven-compatible dish on the Cooking Basket / Cooking Rack / Cooking Pan if you want to bake a cake, quiche or if you want to fry fragile or filled ingredients.
- • Add some oil to fresh potatoes for a crispy result.
- • If some food tends to stick to the Cooking Basket / Cooking Rack / Cooking Pan, add some cooking oil spray on the cooking surface prior to adding the ingredients to cook.
CLEANING AND MAINTENANCE
Proper maintenance will ensure many years of service from your appliance. Clean the appliance after every use. The appliance contains no user serviceable parts and requires little maintenance. Leave any servicing or repairs to qualified personnel.
WARNING: Always ensure the appliance is switched off. Disconnect the plug from the wall outlet before cleaning. Allow all parts of the appliance to cool down completely.
NOTE
- Do not immerse the Power Cord with Plug or appliance into water or any other liquids (ill. m ).
- Do not use abrasive cleaners, steel wool or scouring pads (ill. n ). Dry all parts thoroughly after cleaning, before using or storing the appliance. Ensure that no water enters the appliance Housing.
m.
n.
- • Remove any accessory placed in the appliance.
- • Clean the surface of the appliance with a damp cloth or sponge and a mild detergent.
- • Take extra care when cleaning near the Heating Elements in order not to damage it.
- • To clean the Crumb/Drip Tray, lift and slide it out of the appliance completely. Dispose of any crumbs. Clean the Crumb/Drip Tray afterward.
- • Clean the accessories after each use. All accessories can be washed in hot soapy water.
- • Clean the appliance Housing with a damp sponge or cloth.
NOTE:
- Dry all parts and surfaces thoroughly before use. Make sure that all parts and surfaces are completely dry before connecting the appliance to a wall outlet.
- Before storage, always make sure the appliance is completely cool, clean and dry.
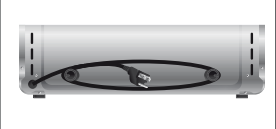
- The power cord can be stored in the Cord Storage at the back of the appliance (ill. o ).
o.
STORAGE
• It is recommended to store the appliance in a dry place.
• Store the appliance on a stable shelf or in a cupboard. To avoid accidents, ensure that both the appliance and its power cord are beyond reach of children or pets.
TROUBLESHOOTING
| Problem | Cause | Solution |
| The appliance is not working | Appliance not plugged in Wall outlet not energized The START/CANCEL Button not pressed The time is not set Cooking program or temperature not set | Insert the plug into the wall outlet Check fuses and circuit breaker Press the START/CANCEL Button Set the time by pressing the TIME/TEMP Button by twice and rotating the TIME/TEMP Knob Select the cooking program by rotating the FUNCTION Knob / set the temperature by pressing the TIME/TEMP Button once and rotating the TIME/TEMP Knob |
| The appliance is working but the LCD Display does not light up | Damaged LCD Display | Disconnect the appliance from the wall outlet and contact qualified personnel to check and repair the appliance |
| The set time has passed but the appliance does not beep | Malfunctioning appliance | Disconnect the appliance from the wall outlet and contact qualified personnel to check and repair the appliance |
| The LCD Display flashes but the appliance does not heat up | Malfunctioning appliance | Disconnect the appliance from the wall outlet and contact qualified personnel to check and repair the appliance |
| The appliance heats up as soon as it is plugged in | Malfunctioning appliance | Disconnect the appliance from the wall outlet and contact qualified personnel to check and repair the appliance |
| The appliance is working but the convection fan does not work | Malfunctioning appliance CONVECTION function is not activated / selected | Disconnect the appliance from the wall outlet and contact qualified personnel to check and repair the appliance Use the appliance under CONVECTION BAKE / BROIL / AIR FRY function |
| The appliance does not reach set temperature | The door is not closed properly | Ensure the door is closed properly |
| Food not fully cooked | Cooking time too short Cooking temperature too low Too much food | Extend the cooking time Increase the set temperature Remove some food; use Cooking Basket / Cooking Rack / Cooking Pan in single layer; rotating the Cooking Basket / Cooking Rack / Cooking Pan mid-cycle or flip the food |
| Food over cooked or burnt | Cooking time too long Cooking temperature too high The food was not flipped during the cooking cycle | Reduce the cooking time Reduce the set temperature Flip the food half way through the cooking cycle ( Operation) |
| Food is soggy and not crispy | The food used is not suited for the appliance Cooking temperature too low Cooking time too short | Ensure the used food is suited for the appliance Increase the set temperature Extend the cooking time |
| French fries are cooked unevenly | Incorrect potato type used Freshly cut potato fries have not been rinsed and dried | Only use fresh potatoes Rinse and dry all freshly cut potato fries prior to placing on the Cooking Basket |
| French fries are not crispy | Crispiness of fries depends on the amount of oil and water Cooking temperature too low | Dry the potato sticks before cooking; cut the potato sticks into thinner sticks; add a drizzle of oil Set the temperature to max. setting |
| The appliance produces an odor and emits smoke | Residues from the production process are eliminated during first use Food residues not properly removed following previous use Food type not suitable for selected cooking program Malfunctioning appliance Food too greasy Food contacts Heating Elements or inner parts of the appliance | Operate the appliance for at least 15 minutes on its highest setting, with no food, until no odor or smoke is present Disconnect the appliance from the wall outlet, let it cool down and clean thoroughly before using again Press the START/CANCEL Button to stop the operation and refer to Cooking programs Disconnect the appliance from the wall outlet and contact qualified personnel to check and repair the appliance Ensure ample ventilation, disconnect the appliance from the wall outlet and let it cool down Disconnect the appliance from the wall outlet, let it cool down and clean thoroughly before using again |
TECHNICAL DATA
Rated voltage: 120V ~ 60Hz Rated power input: 1800W
Rated current: 15A Capacity: 22L
You can download the PDF version of the FARBERWARE AIR FRYER TOASTER OVEN USER MANUAL here.