Technical Details
- Frequency: 315 MHz
- Modulation: ASK
- Telegram: 24 Bit
- Channels: 5 (4 function channels and 1 unsecured light channel)
- Communication: uni-directional
- Power Supply : 2x AAA batteries
- Operating mode: IMPULS, Direction
Safety Advice
Read carefully through these instructions before installing and operating the unit!
Observe the applicable laws, standards and regulations as well as the manufacturer’s instructions for the devices to be operated!
Have faulty units checked by the manufacturer!
Do not make any unauthorized alterations or modifications to the unit!
The manufacturer does not assume any liability for damage caused as a result of improper or non-intended use!
Changes or modifications not expressly approved by the party responsible for compliance could void the user ́s authority to operate the equipment.
Statements
This product complies with Part 15 of the FCC rules and with the Industry Canada license-exempt RSS-standards. Operation is subject to the following two conditions: (1) this device may not cause harmful interference, and (2) this device must accept any interference received, including interference that may cause undesired operation.
Features
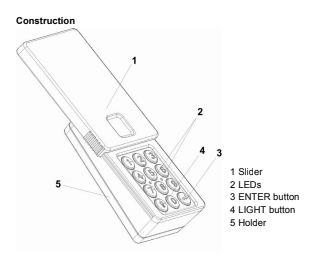
Personal Identification: Four permanent PINs and one temporary PIN can be stored. Each PIN has to be programmed into the garage door opener (GDO). All of the PINs have four digits, which can be free chosen and which can be changed at any time. After entering a valid PIN and pressing the ENTER button, a corresponding telegram is sent to the GDO. The keypad remains active for further actions for additional 25 seconds. Within this interval, the keypad can be used without re-entering the PIN. As long as the keypad is in stand-by mode, it is not possible to control a second GDO.
Temporary PIN: This restricted PIN can be used for a maximum of 99 opening operations. The PIN as well as the number of opening operations can be set and/or changed individually.
“One-button-close” function: This function can be activated and deactivated on the keypad. By pressing the ENTER key, all garage doors that are associated with the Wireless Keyless Entry System are closed without the need for entering a PIN. The “One-button-close” function cannot be used during the 25-second stand-by interval. The close command applies to all GDO’s, i.e. all garage doors are closed simultaneously by pressing the ENTER key.
Keypad illumination: Pushing up the cover or pressing any key causes the keypad to light up for 5 seconds. Any further pressing of the keypad buttons prolongs the illumination time by 5 more seconds.
Light function: By pressing the LIGHT button followed by the ENTER button, an external lighting or similar device can be switched on and off by radio.
Transmitter-programmes-transmitter function: This function is performed wirelessly. Saved PINs are overwritten, i.e. if 4 PINs have already been saved, programming a 5th PIN will overwrite the first PIN (e.g. 1-2-3-4).
“Low-Battery” check: This occurs immediately when pushing up the cover. If a Low Battery state is recognized, the keypad illumination starts to flash for 10 secs.
Factory settings: The keypad is pre-programmed with the PIN “1-2-3-4” and can be teached directly into a GDO. The “One-button-close” function is enabled.
| Function | Action | Indication |
| Switch on keypad | Push up coveror press LIGHT button or press any number button | Keypad lights up for 5 secs.When the keypad illumination starts to flash for 10 seconds after the cover hasbeen pushed up, the batteries of the keypad need to be replaced by new ones. |
| Switch external Light on/off | Press LIGHT button followed by ENTER button | Switches on/off the external radio receiver.LEDs and keypad light up for 2 secs, keypad goes into Stand-by mode. |
| Door control (ON / OFF) | Enter PIN, then press ENTER button (for dead-man’s control mode: press and holdENTER button) | PIN correct: LEDs flash slowly for 25 secs, keypad is in ready mode.PIN incorrect: LEDs flash rapidly for about 2 secs, then the keypad lightswitches off and the keypad goes into Stand-by mode.PIN incorrect 3 times in a row: LEDs flash rapidly for about 2 seconds. The keypad can no longer be used for 2 minutes. This is indicated by periodicallyflashing of the LED’s every 2 seconds. Another incorrect PIN after 2 minutesblocks the keypad again for 2 minutes. |
| Repeatedly pressing the ENTER button during ready mode actuates a command sequence STOPàCLOSEàSTOPà UPà STOPàCLOSEà… to the control unit. | LEDs continue to flash slowly. Keypad lights up for 5 secs.Pressing any button prolongs the ready mode by 25 secs.The keypad lights up each time for further 5 secs.If no further buttons are pressed, the keypad goes into Stand-by after 25 secs. | |
| Use”One-button-close” function:(to close all open ports simultaneously) | Briefly press ENTER button)(not possible during a Stand-byperiod) | Keypad lights up for 5 secs. All programmed PINs are transmitted, each of theLEDs flash rapidly for a short period.The pause between the transmissions lasts at least 1.5 secs. Finally the LEDslight up for 2 secs.Attention: The One-button-close function must be activated. If the function isdeactivated, the keypad lights up after pressing the ENTER button, the LEDsflash rapidly for about 2 secs, thus signaling an error. |
Programming
| Function | Action | Indication |
| Transfer available transmitter to the keypad and allocate aPIN | (1.) Press button at least 3 secs | Keypad lights up as long as the programming mode is active.LEDs light up for about 10 secs. (Programming possible for 10 secs.). |
| (2.) Hold available transmitteLEDs flash rapidly for a brief moment.r very close to buttons 5 / 6o of the keypad, then press and hold the transmitter button and move the transmitter slowly downwards, to the area of buttons 8 / 9 and 0 / .Release the transmitter button when the LEDs on the keypad begin to flash rapidly. | LEDs flash rapidly for a brief moment. | |
| (3.) Enter new, valid PIN, then press ENTER button.”valid” = PIN has 4 digits and is not yet allocated | LEDs and keypad light up for 2 secs, keypad goes into Stand-by.Attention: If 4 PINs have already been saved, when saving the 5th PIN, the first PIN will be overwritten without forewarning (i.e. first the pre-programmed PIN 1- 2-3-4). | |
| Change PIN | (1.) Press button 0 at least 3 secs | Keypad lights up for 5 secs.LEDs flash rapidly (Entering possible for 10 secs.) |
| (2.) Enter old PIN, then press ENTER button | LED‘s light up for about 2 secs.Attention: If the PIN is incorrect/not valid, the LEDs flash rapidly for about 2 secs. Subsequent, the procedure is automatically terminated. | |
| (3.) Enter new PIN, then press ENTER button. | LEDs and keypad light up for 2 secs, keypad goes into Stand-by. | |
| Generate a temporary PIN | (1.) Press button (1) at least 3 secs | Keypad lights up for 5 secs.LEDs flash rapidly (Entering possible for 10 secs.). |
| (2.) Enter valid user PIN, then press ENTER button. | LEDs light up for 2 secs.Attention: If the PIN is incorrect/not valid, the programming will be terminated.The LEDs flash rapidly for 2 secs. | |
| (3.) Enter 4-digit, temporary PIN, then press ENTER button. | LEDs light up for about 2 secs. | |
| (4.) Enter number of openings (max. 99) using number button, then press ENTER button. | LEDs and keypad light up for 2 secs, keypad goes into Stand-by. | |
| Cancel temporary PIN | )-(3.) analogous to the procedure “Generate temporary PIN”;(4.) Enter “0”, then press ENTER button. | The signaling occurs in the same way as during the procedure “Generatetemporary PIN”. |
| Connect available transmitter to the Light function of the keypad | (1.) Press button (7) at least 3 secs | Keypad lights up for 5 secs.LEDs light up (Programming possible for about 10 secs.) |
| (2.) Hold available transmitter very close to buttons(5) / (6) LEDs flash rapidly.of the keypad, then press and hold the transmitter button and move the transmitter slowly downwards, to the area of buttons (8) / (9) and (0) / .Release the transmitter button when the LEDs on the keypad begin to flash rapidly. | LEDs flash rapidly. | |
| (3.) Press ENTER button | LEDs and keypad light up for 2 secs, keypad goes into Stand-by. | |
| Activate “One-button-close” function | (1.) Press button (9) at least 3 secs | Keypad lights up for 5 secs.LEDs flash rapidly. |
| Press and hold ENTER button at least 3 secs. | LEDs and keypad light up for 2 secs, keypad goes into Stand-by. | |
| Deactivate “One-button-close” function | (1.) Press button (8) at least 3 secs. | Keypad lights up for 5 secs.LEDs flash rapidly. |
| (2.) Press and hold ENTER button at least 3 secs. | LEDs and keypad light up for 2 secs, keypad goes into Stand-by. | |
| RESET | Remove battery from the device) Press and hold ENTER button and replace battery.)Release ENTER button | LEDs flash rapidly for about 5 secs. The PIN 1-2-3-4 and a random code are reset. |
- Manual interruption of the programming: possible at any time by pressing the LIGHT button
- Automatic termination of the programming: Time-out after 10 seconds without pressing any key
- After termination, the LEDs go out and the device goes into the Stand-by mode.
- Entering the number of opening operations (temporary PIN): The last two number buttons pressed are accepted. If only one number button is pressed followed by pressing ENTER, this is then also accepted (e.g. key “4”, then ENTER allows 4 opening operations)
You can download the full user manual here in PDF format.