

Statement of use: The 6O22 can be used with millivolt, 24V single and 2-stage conventional systems, gas/oil/electric heat, 1-stage neat Pumps, 2 -stage neat Pumps, zoned hot water (C2 or 3 wire), Zoned forced air, single and 2 -stage cooling, and hybrid systems.
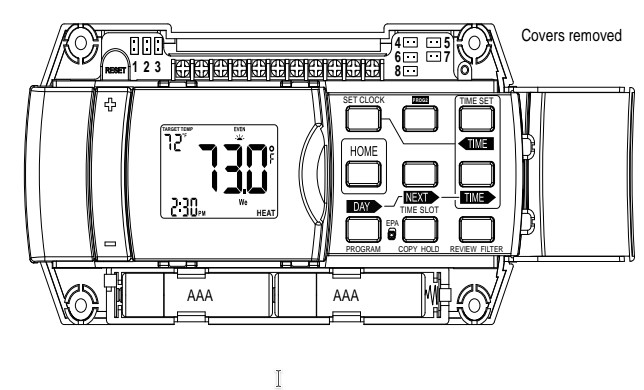
Set Clock
Set day of the week
Press SET CLOCK once to set the day of the week. The day of the week display on flashes. (Initially SU for Sunday)
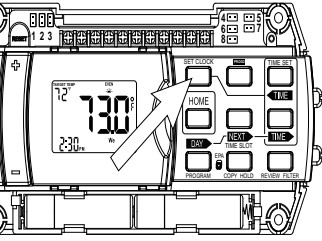
Press [TIME DOWN] or [TIME UP] to select the day.
Set time of day
- Press SET CLOCK again to set the time. The time display will flash.
- Press [ TIME DOWN ] or [ TIME UP ] to set the time. Press and hold to set the time in the fast mode.
- Press HOME to store your settings.
EPA Program
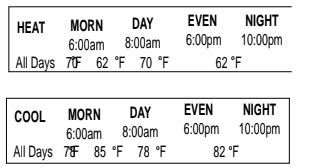
This Thermostat comes preprogrammed with an Energy-Star’ approved program. This program is recommended by the EPA for energy efficiency. We strongly recommend that you use this program for one week, and see if it works for you. If it does not fit your needs you can always input a custom program.
- To Run the Energy-Star program, select HEAT or COOL with the mode switch. The unit is now running the Energy-Star program. To return to the E-star program press EPA.
- One of the TIME SLOT icons MORN, DAY, EVEN, NITE comes on, this indicates the TIME SLOT active in the Energy-Star program. For program details refer to the Energy-Star program chart above
Program
NOTE: 60 Second Rule-During programming, if a button is not pushed within 60 seconds, the unit will go out of the set mode. Everything you have input in this programming will automatically be saved.
- Select HEAT with the HEAT/Cool MODE switch.
- To select the DAY you want to program: Press PROGRAM to enter programming mode. The PROGRAM icon will come on. The day icon will show SU (Sunday). Press [DAY] again to advance the day selection.
- Select the TIME SLOT you want to program: To change the TIME SLOT (MORN, DAY, EVEN, NITE) press the [NEXT] button. The display will cycle through the time periods in sequence. Select MORN.
- Select the desired temperature for that TIME SLOT : To change the temperature for that TIME SLOT press the TEMP +/- buttons.
- Select the time of day you want that TIME SLOT to represent: To set the time when MORN will begin, press the TIME DOWN or TIME UP buttons to move the set point forward or backward in time.
- Select the next TIME SLOT and program temp and time:
Press[NEXT] the display will show DAY. Repeat setting temp and time. Select the remaining TIME SLOT’s, EVEN and NITE. Program their temp and time info. Repeat the above procedures for each day of the week. Push [DAY] button to cycle through the days.
To COPY the program of the current day to another day, press COPY program once. COPY will display on the LCD. The day icon for the source day will go solid and the day icon for the destination day will flash. Use day button to select the destination day. Press COPY again to confirm the copy.
If you decide you don’t want to copy, press HOME to exit.
PROG 2: An alternative program can be used for holidays, shift work, etc. Access by pushing the PROG 2 button. PROG 2 will then be active until you shut it off by touching the PROG 2 button again. The main program will then again be active. To change PROG 2 press <DAY> until PROG 2 is displayed and repeat the programming procedure.
- When finished with your custom program, either wait 60 sec or press HOME to save and run your program.
To program for COOL, select COOL with the Heat/Cool MODE switch and repeat the above procedure.
To REVIEW the program you have entered:Press PROGRAM once to enter programming mode. Then press FILTER/REVIEW once.
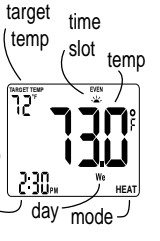
The display will cycle through the programmed times and temps, showing each program for 12 seconds. Starting from Sunday; MORN and ending on Saturday; NITE. The programmed temperature is shown on the left of the LCD, the programmed time, day and time slot are shown on the right and the right top of the LCD respectfully.
- Press HOME to leave program REVIEW mode and run the program.
Special Features
Swing
SWING setting determines the temperature difference from ON to OFF that the 6022 will command the HVAC system to run.
- With the MODE switch in HEAT or COOL, press the <TIME UP> button.
- The SWING icon is displayed. The current setting of temp swing is shown on the display (default at .5°F).
To change the swing, push TEMP UP or TEMP DOWN buttons. The furnace will cycle more at the lower numbers as it tries to keep your set point constant. To complete the swing setting, push the HOME button.
Manual
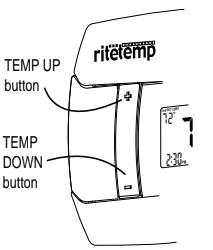
- With the MODE switch in HEAT or COOL, push the TEMP +/- buttons to temporarily change the control temperature by 1 degree per step. Press and hold for button faster setting.
- The OVERRIDE icon flashes to shows the displayed temperature may be different from the programmed setting.
- The OVERRIDE is canceled at the start of the next time period, or when the MODE switch is moved, or if TEMP HOLD is pressed twice.
Temp HOLD
To change and hold the temperature until you return.
- Open the door and push the HOLD button. The HOLD icon comes on. Push the UP or DOWN arrow buttons to set the hold temperature.
- HOLD is canceled if the MODE switch is moved, or press HOLD again.
Lock
Allows you to lock the 6022 (to prevent any changes in custom settings)
- To enable or disable the program lock, press the following buttons one at a time, in this sequence.[TIME] then FILTER, then SET CLOCK, and last HOME. The LOCK icon (a key) appears when the system is locked.
- Repeat to unklock
Filter
The life of a HVAC filter varies depending on many factors, furnace run time, and this will vary from the filter life noted on the filter media. The 6022 has a feature that keeps track of actual furnace run time and reminds you to periodically replace your system’s air filter.
- Press the FILTER button once to review the current filter record. The FILTER and WKS icons come on with filter run-hours being displayed.
- Press <TIME UP> to clear the record. Press again to recover old run-time.
- To SET or see the LIMIT FILTER setting, press and hold the FILTER button for two seconds. The default filter limit is set to 0 weeks and the max setting is 99 weeks. Use the UP and Down buttons to set the filter limit. The LIMIT FILTER must be set to get a FILTER warning on the HOME screen when the filter needs service.
To leave the filter display, press HOME or wait 60 seconds.
Low Battery
- When the batteries are low, the battery icon will come on and flash. The two AAA Batteries in the unit need to be replaced. In some installations your heater system will stop functioning when the thermostat loses power. Replace batteries as soon as you see this warning. The thermostat programs will remain for 30 seconds while the batteries are removed and replaced.
- Do not take longer than 30 sec to change the batteries in your unit or you will lose all custom settings and all programming. Only the Energy-Star” program will remain. Once the batteries are replaced, the system will return to normal in 2 seconds.
C or F display
Celcious / Fahrenheit selection. The C/F jumper is on the top left of the 6022.
Separate the control unit from the wall mounted terminals. When changed, the thermostat must be reset to activate the change. When resetting, all custom settings and programming will be erased and only the Energy-Star” program will remain.
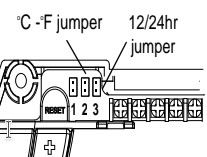
12/24 hour
The thermostat can display time in 12 or24 hour formats. The 12/24 jumper is on the top of the 6022 (see illustration). When changed, the thermostat must be RESET to activate the change.
Calibration
NOTE: Your thermostat comes from the factory calibrated to + or – 1°F actual temperature. It is an accurate instrument. If you want your thermostat to display the same temperature as another thermometer in your home, you can adjust its calibration.
To change the calibration:
- Mode switch of the unit must be in the HEAT or COOL position.
- Press the [TIME] button.
- Press the Temp Up/Temp Down arrows to adjust the temperature reading.
- Press HOME to save the new setting.
HEAT PUMP AUX only
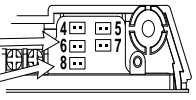
If you have a heat pump with auxiliary heat, and the heat pump is not working properly, your thermostat will still keep your room temperature within about 2F of the target temperature.
- To select Auxiliary ONLY heat by temporally moving the HEAT PUMP [Jumper 8] jumper to the HP-AUX ONLY position [Jumper 6]. This will keep your room temperature within the swing setting of the target temperature.
- Be sure to restore it to PUMP when the pump is again operational as aux heat is more expensive than pump heat.
6022 Features
This thermostat can be used with all millivolt and 24VAC heating and cooling systems. It cannot be used with line voltage systems. This thermostat is digital and your desired heat or cool temperatures can easily be set on the large screen with the +/- buttons on the front. A minimum 4 minute off time protects heating and cooling systems from damage.
This thermostat uses a new technique called sequential staging for more comfort with faster reaction to requested temperature changes when controlling 2 stage systems.
Customer Support: 877-505-2353 or
Visit our website www.ritetemp-thermostats.com
You can download the PDF version of the Ritetemp 6022 tthermostat user guide here.