
Dear User,
Our purpose is to have this product, which was produced in our modern facilities and in accordance with Total Quality Management Philosophy, give the maximum benefit.
For that reason, we suggest that you read carefully and keep this manual on hand before you operate this product.
1. SETTING YOUR APPLIANCE
Electric connection and safety
- The appliance needs 16-amp fuse. If it is necessary, have and electrician make a 16-amp fuse
- The appliance uses 230 V Ac 50Hz electricity. If network doesn’t have this, get in touch with your authorized is not proper
- Electrical connection should be done through grounded outlets in accordance with regulations. If there is not a grounded outlet get in touch with a licensed electrician. Our firm doesn’t accept any responsibilities because of using improper outlets.
- Don’t let electric cord to touch hot surfaces of the oven.
- After setting your oven the distance between the oven and rear wall should be 30 cm. Otherwise oven might overheat.
Gas connection and safety
- Put the clamp around the hose. Heat the hose in the hot water, and put to house gas supply to the very end. Squeeze the clamp using a screwdriver.
- For leakage control pay attention that the knobs on the control panel should be closed and the gas supply should be open. Check if there is any leakage using liquid soap.
Check the gas connection again.
Your appliance should be level with the kitchen counter. If necessary, adjust the level using appliance’ legs.
Do not put the electric cord and gas hose through the rear side of the oven. Do not move the oven that connected to gas supply. Otherwise you may cause gas leakage.
2-TECHNICAL FEATURES OF THE OVEN
| SPECIFICATIONS | 60 * 60 | 50 * 60 | 50 * 50 |
| Width | 600mm | 500mm | 500mm |
| Length | 600mm | 600mm | 500mm |
| Height | 850mm | 850mm | 850mm |
| Interior width | 457mm | 395mm | 395mm |
| Interior length | 417mm | 385mm | 385mm |
| Interior height | 345mm | 345mm | 345mm |
| Oven volume | 66Lt | 52lt | 52lt |
| Lamp voltage | 15W | 15W | 15W |
| Thermostat | 50-30C | 50-30C | 50-30C |
| Timer | 90dk | 90dk | 90dk |
| Lower resistance | 1100W | 1100W | 1100W |
| Upper resistance | 1000W | 800W | 800W |
| Turbo resistance | 2200W | ||
| Grill resistance | 2000W | 1500W | 1500W |
| Fan motor | 23W | 23W | 23W |
| Supply voltage | 230V AC 50Hz | 230V AC 50Hz | 230V AC 50Hz |
| Hot Plate Power @ 145 | 1000 W | 1000 W | 1000 W |
| Hot Plate Power @ 145(Rapid} | 1000 W (1500 W | 1000 W (1500 W | 1000 W (1500 W |
| Hot Plate Power @ 180 | 150W | ||
| Hot Plate Power @ 180(Rapid} | 150W (200W) |
Before the First Use,
Before operating the appliance, read the manual carefully. You will find the information related with your safety, the appliance’s using and maintenance.
Keep this manual, for it might be used by others.
Note: This manual is for more than one model. Some features in this manual might not be for your appliance.
Burner Features
This table shows you the gas that you can use and technical scale for gas
Burner Features
This table shows you the gas that you can use and technical scale for gas
| Gas Type | G30 | G20 | G20 | |
| Gas Pressure | Mbar | 30 | 20 | 13 |
| Auxiliary Burner | Power (kw) | 0.90 | 0.80 | 0.90 |
| Injector size (mm?) | 0.50 | 0.70 | 0.80 | |
| Consumption gr/h-m*/h | 70 | 0.81 | 0.94 | |
| Normal Burner | Power (kw) | 1.45 | 1.45 | 1.75 |
| Injector size (mm?) | 0.65 | 0.90 | 0.10 | |
| Consumption gr/h-m*/h | 114 | 0.149 | 0.185 | |
| Power (kw) | 2.30 | 3.00 | 2.85 | |
| Injector size (mm?) | 0.80 | 1.35 | 1.50 | |
| Consumption gr/h-m*/h | 181 | 0.284 | 0.301 | |
| Power (kw) | 1.95 | 1.75 | 1.85 | |
| Injector size (mm?) | 0.70 | 1.05 | 1.10 | |
| Consumption gr/h-m*/h | 154 | 0.185 | 0.195 |
** G30 LPG
3- WARNING
- Your oven is adjusted for LPG
- It operates on 230 V AC 50 Hz Voltage
- If your network fuse is below 16 Amp, have an authorized electrician replace it with a 16 Amp.
- Your oven should be used with grounded outlet. If grounded outlet is not used, our company doesn’t accept any charges.
- Keep your gas hose and electrical line away from hot parts, sharp edges, and don’t let them touch to the appliance.
- When gas tube gets faulty, have the authorized service replace it immediately.
- Before replacing the lamp, disconnect the electric supply.
- Connect your appliance to LPG supply in a 300 mm SS G Omar) outlet pressure by a detonator.
- Gas supply cord should be short and must not have any leakage.
- While gas leakage checks, you must not use lighters, matches, burning cigarettes, or similar fire making devices.
- Operating Appliance causes moisture and heat in the kitchen, so you should let fresh air in regularly.
- Some parts of the appliance may be hot while it operates, children should be kept away from the appliance.
- You must not touch the oven glass cover while it operated.
- Before operating appliance, you should keep curtains, papers or the other flammable materials away from the appliance. You must not keep any flammable material both inside and on the appliance.
- While the appliance is operating, its outer surfaces get hot. Interior sides, heat supplying parts and the vapor are very hot. These parts still continue to be hot after turning the appliance off, so you must never touch these parts. Keep the pets and children away from the appliance.
- Don’t go away so long, while cooking liquid and oily foods, flame may occur due to the heat. Warning: In the danger of fire, cover the pot or pan with their covers and turn off the appliance. Don’t leave hot oil and food without care, so they may cause fire.
- This appliance is only for domestic use. Don’t use it in garages and offices.
- For cooking in the oven, you should adjust oven control knob and heating control knob together.
- Keep your hands away from both top cover and hinges, because you may injure your hands.
- Don’t apply or put weight on the window cover or racks while they are open. The appliance may be turned over.
- Top glass cover should not be closed, while surface elements are operating or hot. Don’t put heavy, very hot or cold materials on glass cover.
- While and after cleaning, pay attention not to take out the surface elements or replace them with each other.
- While grill knob is on, parts may be hot so children should be kept away.
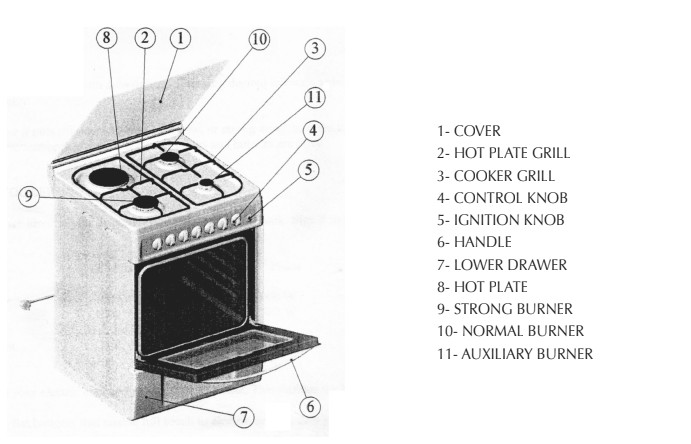
4. DESCRIPTION OF OVEN AND CONTROL PANEL

5. USING OF THE COOKER
USING OF THE GAS COOKER
In order to get maximum efficacy, pay attention to use the pots with flat bottoms and following bottom pot measurements.
Strong burner: 24-28 cm
Normal burner: 18-24 cm
Auxiliary Burner: 12-18 cm
In order to operate burner, press the knob and turn it to counter clockwise to the flame sign. Pressing on the lighter button, start burning. If the burning doesn’t start repeat the process.
Operating auto lighter models:
Valves of the appliance are furnished with auto lighters. Pressing desired burner’s valve tur it to flash sign (*).
After burning you may adjust the burner desired flame level.
While cooking, in the case it puts off, due to liquid overflow, or strong wind, turn the knob off and ventilate the room that the appliance is in. Wait at least for one minute before attempting restart. If burner tables and burners are dirty clean them. After cleaning you may start cooking. After cooking turn the knob off.
USING OF ELECTRIC COOKER
Turn the knob to clockwise direction for desired level that you want to cook. Signal lights on the knob means that cooker operates. After cooing turn the knob off.
| Size | 1st phase | 2nd phase | 3rd phase |
| 150mm | 250W | 750W | 1000W |
| 180mm | 500W | 1000W | 1500W |
Reheat-cook on Low Heat Cook on normal heat Frying
In the first using operate your electric cooker 5 minutes on 3rd phase. This enables the heat sensitive material on cooker to burn and cooker to harden.
If possible use pots with flat bottoms that enable full touch to electric cooker, thus you will get maximum efficacy.
6. USING OF GAS OPERATED OVEN SECTION
After first operating, the appliance will emit a smell caused by isolation and heater elements’ first using. In order to get rid of this smell, operate your appliance for 45 minutes without cooking anything.
In order to operate your appliance, turn the knob to full flame position. Then press the lighter in order to make a flame. If your appliance is not furnished with auto lighter, spark it using a fire supply such as matches through the hole and depress the valve. Be sure that broiler gets flame.
Warning 1: Before starting, do not open valves and wait so long, thus you will prevent gas accumulation and dispersion. It is vital for your safety.
Warning 2: While your appliance working, ventilate the room continuously.
MODELS WITH GAS SAFETY SENSORS
Your appliance has special safety apparatus. In case any broiler snuffs out, sensors next to the broiler closes the related valve and prevents gas flowing.
IMPORTANT: In first operating, in order sensor sense the heat, you should keep adjust knob in max position and keep after ignition 5-10 seconds. After normal burning, you may adjust desired flame position.
RECOMMENDATION IN USING GAS OVEN
1. Put the food to cook on the top rack, and adjust the valve to little flame position.
2. During cooking process, valve should be kept little flame position.
3. After cooking put the turn the valve to “0” position, and take the food out.
Warning 2: While your appliance working, ventilate the room continuously. It is important for your health.
While grilling, you should keep the oven door to the first phase and put the grill shield as shown in the figure. Otherwise, front control panel and knobs may be affected from heat and get yellowish color.
Cooking times:
During cooking oven door should not be opened frequently. Otherwise, heat dispersion can be irregular and cooking time may change. For cooking cake, cake pot should be used for efficacy.
7. USING OF ELECTRICITY OPERATED OVEN SECTION
After first operating, the appliance will emit a smell caused by isolation and heater elements’ first using. In order to get rid of this smell, operate your appliance at 250 C for 45 minutes without cooking anything.
For cooking in your oven, if there is timer, turn the timer knob in clockwise direction and choose the cooking time and heat.
Then your appliance will start, and then cooking timer knob will automatically return to “0” position and, oven will turn off.
The oven operates continuously in “M” Manual position. You should manually turn off your appliance after cooking.
Kinds of Food you will cook
Cooking times
And thermostat positions are shown in cooking table.
The values in the table have been taken out of the tests, so they should be taken into account. However, you may search for different tastes in accordance with your desire.
While grilling, you should keep the oven door to the first phase and put the grill shield as shown in the figure.
Otherwise, front control panel and knobs may be affected from heat and get yellowish color.
Cooking times:
During cooking, oven door should not be opened frequently. Otherwise, heat dispersion can be irregular and cooking time may change. For cooking cake, cake pot should be used for efficacy.
8. SUPPOSED COOKING TABLE
| FOOD | HEAT | POSITION OF RACK | COOKING TIME |
| OLEAT | 150-170 | 2 | 30-35 |
| FLAKY PASTRY | 200-220 | 2 | 35-45 |
| BISCUIT | 160-170 | 3 | 20-25 |
| COOKIES | 160-170 | 3 | 20-35 |
| CAKE | 160-180 | 2 | 25-35 |
| BRAIDED COOKIES | 200-220 | 2 | 30-40 |
| BRAIDED | 180-200 | 2 | 35-45 |
| FLAKY | 160-180 | 2 | 20-30 |
| LAMP | 200-230 | 3 | 20-25 |
| BEEF | 200-230 | 3 | 30-40 |
| LAMB | 230-250 | 3 | 30-40 |
| CHICKEN | 230-240 | 3 | 30-4- |
| FISH | 200-220 | 3 | 20-30 |
Note: Data is the result of lab experiments
9. MAINTENANCE AND CLEANING
- Unplug the electric cord and turn the gas controller valve off.
- Do not use hard brush, knife or other sharp edged tools etc. for cleaning the interior, control panel door, trays and the other parts. Do not use deforming materials and detergents.
- Clean the interior using soapy clothes, and then dry it with another soft cleaning cloth.
- Clean the glass surfaces using special glass-cleaning materials.
- Clean the top gas burners with soapy water and brash the gas tubes.
- Do not use flammable materials such as acids, gasoline etc. for cleaning.
- Do not wash any parts of the oven in dishwasher.
- To clean the front door’s glass cover, take the washers out using a screwdriver and take the inside glass out. Then wash and rinse. After drying, put the glass in the gasket properly and put it into its place.
USE OF ELECTRONIC TIMER & PROGRAMMING (FOR MODELS WITH DIGITAL TIMER)
An electronic timer is module which enables your oven to get the food ready to serve at the desired time.
The only thing to be done is to program the cooking time and ready time. It can also be used as an alarm clock, where you just give in the amount of time after which it should remind you by a buzzer tone.
When you connect the oven to the electric supply the 0.00 will be appear on the timer screen. At the
same time the mark AUTO will blinks on the screen. In this position as the contacts of timer is open the oven does not operate. The heating elements supplied by electric currency through the timers’ contacts. If you desire to operate the oven manually, you have to push on the ¥ button.
The oven’s timer works at the same principle with clock. In the absence of electric currency, the timer should
be reset again. When is not the defect of timer. In such cases the timer should be adjusted again.
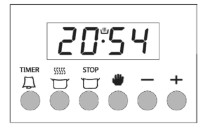
TIMER OF DAY ADJUSTMENT
This adjustment can only make when no cooking program is in progress. Press the WP button or J and buttons together. Within 5 seconds, using + and – adjust the clock. Long presses of those buttons will result in fast changes.
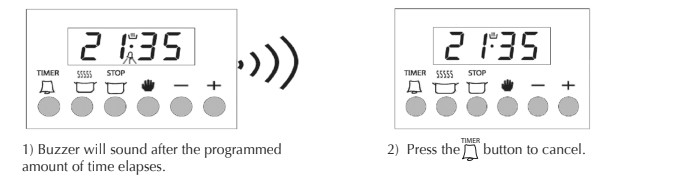
ADJUSTING THE BUZZER ALARM
With this feature, you can program after how much elapsed time you should be warned by a buzzer sound.
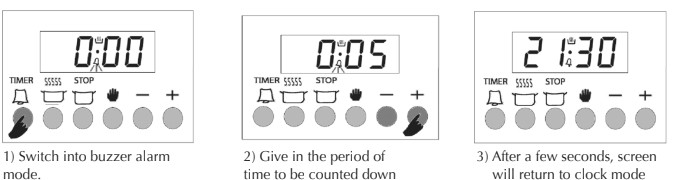
Note: Once programmed, the remaining time can be seen by pressing the IA button once
CANCELLING THE BUZZER SOUND
AUTOMATIC COOKING PROGRAM
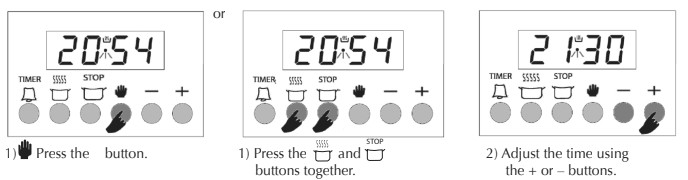
If you want to start cooking immediately, you just have to give in the cooking time.
Example: We placed our food into the oven and want it to be cooked for 2 hours and 15 minutes
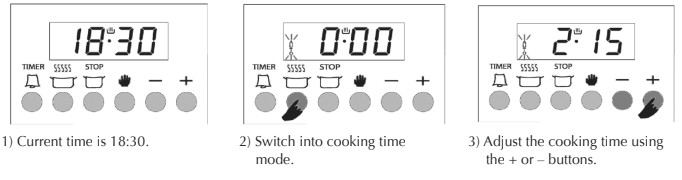
Now, you have programmed your oven to cook the food for 2 hours and 15 minutes.
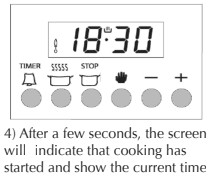
Please do not forget to bring the function and/or temperature knobs of your oven to appropriate position.
Note: You may cancel the automatic cooking mode any time by pressing the button or and buttons together.
In the above example, cooking immediately started after giving in the cooking period. By pressing the [J button, you can see the ready time, i.e. the time when the food will be ready to serve, and if you want, you can also change it. In the example below, the ready time will be changed to 21:30.
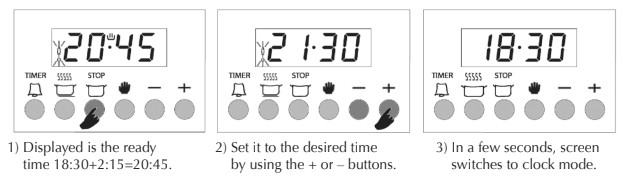
We now have programmed our oven to get the food ready at 21:30. Since the cooking time was pre-programmed as 2 hours 15 minutes, your oven will start cooking at 19:15, so that the food is ready at 21:30.
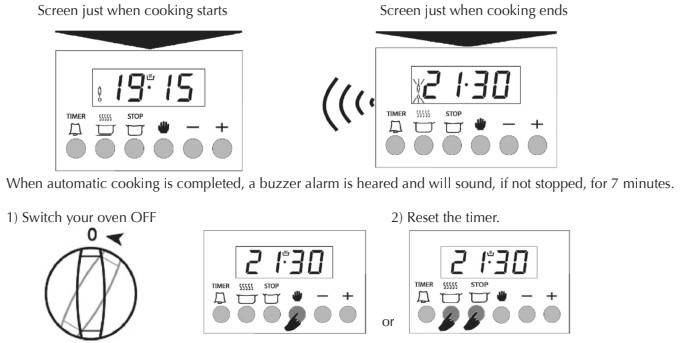
Note: Your oven will be inoperative until you reset the timer.
In the example shown, cooking time has been programmed first, the ready time was calculated automatically and was edited by us. It is also possible first to program the ready time, in that case the cooking time will be calculated automatically and should be edited thereafter.
BUZZER VOLUME ADJUSTMENT
You may adjust the buzzer tone of the timer in the following way:
1) Pressing and holding the ‘’ button, you can hear the current buzzer tone. Releasing and pressing again will switch to the next tone (3 different tones available}
2)The buzzer tone will be set to the last adjusted tone.
Note: As factory setting, the buzzer volume is set to the high tone. In case of a long power loss, the set buzzer tone will be this one.
Download the full PDF version of the user manual here.