Congratulations for choosing Kinetico to improve the quality of your water. You will immediately begin to notice the numerous benefits of having quality water in your home and the benefits of having a Kinetico Water Filtration System.
© 2020 Kinetico Incorporated “Kinetico” and the Kinetico logo are trademarks in the United States, other countries or both, of Kinetico Incorporated, Newbury, Ohio.
About Your Water Filtration System
Water is the most important resource in the world. And although the water you use for drinking and cooking constitutes less than one percent of all water used in the home, its quality is probably most important to you.
Experts suggest you drink approximately eight, eight-ounce glasses of water per day. Now that you have a Kinetico Water Filtration System, you can rest assured you’re drinking clean, high quality water. And it will taste great too. With a Kinetico Water Filtration System,
drinking those eight glasses of water will be a pleasure, not a chore.
Maintaining Your Water Filtration System
NOTE: You must follow the Water Filtration System’s operational, maintenance and replacement instructions to ensure proper system performance. Do not use where water is microbiologically unsafe or with water of unknown quality.
The Water Filtration System must be properly maintained to continue providing high quality household water.
Shutting Off the System
If you should ever discover a problem with your Water Filtration System, turn off the water supply to the system. Then call your local, authorized Kinetico dealer for service.
Filter Changes
Kinetico recommends changing the cartridge at least once per year, or if the water flow is reduced to an unacceptable level, or bad taste and/or odor return.
Depending upon your water chemistry, the return of certain compounds may not be noticable upon filter exhaustion.
It is recommended to have your water tested periodically in order to understand your specific needs with regard to filter change frequency.
Your local, authorized Kinetico dealer can change your cartridge, check your water and make sure your system is operating properly. If you choose to install your new cartridge yourself, follow the instructions in the cartridge replacement section at the end of this manual carefully. Never attempt to remove the system’s cartridge without first depressurizing the system.
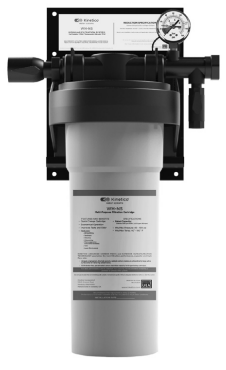
Install Your Kinetico Water Filtration System
What to Know Prior to Installation
• The Kinetico Water Filtration System is not to be used where water is microbiologically unsafe or with water of unknown quality without adequate disinfection before or after unit.
• For best performance and to maintain full capacity, we recommend installing a prefilter to protect this system.
• The need for a prefilter is determined by the amount of water used and the solid material content of your water supply.
• Do not install where line pressure is outside of 40-100 psi for model WH-NS or where temperature is lower than 40 ̊F or exceeds 100 ̊F.
• Installation must comply with any existing local plumbing codes.
• The unit(s) must be protected against freezing. Failure to do so may result in cracking of the filter and water leakage.
• This Kinetico Water Filtration System is designed for cold water line use only. Passing hot water through the system may seriously damage filter housing.
• Filter must be in contact with water at all times.
• Recommended pH range is 6 to 8.5.
• Recommended inlet pressure is 60 psi.
• Tools needed: drill, screwdriver, tube cutters (if hard plumbing: lead-free solder, heating device and flux).
Installation Instructions
Before Installing:
- Determine plumbing requirements
- Open box and verify all appropriate materials are present:
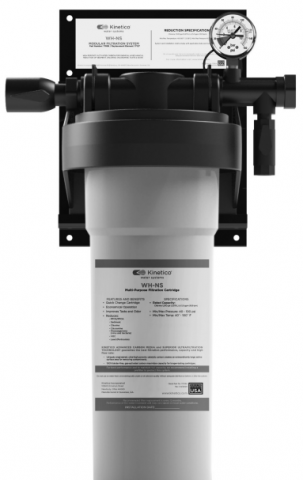
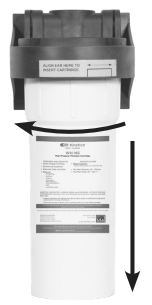
• Filter System- Head Assembly
- Cartridge Assembly
- Pressure Gauge
• O-rings and lubricant
• Mounting Track(s)
• E-clips
• Instruction Manual
• Proprietary Inlet and Outlet Adapters
Step One:
Prepare Space for the System:
- Select appropriate space to install the WH-NS System. The filter should be mounted upright on a vertical surface without obstruction, leaving a minimum of 6” space below the system for cartridge change outs. System measurements are shown below.
- Identify incoming water line. The WH-NS System should be connected to cold water only.
- Turn off the water supply. Depressurize and drain supply lines. Cut supply lines as needed to install the WH-NS System.
NOTE: If hard copper plumbing is present, use only lead-free solder and protect filter housing from heat. Do not solder within 12” of plastic parts.
NOTE: Follow appropriate plumbing codes.
VERIFY APPROPRIATE SPACE IS AVAILABLE FOR SYSTEM
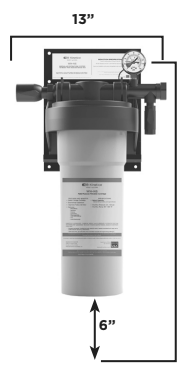
WH-NS Installation Dimensions Width x Height (head + cartridge + clearance) x Depth WH-NS 13” x (9” + 10” + 6”) x 10”
Step Two:
Typical Install – Choose correct mounting hardware for surface and attach back plate to wall. Mounting surface and hardware should be rated to support at least 50 lbs.
- Using a level, mark screw holes for back plate. Drill holes, and insert anchors.

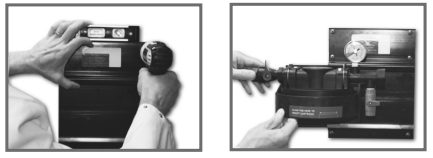
- Screw back plate into wall anchors. Slide filter head onto back plate.
Step Three:
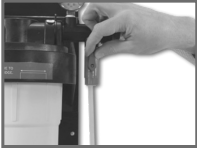
Attach Fittings
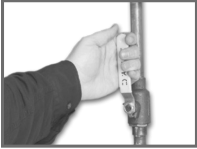
- Use appropriate 3/4”NPT fittings to connect to the cold water supply line. Do not over tighten fittings into plastic parts! Limited
Warranty will be voided if parts are cracked and/or broken due to misuse and/or over tightening. Use only Kinetico approved, WH
Series fittings.
Connect water filter inlet and outlet to cold water supply. If copper plumbing is necessary, use only lead-free solder and protect filter housing from excessive heat. Do not solder within 12” of plastic parts.
Step Four:
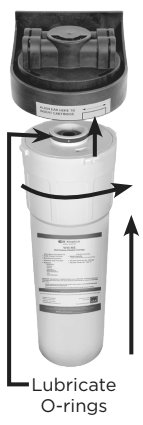
Install Cartridge:
- Generously lubricate inner and outer O-ring using provided lubricant.
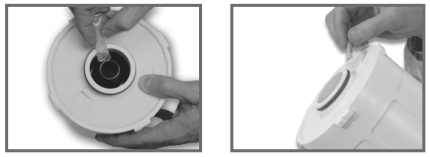
- Align cartridge tabs as indicated on head and insert cartridge and twist to lock into place.
Step Five:
Pressurize and Flush the System:
- Confirm the inlet ball valve to the system is off, then turn on the main supply line to the system.
- Open the flush valve and slowly turn inlet ball valve to ON position, allowing water to fill filter system. Once the system is filled, water will flow from the outlet of the flush valve. It may be helpful to add tubing to the end of the flush valve for routing to a bucket or nearby drain.
- Allow flush valve to remain open for 30-60 seconds. Flush water may be discolored for a short period of time.
- Once the water is clean and free of air bubbles, close flush valve.
- Start drawing water from a downstream faucet to remove remaining air from the system and water lines. Keep water running for approximately one minute until only water without air flows through.
Step Six:
Use Permanent Marker to Record the Installation Date on the Date Label.
Recommended filter replacement is every 12 months. Performance of the water treatment unit may vary based on local water conditions.
Maintenance
Cartridge Replacement Schedule
• Note the line pressure at the time of install. If the line pressure downstream of the system drops significantly, the cartridge(s) needs to be replaced.
• It is recommended to replace cartridges every 12 months regardless of pressure drop.
•Use system back plate label for cartridge replacement ordering information.
Replace the Cartridge of Your Kinetico Filtration System
Specifications
| Description | Part Number | Service Cycle (gallons) | Flow Rate (gpm) |
| WH-NS | 17099 | Chlorine – 1,500 (gal) | 5.0 (gpm) |
Min / Max Pressure : 40-100 psi
Min / Max Temperature: 40-100 ̊ F
Inlet / Outlet Size: 3/4” NPT
Step One
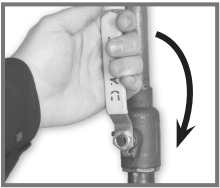
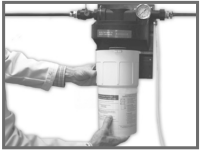
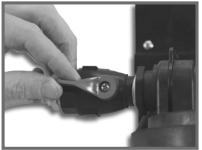
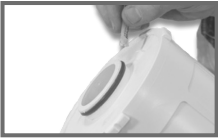
Turn off the inlet valve to the system and ensure the faucet is turned OFF. Push red pressure relief button located at the outlet of the WH-NS filter system to relieve pressure until no more water comes out. Alternatively, you may also relieve pressure by opening the flush valve. Grasp filter cartridge and rotate left 1/4 turn and pull downward to remove the filter cartridge. Properly dispose of old cartridge.
Step Two
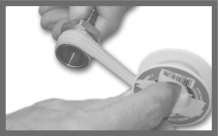
Remove and discard the sanitary cap from the top of the new cartridge. Be sure to apply sufficient lubrication (supplied) to the O-rings. Align tab on cartridge with notch in filter head and push upwards to insert. Be sure to push cartridge all the way in! Rotate cartridge right 1/4 turn until a definite stop is felt and cartridge is sealed. Turn on inlet valve. Flush for one minute or until flush water appears clean and free of air bubbles.
It is recommended that the cartridge be changed at least yearly, when pressure drops significantly, or when bad tastes and/or odors return.
Depending upon your water chemistry, the return of certain compounds may not be noticable upon filter exhaustion.
It is recommended to have your water tested periodically in order to understand your specific needs with regard to filter change frequency.
Troubleshooting
NOTE: A few drops of water may leak at O-ring when first installed. This should stop when O-rings are under pressure and seal properly.
Before beginning any troubleshooting
- Turn inlet valve off.
- Relieve pressure by opening flush valve and pushing the red pressure relief button.
Issue: Leak between threaded connections
- Remove fittings.
- Apply additional thread sealant compound.
- DO NOT over tighten fittings!
Issue: Leak between fittings and filter head
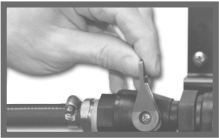
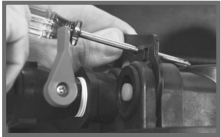
- Remove retainer clip carefully. A screwdriver may be necessary to pry the fitting out. Check fittings carefully for any cracks or damage. If damaged, gently remove leaking fitting, discard and replace with new parts.
- Reinsert retainer clip by pushing down into position.
Issue: Leak between cartridge and filter head
Remove cartridge and inspect O-ring. Relpace if damaged. Reinsert cartridge and verify that it is installed correctly. When viewed from above, white locking tabs on cartridge should be visible in four openings on filter head.
You can download the PDF version of the Kinetico Water Filtration System User’s Manual here.