
IMPORTANT SAFEGUARDS
WARNING: Read and save these safety guidelines. When using pressure cookers, basic safety precautions should always be followed.
When using electrical appliances, basic safety precautions should always be followed:
- READ ALL INSTRUCTIONS.
- Do not touch hot surfaces. Only use side handles for carrying or moving.
- Do not place the appliance on or in close proximity to a hot gas or electric burner, or a heated oven; heat from an external source will damage the appliance.
- Do not use near water or flame. Please keep out of direct sunlight.
- Extreme caution must be used when moving the appliance containing hot liquids. Do not move the appliance when it is under pressure.
- Do not use appliance for anything other than intended use.
- Do not use outdoors. Not for commercial use. For household use only.
- This appliance cooks under pressure. Improper use may result in scalding injury. Make certain the appliance is properly closed before operating. Please see the “Getting Started” section.
- Do not fill the appliance over 2/3 full. When cooking foods that expand during cooking such as rice or dried vegetables, do not fill the appliance over 1/2 full. Over filling may cause a risk of clogging the vent pipe and developing excess pressure. Please see the ”Pressure Cooking” section.
- Before each use, check the steam release valve/handle, steam release pipe, anti-block shield and float valve for clogging.
- Do not open the appliance until the appliance has depressurized and all internal pressure has been released. If the float valve is still up and/or the lid is difficult to open, this indicates that the appliance is still pressurized – do not force it open. Any pressure in the appliance can be hazardous. Please see the “Getting Started” section for instructions to safely remove lid.
- Do not use this appliance for deep frying or pressure frying with oil.
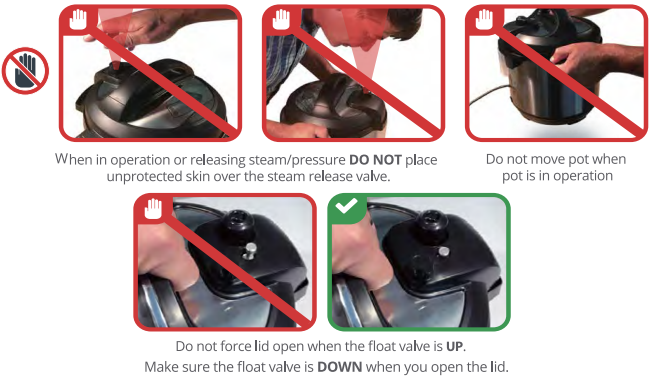
- Do not lean over or place your hands or face over the steam release valve/handle or float valve when the appliance is in operation or has residual pressure. Do not touch the metal portion of the lid when the appliance is in operation; this could result in injury.
- Do not cover or obstruct the steam release valve/handle and float valve with cloth or other objects. Obstructing the steam release valve/handle and float valve can create a safety issue and may cause injury.
- Turn the appliance off if steam escapes from the steam release valve/handle or float valve in a steady stream for longer than 3 minutes. There may be residual pressure in the appliance. Allow the appliance to depressurize naturally or release all excess pressure before opening. Please see the “Troubleshooting” section.
- Turn the appliance off if steam escapes from the sides of the lid and ensure sealing ring is properly installed. Please see the “Getting Started” section.
- CAUTION To protect against electrical shock, do not immerse the power cord, plugs, or appliance in water or other liquid.
- A short power supply cord (0.6 m to 0.9 m) is provided to reduce the hazards resulting from it being grabbed by children, becoming entangled in, or tripping over a longer cord.
- Always attach plug to appliance first, then plug cord into the wall outlet. To disconnect, turn appliance “off”, then remove plug from wall outlet.
- Unplug from outlet when not in use and before cleaning. Allow to cool before putting on or taking off parts, and before cleaning or storage.
- Do not operate any appliance with a damaged cord or plug, or after the appliance malfunctions or has been damaged in any manner. Contact Customer Care.
- Do not let power cord hang over edge of table or counter, or touch hot surfaces.
- Intended for countertop use only. Keep the appliance on a stable, heat-resistant platform. Do not place on anything that may block the vents on the bottom of the appliance.
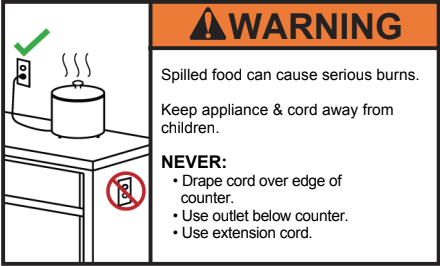
- Spilled food can cause serious burns. Keep appliance and cord away from children. Never drape cord over edge of counter, never use outlet below counter, and never use with an extension cord.
- When cooking meat with skin (e.g. sausage with casing), the skin can swell when heated. Do not pierce the skin as long as it is swollen; this could result in scalding injury.
- When pressure cooking food with a doughy or thick texture, or a high fat/oil content, contents may splatter when opening the lid. Please follow recipe instructions for pressure release method. Once steam is fully released, gently shake the appliance with extreme caution and then release the steam again, if necessary, before removing the lid.
- Before inserting the inner pot into the appliance, wipe the outer surface of the inner pot and cooking element to confirm they are dry and free of food debris.
- Do not attempt to repair, replace, or modify components of the appliance, as this may cause electric shock, fire or injury, and will void the warranty.
- Do not tamper with any of the safety mechanisms.
- Do not use appliance in electrical systems other than 120V/60Hz for North America. Do not use with power converters or adapters.
- Close supervision is necessary when the appliance is used near children.
- This appliance should not be used by children; by individuals whose physical, sensory or mental abilities may prevent safe use of the appliance; or by individuals with limited knowledge of how to use the appliance. Close supervision is needed when using this appliance near these individuals.
- To reduce the risk of electric shock and pressure leakage, cook only in a removable container authorized by the manufacturer.
- The use of accessory attachments not recommended by the appliance manufacturer may cause injuries.
SAVE THESE INSTRUCTIONS
IMPORTANT SAFEGUARDS

Plug into a grounded 3 prong outlet.
Do not remove ground prong.
Do not use an adapter.
Do not use an extension cord.
Failure to follow these instructions can result in death, fire, or
electrical shock.
As per UL safety requirements, a short power supply cord (0.6 m to 0.9 m) is provided to reduce the hazards resulting from entanglement and tripping.
This appliance has a 3-prong grounding plug. To reduce the risk of electric shock, plug the power cord into a grounded (earthed) electrical outlet that is easily accessible.
Only use the power cords included upon purchase with Instant Pot® branded pressure cookers.
Note: ensure the plug is pushed into the socket fully; the loose contact could cause the risk of sparks.
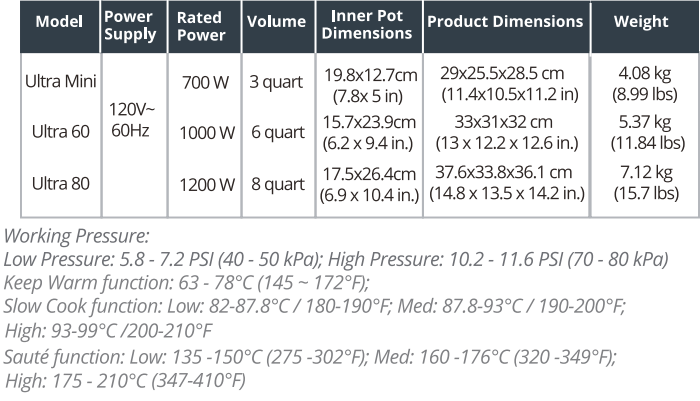
Specifications
Overview
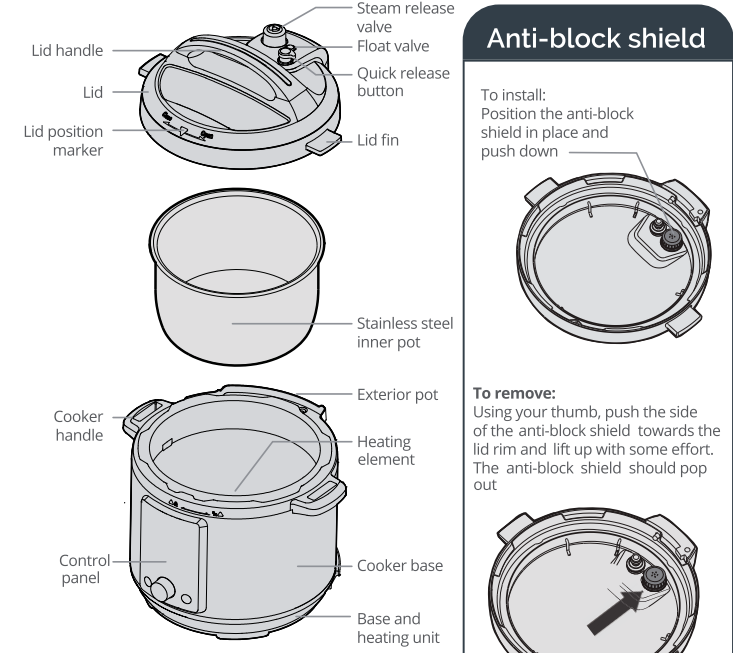
Control and Features
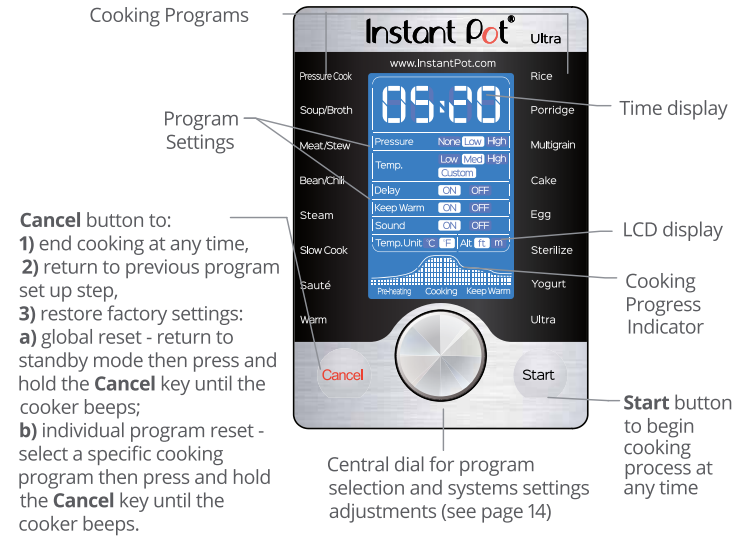
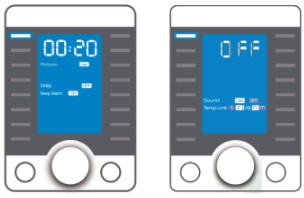
Control Panel
The control panel of your Instant Pot® Ultra Mini/60/80 consists of a large LED display, a central dial for program selections and adjustments, a Cancel button and a Start button.
Note that the Ultra Mini does not have Poultry and Multigrain programs.
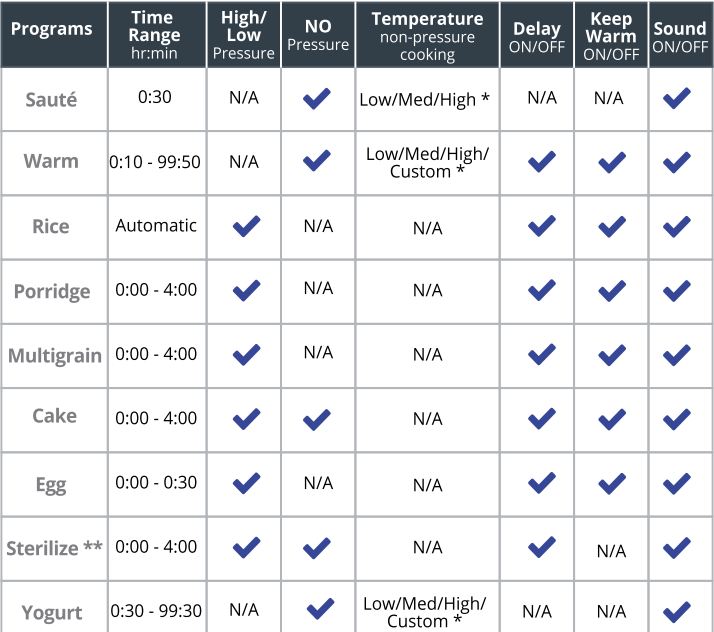
Cooking Program Options
Instant Pot® is a programmed smart cooker that has preset cooking times for different food ingredients and cooking methods. It also remembers your most recent setting per cooking program for a more personalized cooking experience.
Ultra: The ultimate cooking tool to allow full user control of pressure and non-pressure cooking conditions. You can adjust different parameters based on Your favorite recipes.
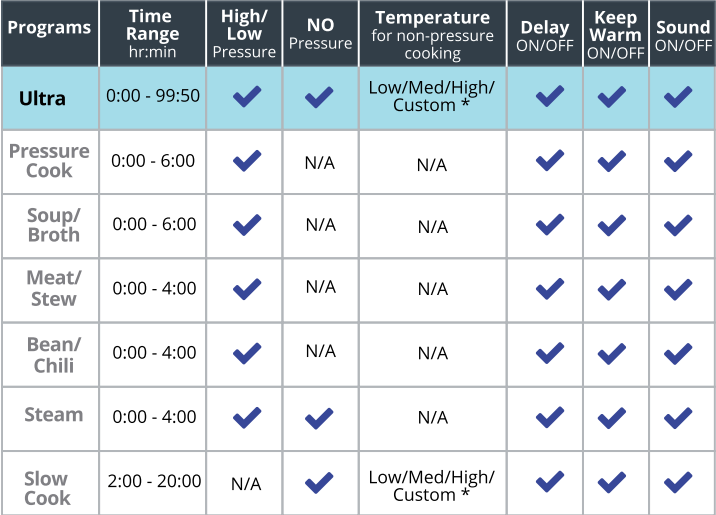
- Med setting is not available on Ultra Mini.
- For dairy pasteurization and water canning only. Please refer to ‘USDA Complete Guide to Home Canning.’ Ultra has not been tested by USDA for food safety in pressure canning.
Getting Started
- Read warning cards and warning labels. Remove all packaging materials and removable warning cards from the cooker and accessories.
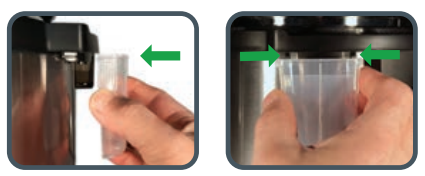
Install the condensation collector at the rear of the cooker by aligning the top of the collector with the guides on the cooker and press in.
2. Install the steam release valve onto the lid if it is not already installed.
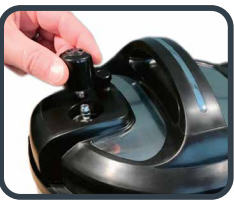
The steam release valve fits loosely, it does not lock tight into the lid.
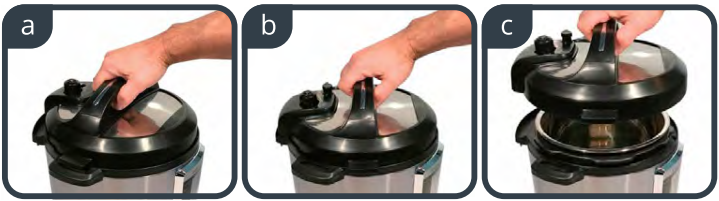
3. Remove the lid by holding the handle, turning the lid counter-clockwise and lifting the lid.
4.Remove the inner pot from the pressure cooker. Add food and liquids to the inner pot as the recipe directs. If steaming, place the steam rack on the bottom of the inner pot first. Always add at least 2 cups (18 fl oz / 500 mL) of liquid for minimum liquid requirement. See “Cooking and Safety Tips” section.
5. Make sure the outside of the inner pot is dry prior to placing the inner pot back into the pressure cooker. Make sure there is no food debris on the heating element.
6.Make sure the sealing ring rack is completely set in the groove on the inside of the sealing ring. Ensure there is no deformation on the sealing ring rack. Do not attempt to repair a deformed ring rack.
7. Place the lid on the cooker, align the mark on the lid with the Unlock mark and turn clockwise to the Lock mark.
8. The Quick Release button will automatically reset and pop up to the Sealing position when the lid is closed (button up = sealed)

Pressure Cooking
The following are pressure cooking programs: Ultra, Pressure Cooker, Soup/Broth, Meat/Stew, Bean/Chili , Steam, Sterilize, Egg, Rice, Multigrain, Cake, and Porridge.
- How the Quick Release button works; when the lid is closed, the Quick Release button will automatically pop up to the Sealing Position (button-up=sealed).
For Quick Release-press down the Quick Release button until it clicks and locks into the Venting position.
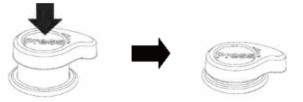
To stop Quick Release- slightly turn the Quick Release button counter clockwise until it pops up to the Sealing Position.

2.Connect the power cord. The default cooking program Pressure Cook flashes and the LCD displays the program settings. Press Start to begin cooking right the way, or adjust program settings as instructed. When the cooker is idle for 30 seconds, the LCD WILL display OFF, indicating the cooker is in standby mode.
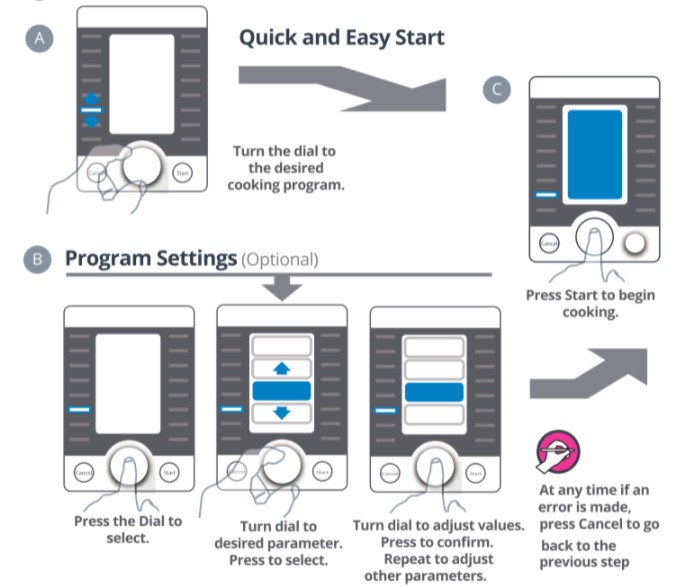
To begin cooking, follow these steps:
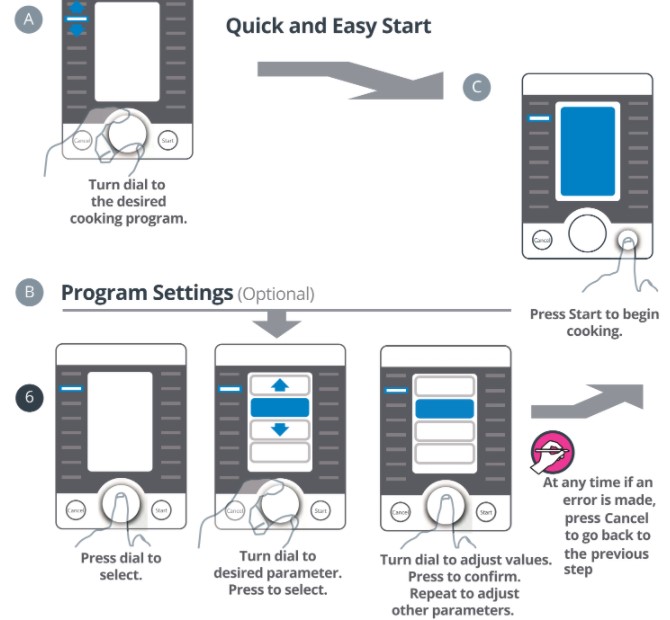
System Settings (Sound ON or OFF, Temperature Unit. degrees F or C and Altitude: ft or m) Press the Cancel button to return the cooker to standby mode displaying OFF. Push and hold the central dial for 5 seconds and then release and hold. Rotate to select the parameter you wish to change, press the central dial and rotate to make adjustments. Press central dial again to confirm the change. Press Start button to exit.
Initial Test Run (optional)
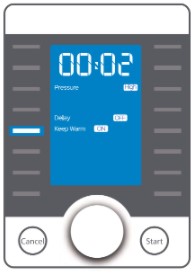
4. Add 3 measuring cups of water to the inner pot (-25 fl oz or 750ml).
5. Plug-in the cooker. Rotate the central dial to Steam, set cooking time to 2 minutes. See diagram below.
Warning
- Inner pot should not be more than 2/3 full. For food that expands during cooking such as rice and dried vegetables, inner pot should not be more than 1/2 full. Please note that certain foods such as applesauce, cranberries, pearl barley, oatmeal or other cereals, split peas, noodles, pasta, and rhubarb can foam, froth, or sputter and can clog the steam release valve.
- Make sure the steam release valve, float valve, and anti-block shield are clean and free from debris.
6. depending on the amount of food and its temperature, the preheating cycle can last from 10 to 40 minutes. As the cooker heats up and pressure builds, the float valve will rise. When working pressure is reached, the cooker enters the cooking cycle and the LCD displays the remaining cooking time.
7. When cooking is finished, the cooker will either be in Keep Warm move or in standby move displaying OFF.
8. Release pressure using one of the following methods (refer to recipe):
Natural Release: Allow the cooker to cool down by itself until the float valve drops down. This may take 10 to 40 minutes, or even more, depending on the amount of food in the cooker. Place a wet towel on the metal part of the lid to speed up cooling (do not cover the steam release valve).
Quick Release: Press the quick release button until it clicks into to the Venting position. Let steam out until the float valve drops down. Never pull out the steam release handle while releasing steam as escaping steam is extremely hot and can cause scalding. For food with large liquid volume or starch content, use the Natural Release method as thick liquid may splatter.

Turn the lid counterclockwise and lift. Make sure the float valve is down before opening the lid.
Non-Pressure Cooking
The following are non-pressure cooking programs: Sauté, Yogurt, Ultra, Slow Cook, and Warm.
- Connect the power cord. The default cooking program Pressure Cook flashes.
Slow Cook, Warm, Ultra
You may use the Instant Pot® glass lid as an option. If using the pressure cooking lid, make sure the steam release valve is turned to Venting position.

Sauté
Choose temperatures between Med (for stir-frying), Low (for simmering or thickening sauce) and High (for pan searing or browning meat).
When working temperature has reached, the LCD displays Hot.
Add food to the inner pot and begin sautéing. Do not use any lid for the sauté program or there will be a warning sign.
the sauté time is set at 30 minutes as a safety precaution.
Making yogurt
- Heat Milk
a) Add milk to the inner pot.
b) Connect the power the cord. the LCD displays OFF indicating that the cooker is in Standby state.
c) Rotate the central dial to locate the yogurt program, and then press to select it.
d) Press central dial again to set the desired heating time. Set the time and press the central dial to confirm.
e) Rotate the central dial and press temp and press the central dial. Select High temperature for Boil. Press Start and let the milk heat.

f) When the cooking cycle has finished, the LCD displays yogt.

to make yogurt in containers instead of the inner pot, modify step 1 (Heat Milk); fill the containers to 90% full with milk, add 1 cup (250ml) of water to the inner pot, place the containers on a steam rack in the inner pot, close the lid, the quick release button will automatically reset to Sealing position. Use the central dial to select the Steam function and set the cooking time to 2 minutes. Once complete, use natural release method then open the lid and continue with steps 2 to 4.
2. Cook Milk
a) Remove the inner pot and place it on a wire rack.
b) Allow the milk to cool to 115 degrees F/46 degrees C. test the milk temperature with a thermometer.
3. Add Start Culture
a) Add start culture to the warm milk in the inner pot. Stir.
b) Place the inner pot back into the cooker and close the lid.
Non-pressure cooking, the steam release valve can be in Venting or Sealing position.
4. Ferment yogurt
a) Rotate the central dial to locate the yogurt program, and then press to select.
b) Press the central dial again to set the desired fermentation time. Press central dial to confirm.
c) Move selection frame to temp to adjust fermentation temperature. Press central dial to confirm.
d) Press the start button. the fermentation process starts.
e) When the cooking cycle has finished, the LCD displays yogt.

f) Remove the lid by the turning it counterclockwise and then lifting.
g) Store yogurt in clean jars and refrigerate.
Cooking and Safety Tips
Safety Tips
• Extreme caution should be taken when pressing the quick release button. Keep hands and face away from the steam release openings. Failure to comply may result in scalding or serious injury.
• Do not attempt to open the lid until pressure inside the cooker is completely released. As a safety feature, until the float valve drops down the lid is locked and cannot be opened. Do not force lid open.
• When opening the lid, the inner pot may adhere to the lid. This is caused by vacuum due to cooling. Make sure the quick release button is in the Venting position.
• If the float valve is stuck, press the quick release button to the Venting position. Once all the steam is released, push the float valve down with a pen or long stick. • Follow the recipe instructions for releasing pressure. With the quick release method, begin immediately upon completion of pressure cooking; otherwise the food may be overcooked. With natural release method, wait for the amount of time specified in the recipe. typically, the quick release method is used for delicate foods such as custards and fresh vegetables; the natural release methods is used for meats, soups, and grains.
• Always add at least 2 cups (18 fl oz / 500 ml) of water or other liquids so enough steam can be generated to cook under pressure. These include cooking sauces, wine, beer, stocks, juices of fruits and vegetables. •Oils and oil-based sauces do not have enough water content and will not account for the required liquid volume. • For extra flavor, use the sauté function as you would when cooking with conventional cookware. For example the brown meat and vegetables for a stew before adding liquids and cooking under pressure.
• Time to pressure and cooking time will vary according to the temperature and quantity of the ingredients. Food that is cold or frozen will take longer to cook than food that is at room temperature.
• When using the Delay Start program, allow sufficient cooling down time before serving.
• The Delay Start program is not recommended for porridge, oatmeal or other foamy and thick liquids. Cooking progresses should be monitored when cooking these foods.
Care and Cleaning
Unplug your Instant Pot® and let it cool to room temperature before cleaning.
• All Instant Pot® inner pots, pressure cooker lids, glass lids, and accessories are dishwasher safe (it is recommended to use the top rack of the dishwasher).
• Remove the inner pot and lid and wash with detergent. Rinse with clear water and wipe dry with a soft cloth.
• Wipe the inner cooker base rim and slot dry with cloth to prevent rusting of the exterior cooker rim.
• Remove the sealing ring and anti-block shield from the underside of the lid. Wash with warm, soapy water, rinse with clear water and wipe dry with a soft
cloth.
• The sealing ring must always be properly positioned on the underside of the lid.
• Clean the outer body with a damp soft cloth or sponge.
• Never use harsh chemical detergents, scouring pads or powders on any of the parts or components.
• Periodically check that the steam release valve and float valve are in good working order and free of debris.
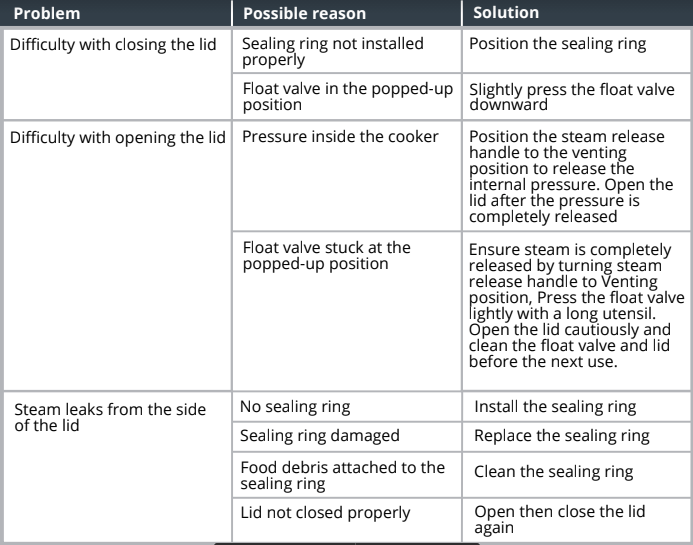
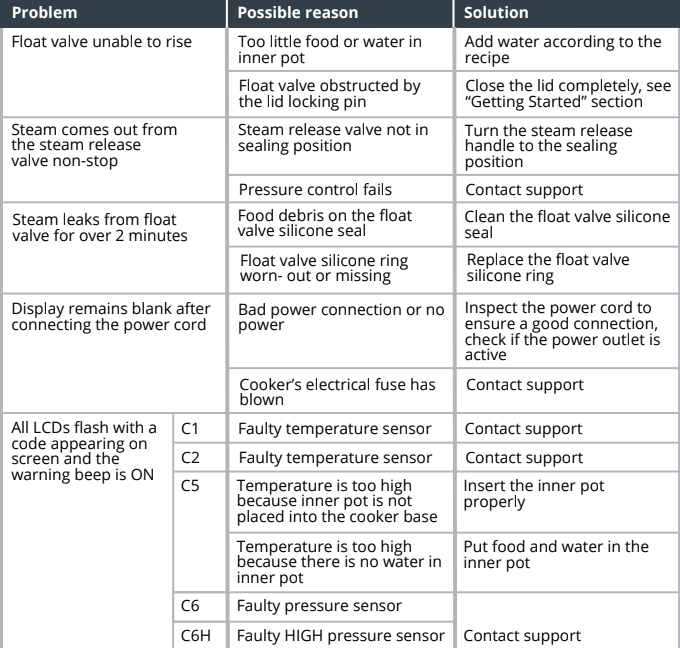
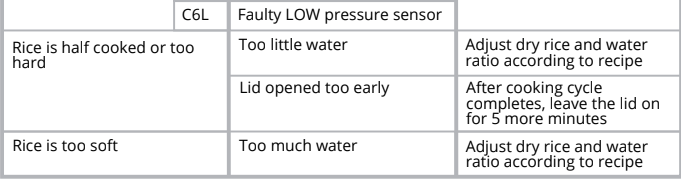
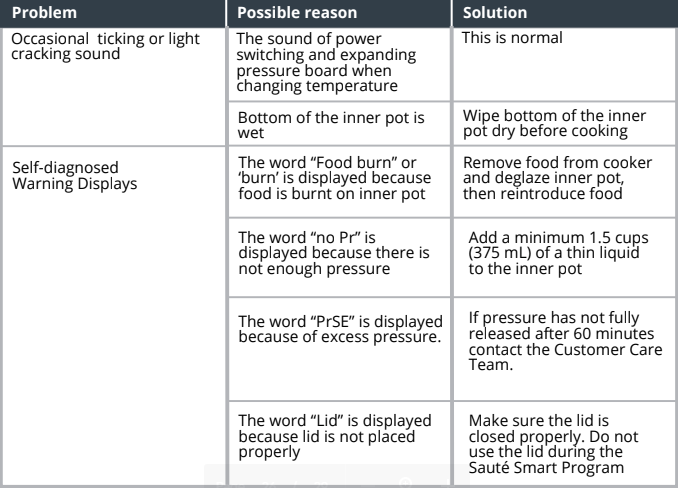
Troubleshooting
If you experience any problems with the cooker, need technical assistance or product return information, please contact the Instant Pot support team using the methods below:
• Create a support ticket: www.InstantPot.com/support/
• Email: support@instantpot.com
• Call 1-800-828-7280 ext 2 for the customer care team.
You can also find tips, videos and FAQs on www.InstantPot.com/faq/
The issues in the following tables do not always indicate a faulty cooker. Please examine the cooker carefully before contacting the support for repair.
Warranty
Limited Warranty
This Limited Warranty is effective for one year from the date of original consumer purchase. Proof of original purchase date and, if requested by an authorized Instant Pot Company (“IPC”) representative, return of your appliance as IPC may direct at IPC’s expense, is required to obtain service under this Limited Warranty.
When this appliance is operated and maintained in accordance with written instructions attached to or furnished with the product, Instant Pot Company will pay for either (i) repair labor to correct defects in materials or workmanship that existed when this appliance was purchased or (ii), at its sole and exclusive
discretion, replace the appliance for a period of one (1) year from the date of purchase. In the event that your appliance is replaced, the Limited Warranty on the replacement appliance will expire at the original date (i.e. 12 months from the original purchase date).
This Limited Warranty extends only to the original purchaser and use of the appliance in the United States of America and Canada. This warranty does not cover units that are used outside of the United States of America and Canada.
Any modification or attempted modification to your appliance may interfere with the safe operation of the appliance and will void this Limited Warranty. This Limited Warranty does not apply in respect of any appliance or any part thereof that has been altered or modified from its factory settings unless such
alterations or modifications were expressly authorized by an IPC representative.
IPC is not responsible for shipping costs related to warranty service, save and except for shipping costs associated with the return of your appliance as provided herein.
Limitation and Exclusions
The liability of IPC, if any, for any allegedly defective appliance or part shall in no circumstances exceed the purchase price of a comparable replacement appliance.
This Limited Warranty does not cover:
- Damage resulting from accident, alteration, misuse, abuse, neglect, unreasonable use, use contrary to the operating instructions, normal wear and tear, commercial use, improper assembly, disassembly, failure to provide reasonable and necessary maintenance, fire, flood, acts of God or repair by anyone unless directed by an Instant Pot Representative.
- Repairs where your appliance is used for other than normal, single-family household use or when it is used in a manner that is contrary to published user or operator instructions.
- Use of unauthorized parts and accessories, or repairs to parts and systems resulting from unauthorized repairs or modifications made to this appliance.
The cost of repair or replacement under these excluded circumstances shall be borne by you.
Disclaimer of Implied Warranties
IMPLIED WARRANTIES, INCLUDING ANY WARRANTIES OF MERCHANTABILITY OR IMPLIED WARRANTY OF FITNESS FOR A PARTICULAR PURPOSE, ARE HEREBY LIMITED TO ONE YEAR OR THE SHORTEST PERIOD ALLOWED BY LAW. Some states or provinces do not allow limitations to the duration of implied warranties of
merchantability or fitness, so this limitation may not apply to you.
Disclaimer of Representations Outside of Warranty
IPC makes no representation about the quality, durability, or need for service or repair of this appliance other than the representations contained in this warranty.
Limitation of Remedies; Exclusion of Incidental and Consequential Damage
YOUR SOLE AND EXCLUSIVE REMEDY UNDER THIS LIMITED WARRANTY SHALL BE PRODUCT REPAIR OR REPLACEMENT AS PROVIDED HEREIN. IPC SHALL NOT BE LIABLE FOR INCIDENTAL OR CONSEQUENTIAL DAMAGES ARISING OUT OF OR IN CONNECTION WITH THE USE OR PERFORMANCE OF THE APPLIANCE OR
DAMAGES WITH RESPECT TO ANY ECONOMIC LOSS, PERSONAL INJURY, LOSS OF PROPERTY, LOSS OF REVENUES OR PROFITS, LOSS OF ENJOYMENT OR USE, COSTS OF REMOVAL, INSTALLATION OR OTHER CONSEQUENTIAL DAMAGES OF WHATSOEVER NATURE.
You the buyer may have other rights and remedies under your state’s or province’s applicable laws, which are in addition to any right or remedy which may be available under this limited warranty.
Warranty Registration and Service
Please visit http://instantpot.com/support/register/ to register your new Instant Pot and validate your warranty within thirty (30) days of purchase. You will be asked to provide the store name, date of purchase and model number (found on the base of your cooker) along with your name and address. The registration
will enable us to keep you up to date with product developments, recipes and contact you in the unlikely event of a product safety notification. By registering, you acknowledge to have read and understood the instructions for use, and warnings set forth in the accompanying instructions.
To obtain service under this warranty, please call the Customer Care Team at 1-800-828-7280. If IPC is unable to resolve the problem, you may be asked to send your appliance to the Appliance Service Department for quality inspection. IPC is not responsible for shipping costs related to warranty service, save and except for shipping costs associated with the return of your appliance from Canada or within the 48 contiguous states and the District of Columbia of the United States of America, as provided herein. When returning your appliance, please include your name, address, phone number, proof of the original purchase date as well as a description of the problem you are encountering with the appliance.
You can download the PDF version of the INSTANT POT ULTRA SERIES User Manual here.