SAVE THESE INSTRUCTIONS.
Please read the manual carefully and retain for future use.
IMPORTANT SAFEGUARDS
1. Use caution to avoid burns: Do not touch the hot surface or the heated water while using the cooker. Turn off the cooker and allow the cooker to cool before emptying water from the cooking container.
2. Use caution to avoid electrical shock: Never immerse the power cord, plug, or entire cooker in water or other liquid. Do not fill the water past the [MAX] fill line. Never immerse the control panel or upper section of the device in water or other liquid. If the device or any of the specified areas is submerged, unplug the cooker immediately and contact the Customer Care team (https://www.instantpot.com/support/).
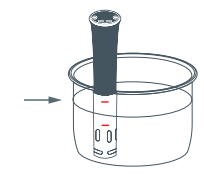
3. Operate the cooker in water ONLY. Do not use in any other liquids or operate outside of water. Maintain the water levels between the [MIN] and [MAX] indicators.
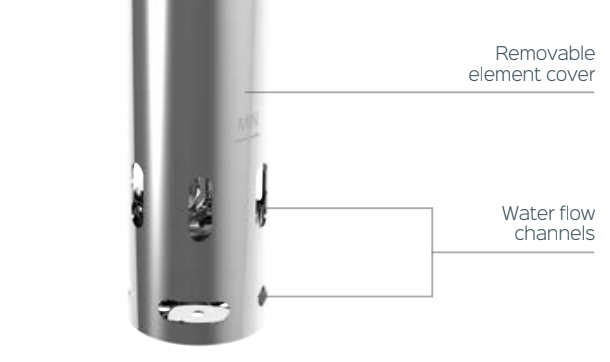
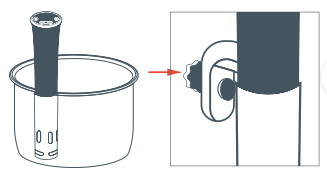
4. Never operate the cooker with the stainless steel element cover removed. Always ensure the cooker is securely clamped.
5. Adult supervision is required if the cooker is operated near children.
6. Unplug from outlet when not in use and before cleaning. Allow to cool before storage.
7. Do not let cord hang over edge of table or counter, or touch hot surfaces.
8. Do not operate the cooker with a damaged power cable or plug, or after the product malfunctions or has been damaged in any manner. Immediately contact the Customer Care team (https://www.instantpot.com/support/).
9. Do not place on or near a hot gas or electric burner, or in a heated oven.
10. Place your cooking container on a heat protector or mat to avoid damaging work surfaces.
11. Never use deionized water.
12. Always seal food in a bag or jar before submerging it into the water of the cooking container.
13. Consuming raw or undercooked meats, poultry, seafood, shellfish or eggs may increase the risk of food borne illness; refer to the minimum cooking times provided within this guide.
14. Do not use the cooker for any use other than outlined within this guide.
15. WARNING: Spilled hot water can cause serious burns. Keep appliance and cord away from children. Never drape cord over edge of counter, never use outlet below counter, and never use with an extension cord.
16. Product is not intended for outdoor use, and is intended for household use only.
Read all the safety and usage instructions before using the cooker. Save these instructions.
Introduction
Sous Vide Cooking
The Accu Slim Sous Vide Immersion Circulator is designed for the gourmet who strives to create ‘restaurant quality dishes’ in the comfort of their home. Professional chefs and high-end restaurants have been relying on Sous Vide cooking to achieve that perfect tenderness for decades.
The term “Sous-Vide” is French for ‘Under Vacuum’, referring to the process of vacuum sealing food, bringing it to a very precise temperature, and holding it there for a period of time to achieve precise and amazing results. “Sous-Vide” is synonymous with superior taste, and the highest quality. Sealing food in pouches permits it to cook in its own juices, retaining the vitamins and minerals from within the food, natural flavors are intensified, food is healthier, more tender, juicer, and tastier. The process relaxes the fibres in meat, poultry, and seafood so marinades and seasonings are more easily absorbed for greater flavor. Instant Pot® Accu Slim Sous Vide Immersion Circulator creates and maintains an even and accurately controlled cooking water-bath for perfect cooking results. The product can be used on meat, poultry, seafood, eggs, vegetables, and fruits.
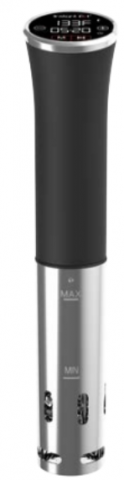
Instant Pot®’s Sous Vide Immersion Circulator has a touch-screen digital control panel, a stainless steel element cover, a handle for better usability, and a secure stand-up design.
Developed to be easy-to-use to allow you to prepare the perfect dishes for family and friends. Ideal for entertaining, preparing food in individual pouches provides you the ability to easily cater to personal tastes, and nutritional requirements all while preparing your succulent dishes ahead of time.
Precise Temperature Control
The Accu Slim Sous Vide Immersion Circulator has a temperature range of between 20 °C and 95 °C / 68 °F to 203 °F, with increment options of 0.1 °C or 1 °F. Different cooking temperatures are required for different types of food, and the precision accuracy that the device provides allows the chef to make adjustments to the preferred degrees of doneness.
For example, the optimal temperature to cook a steak to medium doneness is 56 °C / 133 °F. *See the Temperature and Time Guide (page 9) for additional information.
Time
The cooking time is dependent upon the thickness, rather than the weight of the food. A thicker cut of meat will require a longer amount of time to cook. The default cooking time is 04:00 hours and can be adjusted to your preference: from 1 minute to 72 hours (00:01 – 72:00).
Ideal Foods for Sous Vide Cooking
Meats
Red meat: lamb, beef, venison, bison, and pork
Poultry: chicken, turkey, and duck
Seafood: fish, lobster tails, and scallops
Eggs
Vegetables
Root vegetables: potatoes, carrots, parsnips, beets, and turnips
Tender vegetables: peas, asparagus, corn, broccoli, cauliflower, eggplant, onions, and squash
Fruit
Firm fruits: apples, and pears
Tender fruits: mangoes, plums, apricots, peaches, nectarines, papayas, and strawberries
Food Preparation
• Start with fresh and high quality ingredients.
• Ensure that all meat, seafood, and poultry have been stored at below 5 °C or 41 °F. We recommend using a digital food thermometer to check the temperature.
• Make sure that the food pouches are clean and that they’ve not been contaminated by dirt or other food items.
• Use detergent and warm water, or a sanitizing solution to clean the food preparation area. • To avoid any cross-contamination, ensure that the area used for raw ingredient preparation does not come into contact with any cooked foods.
• Wash hands well before any food preparation.
Storage
If the food you have cooked is not going to be consumed immediately, plunge the pouch into ice water to reduce temperature quickly. Keep refrigerated.
Ingredients & Seasonings
• Use the highest-quality and freshest ingredients available when cooking sous vide. The food cooks in its own juice. You want to make sure the juice has the best possible flavor.
• When seasoning with salt, it is better to use a little less than you would to season foods cooked by traditional methods, especially with meats, poultry, and fish. You can always season to taste with salt after cooking.
• Use garlic powder rather than raw garlic, as raw garlic can become strong and bitter when cooked sous vide. Make sure not to use garlic salt. Pure and high-quality garlic powder will provide better results.
Overview
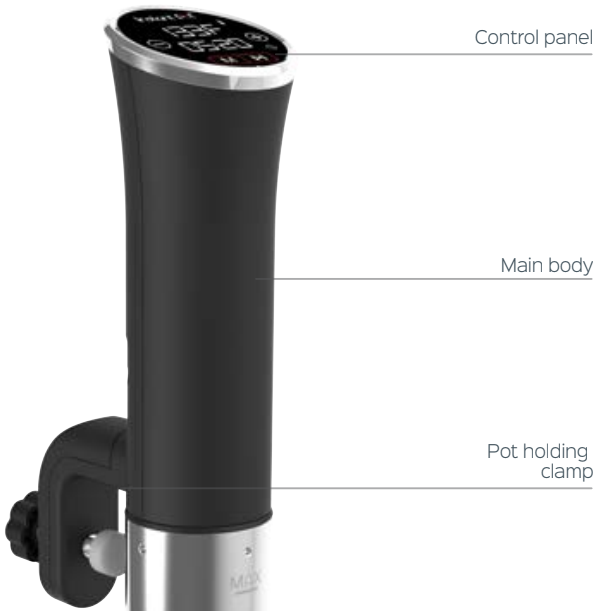
Controls & Features
- Turn On & Off
ON: plug in the cooker.
OFF: unplug the cooker.
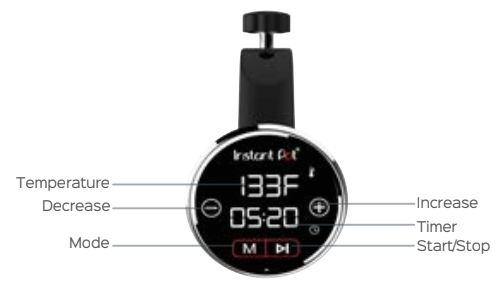
2. Start/Stop Button
Start & Stop: Power on the cooker, set the desired cooking temperature and time. Press the button to start the cooking process. Press this button again to stop the cooking process and return to the default temperature and time settings.
3. Mode Button
Use this button to toggle back and forth between the temperature and time settings. Hold this button down for 5 seconds to change the temperature display from Celsius to Fahrenheit. It is not possible to switch between Celsius and Fahrenheit while the cooker is cooking.
4. Setting Adjustment Buttons
Use the and buttons to change to the desired temperature and time settings. When using the temperature setting, press the or buttons once to increase or decrease the temperature in increments of 0.1 °C (or 1 °F). Press and hold the or buttons to change the values faster.
To adjust the cooking time, press the or buttons to increase or decrease time in increments of 1 minute for cooking time between 1 minute and 2 hours (00:01 – 02:00), and in increments of 10 minutes for cooking times between 2 hours and 72 hours (02:00 – 72:00). Press and hold the or buttons to change the values faster. When you’ve reached the desired temperature and time, press and hold the button to begin cooking.
To make adjustments to the cooking settings (temperature and time) once the cooker has begun cooking, press the button, and then adjust the or button. Press the button once more to toggle between temperature and time. The setting actively being adjusted will blink. Press the button to confirm the change.
Instructions
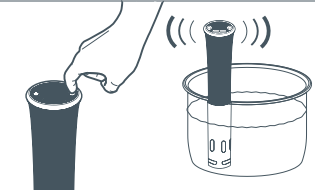
- Plug the cooker in and all the buttons will light up. A “beep” will sound.
The cooker will display the default time of 04:00 and temperature of 56 °C / 133 °F. If this is the desired cooking temperature and time, press the button to begin cooking. To adjust the cooking settings, continue to Step 2.
2. Press the button, and the temperature display will flash. Press the or button to set the desired temperature.
Press the button again, and the time display will flash. You can now use the or button to set the desired cooking time.
3. Once the temperature and time parameters have been set, press the button to start the cooking process. There is a preheat stage to bring the cooker to the desired temperature before cooking. As the cooker is preheating, the display will indicate the temperature of the water as the heat increases and [ON] will flash on the LED display time area. When the desired temperature is reached, the cooker will beep 3 times and begin counting down the cooking time as displayed on the timer.
4. If at this stage you need to stop or reset the cooker, press the button. This will stop the cooking process and the display will return to the default temperature and time settings. Repeat steps 2 and 3 to program a new cooking time and temperature.
5. The display will show [donE] when the cooking cycle is completed.
Technical Specifications
Default Temperature & Time: 56 °C / 133 °F, 04:00 hours
Temperature Setting Range: 20 °C – 95 °C ; 68 °F – 203 °F
Time Setting Range: 1 minute up to 72 hours (00:01 – 72:00)
Temperature Adjustment Increments: ± 0.1 °C / 1 °F
Steps to Sous Vide Cooking
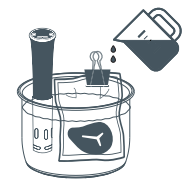
- Place the cooking pot on a secure heat protector, mat or within your Instant Pot® cooker. Position the container near an electrical outlet.

2. Clip the cooker to the side of the cooking pot, securing it with the clamp
3. Fill the cooking pot with water, making sure the water level is above the [MIN] level mark as indicated on the cooker and below the [MAX] level mark, leaving room in the container for food to be added.
4. Set the temperature on the cooker and preheat the water while you prepare your recipe. Once the water has reached the selected temperature, the cooker will beep 3 times.
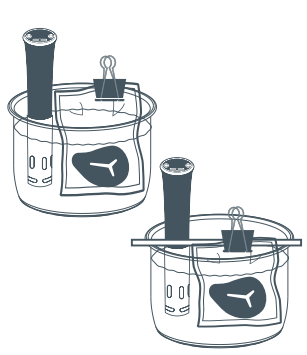
5. Place the food to be cooked in the freezer bag or pouch. Separate single servings of food within individual bags.
The thickness of food extends the cooking time required.

6. Remove the air from freezer bag and seal the bag, creating as tight a vacuum seal as possible.
Note: If you are using a vacuum sealer and pouch, the seal will be created by the vacuum sealer after the air has been removed.

7. Immerse the sealed bag into the cooking pot. The bag should be submerged below the water level, however if using a freezer bag, do not submerge the seal of the bag. Clip the seal portion of the bag to the side of the pot to secure it.
You can also choose to suspend a long, thin stick across the top of the cooking container and clip the bag to the stick (this is helpful when you are cooking more than one bag).
If the food is floating, use a large, heavy spoon, plate, pot lid or other heatproof utensil to weigh the bag down and keep the food submerged.
8. Let the cooking begin. For long cooking times, check periodically to make sure the water level remains above the food and the [MIN] level mark. If you need to add water, heat it on the stovetop or in the kettle to approximately the same temperature as the water in the container to avoid cooling the water.
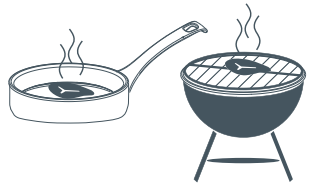
9. Once your sous vide has completed cooking, use a pan to sear or brown the meat to your preference. It is recommended to use a cast iron pan or barbeque.
Cooking Guidelines
The following provides some general guidelines to setting the temperatures and times for your sous vide cooking. You can always make adjustments according to your personal preferences.
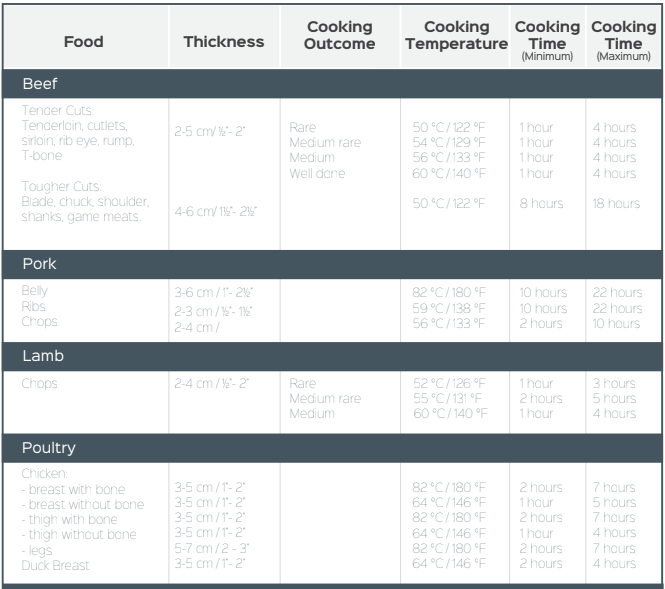
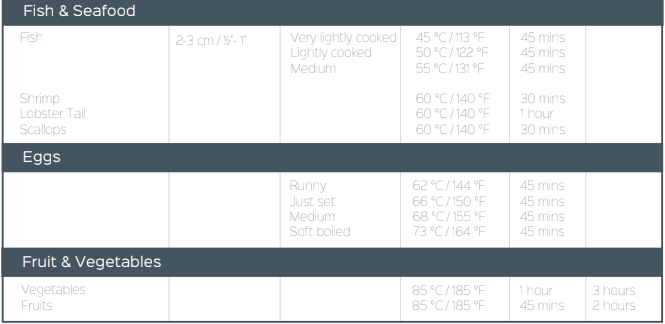
Please note:
• Longer cooking times may alter food texture.
• Suggested times and temperatures are intended as guidelines; additional cooking time may be required to achieve desired result.
• All thicknesses in preceding table are measured once the food has been vacuum sealed.
• Thinner cuts of meat will cook faster.
Seasoning Suggestions
Sous Vide cooking is all about the main ingredient and enhancing its natural flavor. The seasoning options with this method of cooking are endless. Below are suggestions of some great flavor combinations to inspire you and get you started.
*All seasoning recipes have been based on an approximate 500 g (1 lb) meat serving.
Lamb
• 2 sprigs fresh rosemary, 1 tsp (5 mL) garlic powder
• 3 anchovies, finely chopped
• 2 sprigs fresh mint
• 1 tsp (5 mL) ground coriander, 1 tsp (5 mL) ground cumin
• 1 tbsp (15 mL) Moroccan spice rub
• 2 tbsp (30 mL) olive oil, 1 tbsp (15 mL) of lemon zest, 1 tsp (5 mL) garlic powder
• 2 sprigs fresh thyme
Beef
• 50 g (2 oz) butter, 2 cloves crushed garlic, 2 sprigs fresh thyme
• 50 g (2 oz) butter, 2 tbsp (30 mL) fresh chives, 1 tbsp (15 mL) grainy mustard
• 1 tbsp (15 mL) olive oil, 2 sprigs fresh thyme, 50 g (2 oz) cooked bacon
• 50 g (2 oz) butter, 2 cloves crushed garlic, 2 sprigs fresh parsley
Salmon
• 1 tbsp (15 mL) soy sauce, 1 tbsp (15 mL) honey, 1 tsp (5 mL) grated ginger
• 2 tbsp (30 mL) maple syrup, 1 tbsp (15 mL) soy sauce, 1 tsp (5 mL) garlic powder
• 2 tbsp (30 mL) teriyaki sauce, 1 tsp (5 mL) grated ginger, 1 tsp (5 mL) garlic powder, 1 tsp (5 mL) chili flakes
White Fish
• 2 slices lemon, 2 sprigs fresh dill
• 1 stalk lemon grass, ¼ cup (50 mL) fresh basil, 2 slices lime
• 1 tbsp (15 mL) soy sauce, 1 tsp (5 mL) sesame oil, 2 sprigs fresh coriander
• 1 tbsp (15 mL) fresh dill, 1 tsp (5 mL) smoked paprika, 1 tsp (5 mL) lemon rind, ½ tsp (3 mL) cayenne
Chicken
• 2 slices lemon, 2 sprigs fresh thyme
• 50 g (2 oz) browned butter, 4 fresh sage leaves, salt and black pepper
• 20 g (1 oz) butter, 2 sprigs fresh flat leaf parsley, 2 tbsp (30 mL) capers
• 1 onion, 1 clove garlic, ½ cup (125 mL) chopped tomatoes, ¼ cup (50 mL) fresh basil
• Mix 1 tbsp (15 mL) ricotta with 1 tbsp (15 mL) lemon zest and stuff mixture into chicken breasts
Pork
• 1 tbsp (15 mL) fennel seeds, 1 tsp (5 mL) sea salt, 1 tsp (5 mL) black pepper
• ¼ cup (50 mL) apple sauce, 1 tsp (5 mL) sea salt, 1 tsp (5 mL) black pepper
• 1 tbsp (15 mL) lemon zest, 1 tbsp (15 mL) fresh thyme, 1 tbsp (15 mL) fresh sage, 1 tsp (5 mL) sea salt, 1 tsp (5 mL) black pepper
• 1 tbsp (15 mL) ground cumin, 1 tbsp (15 mL) ground coriander, 1 tsp (5 mL) cinnamon, 1 tsp (5 mL) brown sugar, 1 tsp (5 mL) chili flakes
FAQs
Is there a way to speed up the cooking process?
Yes, to speed up heating of the water, especially when you are cooking at higher temperatures, heat the water on the stovetop in a pot or a kettle, then pour the water into your cooking container once it has heated. For foods cooked for a long time (more than 6 hours) or if the room is especially cool, we recommend you use your Instant Pot® Electric Pressure Cooker inner pot (6 or 8 Quart) placed within the cooker base, to add insulation and reduce heat loss.

Can I cook more than one recipe within the pot at the same time?
Yes, plan ahead by choosing more than one recipe that cooks at the same temperature and cook items together. As long as there is enough room in the cooking container, and the items are placed in separate bags, you can cook foods within the same container that you would normally cook separately. The flavors and aromas won’t transfer.
Do I need to have a cover?
No, sous vide cooking is not affected by whether the container is covered or not.
Are there health benefits to Sous Vide Cooking?
Yes, vitamins, minerals and juices are retained within the food allowing the natural flavors to be intensified. This process makes the food healthier, more tender and tasty.
How are the nutrients better preserved during the Sous Vide cooking method?
The oxygen free environment (such as within a vacuum sealed bag) helps to retain the foods’ valuable nutrients.
What tools do I require to get started?
Getting started is easy, most materials are available in your home, freezer bags, sealing machine (optional) and a water bath container. The Instant Pot® inner pot is an ideal water bath container.
What is the minimum and maximum water depth used during cooking?
Use the [MAX] and [MIN] water level marks indicated on the cooker as a guide. Secure the cooker in place, and fill the cooking container with water above the [MIN] water level mark and below the [MAX] water level mark (as indicated on the cooker).
Once everything has been setup and the cooking process has begun, do I need to watch over it?
No, once it is set you can forget it until the process is completed and you are ready for the final stage, a quick sear to complete the dish. If the cooking time is set over 6:00 hours – you will need to maintain the water level above the [MIN] level and below the [MAX] level as indicated on the cooker.
Is the cooker easy to clean?
Yes, the cooker requires minimal cleaning, simply air dry the bottom portion (the removable element cover and water flow channels).
Does the Accu Slim only work in conjunction with the Instant Pot® electric pressure cookers?
No, the cooker will work within any cooking container (plastic, metal or glass) that you are able to secure the clamp to the side and maintain the water level between [MIN] and [MAX] lines. The Instant Pot® Multi-Use Programmable Pressure Cookers provides insulation that will help the cooker to maintain temperature.
Will the cooker work properly if the base touches the bottom of the cooking container?
Yes, water travels in and out of the water flow channels that are located on either side of the cooker. The water travels through the channels in a horizontal flowing motion. It will not impact the cooking process if the base touches the bottom of the cooking container.

Do I need to sear / brown or is this step optional?
Yes, do not skip this step. To achieve gourmet results, we recommend searing on a cast iron pan or barbequing.
Can the cooker be on an angle?
No, ensure the cooker is perpendicular to the water level in order to properly circulate the water bath.

Should I flavor the cooking bath water?
No, it is not necessary to flavor the cooking bath water as the liquid does not penetrate the bag during the cooking process. To add spices or marinades, place the contents with the food inside the bag.
Why does a pouch float and does it matter if it does?
There may be air or gas trapped in the pouch and air is lighter than water. Air or gas trapped in the pouch can lead to uneven cooking. If this occurs, remove the floating pouch, open it, dry the edges, and reseal.
What do I need to do if the seal of my freezer bag goes underwater?
Pull the freezer bag out of the water to verify that no water has entered the bag. If water has entered, remove it. Adjust seasoning as required. Submerge the bag back into the water and continue the cooking process.
Troubleshooting
If you experience any problem with your sous vide cooker, try these helpful tips.
Error code E1
When the water level falls below the [MIN] level mark on the cooker, it will trigger a sensor and the cooker will stop. Error code E1 will be featured on the display. Turn the device OFF, add sufficient water, turn the cooker ON again, and the cooking process will resume.
Error code E2
The anti-dry sensor has indicated a loose connection. Error code E2 will be featured on the display. The device will stop working automatically. Please contact Customer Care team (https://www.instantpot.com/support/) .
Error code E3
The anti-dry sensor has become damaged. Error code E3 will be featured on the display. The device will stop working automatically. Please contact Customer Care team (https://www.instantpot.com/support/).
Error code E4
When the water level falls below the [MIN] level mark on the cooker, and the water shortage sensor fails to activate, it will trigger the dry boil sensor and the cooker will stop. Error code E4 will be featured on the cooker. Turn the appliance OFF, add sufficient water, and turn the cooker ON again. When the cooker has sufficiently cooled down, the cooking process will resume.
Error code E5
The cooker will stop when the temperature sensor is in an open loop caused by a loose connection wire. Please contact the Customer Care team (https://www.instantpot.com/support/).
Error code E6
The cooker will stop when the temperature sensor is broken and experiences a short out. Please contact the Customer Care team (https://www.instantpot.com/support/).
If you experience any problems with the cooker or need technical assistance, please contact the Instant Pot® the Customer Care team:
• Create a support ticket: www.InstantPot.com/support/
• Email: support@instantpot.com
• Call 1-800-828-7280 x2 for the Customer Care team.
The issues listed above do not always reflect a faulty sous vide. Please examine the cooker carefully before contacting the Customer Care team.
Warranty
Limited Warranty
This Limited Warranty is effective for one year from the date of original consumer purchase. Proof of original purchase date and, if requested by an authorized representative of Double Insight Inc (“DI”), return of your appliance, is required to obtain service under this Limited Warranty. Provided that this appliance is operated and maintained in accordance with written instructions attached to or furnished with the appliance, DI will, in its sole and exclusive discretion, either: (i) repair defects in materials or workmanship or (ii), replace the appliance. In the event that your appliance is replaced, the Limited Warranty on the replacement appliance will expire 12 months from the date of original consumer purchase.
This Limited Warranty extends only to the original purchaser and use of the appliance in the United States of America and Canada. This warranty does not cover units that are used outside of the United States of America and Canada.
Any modification or attempted modification to your appliance may interfere with the safe operation of the appliance and will void this Limited Warranty. This Limited Warranty does not apply in respect of any appliance or any part thereof that has been altered or modified from its factory settings unless such alterations or modifications were expressly authorized by a DI representative.
Limitation and Exclusions
The liability of DI, if any, for any allegedly defective appliance or part shall in no circumstances exceed the purchase price of a comparable replacement appliance.
This Limited Warranty does not cover:
1. Damage resulting from accident, alteration, misuse, abuse, neglect, unreasonable use, use contrary to the operating instructions, normal wear and tear, commercial use, improper assembly, disassembly, failure to provide reasonable and necessary maintenance, fire, flood, acts of God or repair by anyone unless directed by a DI Representative;
2. Repairs where your appliance is used for other than normal, single-family household use or when it is used in a manner that is contrary to published user or operator instructions; or
3. Use of unauthorized parts and accessories, or repairs to parts and systems resulting from unauthorized repairs or modifications made to this appliance.
The cost of repair or replacement under these excluded circumstances shall be borne by you. Disclaimer of Implied Warranties
EXCEPT AS EXPRESSLY PROVIDED HEREIN AND TO THE EXTENT PERMITTED BY LAW, DI MAKES NO WARRANTIES, CONDITIONS OR REPRESENTATIONS, EXPRESS OR IMPLIED BY STATUTE, USAGE, CUSTOM OF TRADE OR OTHERWISE WITH RESPECT TO THE APPLIANCES OR PARTS COVERED BY THIS WARRANTY, INCLUDING BUT NOT LIMITED TO, WARRANTIES, CONDITIONS, OR REPRESENTATIONS OF WORKMANSHIP, MERCHANTABILITY, MERCHANTABLE QUALITY, FITNESS FOR A PARTICULAR PURPOSE OR DURABILITY.
Some states or provinces do not allow for the exclusion of implied warranties of merchantability or fitness, so this limitation may not apply to you. In these states and provinces, you have only the implied warranties that are expressly required to be provided in accordance with applicable law.
Disclaimer of Representations Outside of Warranty
DI makes no representation about the quality, durability, or need for service or repair of this appliance other than the representations contained in this warranty.
Limitation of Remedies; Exclusion of Incidental and Consequential Damage
YOUR SOLE AND EXCLUSIVE REMEDY UNDER THIS LIMITED WARRANTY SHALL BE APPLIANCE REPAIR OR REPLACEMENT AS PROVIDED HEREIN. DI SHALL NOT BE LIABLE FOR INCIDENTAL OR CONSEQUENTIAL DAMAGES ARISING OUT OF OR IN CONNECTION WITH THE USE OR PERFORMANCE OF THE APPLIANCE OR DAMAGES WITH RESPECT TO ANY ECONOMIC LOSS, PERSONAL INJURY, LOSS OF PROPERTY, LOSS OF REVENUES OR PROFITS, LOSS OF ENJOYMENT OR USE, COSTS OF REMOVAL, INSTALLATION OR OTHER CONSEQUENTIAL DAMAGES OF WHATSOEVER NATURE.
You the buyer may have other rights and remedies under your state’s or province’s applicable laws, which are in addition to any right or remedy which may be available under this limited warranty. In these states and provinces, DI will only be liable to you for damages that it is expressly required to be liable to you under applicable law.
Warranty Registration
Please visit http://instantpot.com/support/register/ to register your new Instant Pot® and validate your warranty within thirty (30) days of purchase. You will be asked to provide the store name, date of purchase and model number (found on the base of your Appliance) along with your name and address. The registration will enable us to keep you up to date with product developments, recipes and contact you in the unlikely event of a product safety notification. By registering, you acknowledge that you have read and understand the instructions for use, and warnings set forth in the accompanying instructions.
Warranty Service
To obtain service under this warranty, please contact our Customer Service Department by phone at 1-800-828-7280 or by email to support@instanpot.com. You can also create a support ticket online at www.InstantPot.com/support. If we are unable to resolve the problem, you may be asked to send your appliance to the Appliance Service Department for quality inspection.
DI is not responsible for shipping costs related to warranty service, save and except for shipping costs associated with the return of your appliance from Canada or within the 48 contiguous states and the District of Columbia of the United States of America, as provided herein. When returning your appliance, please include your name, address, phone number, proof of the original purchase date as well as a description of the problem you are encountering with the appliance.
You can download the complete PDF version of Instant Pot Accu Slim Sous Vide Immersion Circulator User Manual here.