IMPORTANT SAFEGUARDS
When using electrical appliances always follow the safety precautions below.
Using the appliance
Read all instructions.
• This appliance is intended for household use only. Any other use is considered improper and therefore dangerous.
• Unplug the machine when the appliance is not in use.
• Never touch hot surfaces. The water/coffee dispensed from the machine may cause burns.
• This machine is designed “to brew espresso coffee”. Be careful not to scald yourself with water jets or through improper use of the machine.
• The use by children – if at least 8 years old – is allowed provided that they are supervised or instructed on how to use the appliance correctly and that they understand the hazards involved. Cleaning and ordinary maintenance should not be carried out by children unless they are more than 8 years old and supervised by an adult. Keep the appliance and its power cord out of the reach of children younger than 8 years old.
• The use by persons with reduced physical, sensory or mental abilities or insufficient experience and/or skills is allowed, provided that they are supervised or instructed on how to use the appliance correctly and that they understand the hazards involved.
• Children must not play with the appliance.
• Use the machine only indoors and protect from weather.
• To protect against fire, electric shock or personal injury do not immerse the cord, plug or the body of the machine in water or any other liquid.
• Do not use the appliance for purposes other than those for which it is intended.
• Do not place the appliance on electrical or gas burners or inside a hot oven.
• The appliance must be turned on only when being used. After use, it must be turned off by moving the power button (8) to the “O” position and disconnecting the plug from the power outlet.
• Before unplugging the machine make sure that the power button (8) is in the “0” position.
• Using attachments not recommended by the manufacturer may result in fire, electric shocks or personal injury.
• Do not drape the cord over the counter top or table top. Do not pull the plug out by the cord and never touch it with wet hands.
• Do not carry or pull the coffee machine by the cord.
• To reduce the risk of injury, do not drape the cord over the counter top or table top where it can be pulled on by children or tripped over unintentionally.
• Do not use the appliance if the cord or plug are damaged or if the machine shows signs of malfunctioning or has been damaged in any way. Take the machine to the nearest authorised service centre for checks or repairs.
• Do not use extension cords or power strips. In case of fire, use carbon dioxide (CO2) extinguishers. Do not use water or powder extinguishers.
• Do not use the appliance for other than its intended use.
Installation of the appliance
• Read the instructions carefully.
• Do not install the machine in an area where the temperature may reach 5°C/32°F or lower (if water freezes, the appliance may be damaged) or higher than 40°C/104°F.
• Check that the electrical voltage used matches the requirements indicated on the appliance data plate. The appliance must be connected to a properly earthed power socket only.
• If the plug and the socket are not compatible, have the plug replaced with a proper one by an authorised service centre.
• Place the machine on a counter top away from water taps and sinks.
• After removing the packaging, check that the appliance is in perfect condition before installation.
• Do not leave the packaging materials within children’s reach.
Cleaning the appliance
• Before unplugging the machine make sure that the power button (8) is off.
• Unplug the machine when performing cleaning operations.
• Wait until the appliance is cool before cleaning.
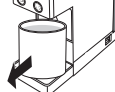
• Remove the water tank (7) by pulling it down slightly and then outward.
• Clean the body and attachments with a damp cloth and then wipe with a non-abrasive dry cloth. Do not use detergents.
• Do not expose the machine to jets of water or immerse it in water, partially or fully.
In the event of failure
Do not use the appliance if the power cord (6) or the plug are damaged, if the appliance shows signs of malfunctioning or is damaged. Take the machine to the nearest authorised service centre for checks or repairs.
If the power cord (6) is damaged it must be replaced by the manufacturer or an authorised service centre.
In case of damage or malfunction, turn off the appliance and do not tamper with it. All repairs that may be required must be carried out by a Technical Service Centre authorised by the manufacturer and request the use of original spare parts only. Failure to comply with these instructions may compromise the safety of the appliance and will result in the forfeiture of warranty rights.
Improper use of the appliance
• This appliance is intended for household use only. Any other use is considered improper and therefore dangerous.
• The manufacturer is not liable for accidents caused by non-compliance with existing legislation on electrical grounding systems.
• The manufacturer is not liable for possible damage caused by improper, incorrect or unreasonable use. This appliance is intended to be used in household and similar applications such as:
- Staff kitchen areas in shops, offices and other working environments;
- Farm houses;
- Hotels, motels and other residential type environments;
- Bed and breakfast type environments.
GENERAL MACHINE OPERATING RULES
Carefully read the instruction manual and warranty limitations. The machine must be connected to a properly earthed power socket. The machine must be kept clean by frequently washing the cup holders, the drip tray, the used capsule tray, and the water tank. Any maintenance should be carried out when the machine is off.
IMPORTANT: never immerse the machine or its removable components in water or put it in the dishwasher.
The water in the tank should be replaced regularly. Do not use the coffee machine with empty tank. The use of a descaling product specially designed for espresso coffee machines is recommended at least every 2 months as described in the Descaling chapter.
The machine is equipped with a valve allowing to maintain constant pressure, which may cause some water to drip from the brew group.
TECHNICAL SPECIFICATIONS Mod. 640
Body material: ABS
Heat exchanger material: aluminium
Water tank capacity: 0.750 litre
Used capsule tray: 7 capsules
Pump: 19 bar
Weight without package: 3.4 kg
Power supply: 220-240 V, 50-60 Hz
Power: 850 W with “Power Save” function
Size (W x D x H) (mm): 100 x 298 x 254
USE EXCLUSIVELY IPERESPRESSO CAPSULES WITH THIS MACHINE.
DISCOVER AND BUY ILLY IPERESPRESSO CAPSULES ON SHOP.ILLY.COM, AT THE SHOPS OR AUTHORISED ILLY CAFÉS OR CALL THE TOLL FREE NUMBER
800-821021 (ONLY FROM ITALY).
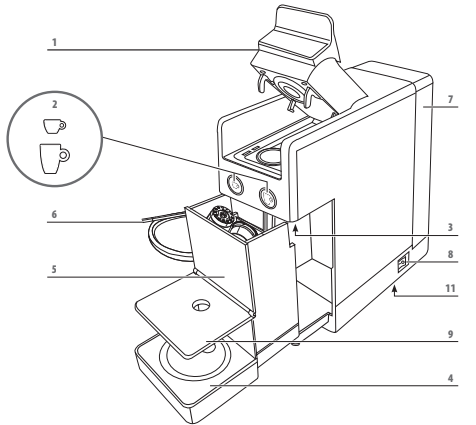
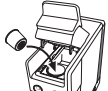
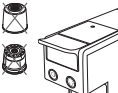
MACHINE PARTS
1 CAPSULE COMPARTMENT OPENING/CLOSING
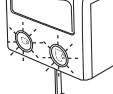
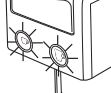
2 BREW BUTTONS:

3 COFFEE DISPENSING SPOUT
4 MUG HOLDER SURFACE
5 REMOVABLE USED CAPSULE TRAY
6 POWER CORD
7 WATER TANK
8 POWER BUTTON
9 ESPRESSO CUP HOLDER SURFACE
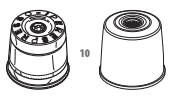
10 IPERESPRESSO CAPSULE:

11 DATA PLATE (ON BASE)
GETTING THE MACHINE READY FOR USE
For first use, or if the machine has not been used for a long time, the internal components should be rinsed through by cleaning the water tank and dispensing at least 3 mugs of water. The instructions below show how to do this.
1

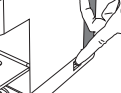
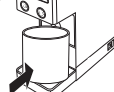
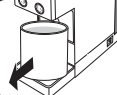
To remove the water tank, push it downwards.
2

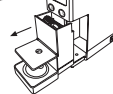
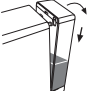
Rotate the tank outwards
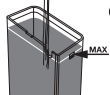
3
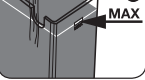
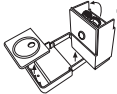
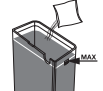
Fill the tank with fresh water up to the maximum level.
4

Refit the water tank by inserting the tabs on the bottom into the slots on the machine then pushing the water tank downwards and towards the machine until it locks into place.
5

Plug in the machine.
6
Switch the power button to “I” to turn on the machine.
7
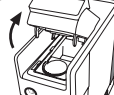
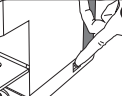
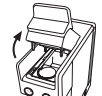
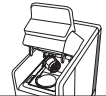
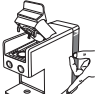
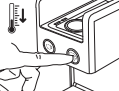
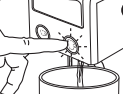
Open the Capsule Compartment Cover by lifting the Cover Lever upwards. Make sure there is no capsule inside.
8

9
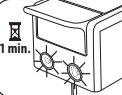
After about 1 minute the

and

stop flashing steady on and the machine is ready for use.
10
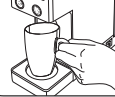
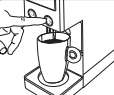
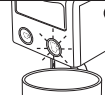
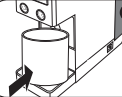
Place an empty mug under the dispensing spout.
11
Press and release the
or
button and wait until water dispensing is complete. The machine is rinsed when at least 3 mugs of water have been dispensed. The machine is now ready for use.
Power Save Function
If the machine is turned on and is not used after about 15 minutes you activate the power save function the keys
and
are still flashing with an interval of 2-3 seconds. Press one of the two buttons to turn on the machine again and wait until they become steady on. The machine is now ready for use.
Power Save Function
If the machine is turned on and is not used after about 15 minutes you activate the power save function the keys and are still flashing with an interval of 2-3 seconds.
Press one of the two buttons to turn on the machine again and wait until they become steady on.
The machine is now ready for use.
In case the machine will not be used for a long period, turn it off by using the power button, unplug it and empty the water tank.
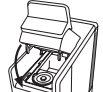
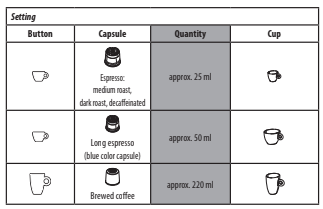
MAKING ESPRESSO COFFEE
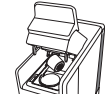
1

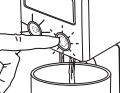
Use the illy capsules shown in the figure.
2
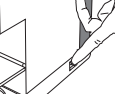
Fully open the capsule compartment cover by lifting the cover lever.
3
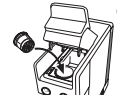
Insert the capsule as shown in the figure.
4
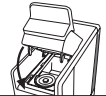
Close the capsule compartment cover completely.
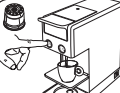
5

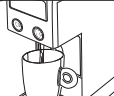
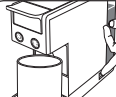
Lower the cup holder surface. Fill the water tank with fresh drinking water.
6
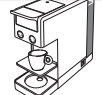
Place an espresso cup in position under the dispensing spout.
7
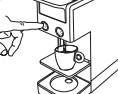
Press and release the

button. Dispensing will stop automatically.
8
Slowly lift the capsule compartment cover. The used capsule will automatically be ejected into the used capsule holder. Repeat the operation if the capsule is not ejected.
ADVICE
To enjoy a high quality espresso coffee remember to:
• Make sure you use an espresso capsule with the setting, otherwise start the process again with a new capsule.
• Change water in the tank daily.
• Preferably use water with a total hardness of less than 12 French degrees to reduce deposits in the machine.
• Use thick and preheated cups to prevent your coffee to become cold too quickly. Cups can be heated by rinsing them with hot water.
MAKING BREWED COFFEE
1
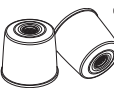
Use the illy capsules shown in the figure.
2
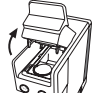
Fully open the capsule compartment cover by lifting the cover lever.
3
Insert the capsule as shown in the figure.
4
Close the capsule compartment cover completely.
5
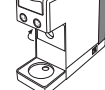
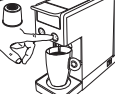
Move the cup holder surface in the vertical position. Fill the water tank with fresh drinking water.
6
Place a mug in position under the dispensing spout.
7
Press and release the

button. Dispensing will stop automatically.
8
Slowly lift the capsule compartment cover. The used capsule will automatically be ejected into the used capsule holder. Repeat the operation if the capsule is not ejected.
ADVICE
To enjoy a high quality brewed coffee remember to:
• Make sure you use a brewed coffee capsule with the setting, otherwise start the process again with a new capsule.
• Change water in the tank daily.
• Preferably use water with a total hardness of less than 12 French degrees to reduce deposits in the machine.
• Use thick and preheated cups to prevent your coffee to become cold too quickly. Cups can be heated by rinsing them with hot water.
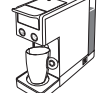
STORING COFFEE QUANTITY IN THE CUP
1

Insert a capsule into the compartment.
2

Close the capsule compartment cover completely.
3
Espresso programming: Using an espresso capsule (shown in the figure above), press and hold the

button. The machine starts dispensing coffee. Release the button once the desired quantity has been dispensed.
4
Brewed coffee programming: Using a brewed coffee capsule (shown in the figure above), press and hold the

button. The machine starts dispensing coffee. Release the button once the desired quantity has been dispensed.
The machine has now been programmed. The next time you press

or

RESTORING THE MACHINE FACTORY SETTING:
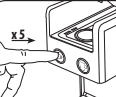
With the capsule compartment cover open, turn the machine on. Within 15 seconds of turning the power on, press the
button 5 times. The
and
buttons flash quickly for 2 seconds and then become steady on. The machine factory settings of
and
are now restored both for quantity and temperature.
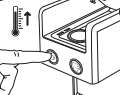
TEMPERATURE PROGRAMMING
1
With the capsule compartment cover open, turn the machine on. Do not insert any capsule.
2
Within 15 seconds of turning the power on, press the

button 5 times. While the lights are flashing, it is possible to change the temperature as described in steps 3 and 4.
3
press the button to increase temperature
4
press the button to reduce temperature
The machine has now been programmed. The next time you press
or
the saved temperature of coffee will be dispensed.
RESTORING THE MACHINE FACTORY SETTING:
With the capsule compartment cover open, turn the machine on. Within 15 seconds of turning the power on, press the
button 5 times. The
and
buttons flash quickly for 2 seconds and then become steady on. The machine factory settings of
and
are now restored both for quantity and temperature.
CLEANING AND MAINTENANCE
1
Turn off the machine.
2
To remove the used capsule holder, slide it outwards. The used capsule tray can contain a maximum of 7 capsules, therefore it is advisable to empty it regularly to prevent the capsules from getting stuck.
3
Empty the used capsule tray and rinse. Clean the tray and the cup holder surface to remove water and coffee residues. Once cleaned, reattach the tray and the mug holder surface.
4
Rinse under water and dry. Do not to wash the drip tray and the used capsule tray in the dishwasher machine.
ADVICE
• Turn off and unplug the machine when not in use.
• Store the capsule coffee machine in a dry place, away from dust and out of the reach of children.
• We suggest to store it in its original packaging.
• Temperature in the storage areas must not be lower than 5°C to prevent damages to the machine internal parts due to water freezing.
• Eject the capsule right after the brewing cycle for proper hygiene and to preserve the high product quality.
DESCALING
If the
and
buttons flash alternately, the machine needs to be descaled. Read all instructions carefully before performing the descaling in order to familiarise yourself with the process. The cycle lasts about 8 minutes.
NOTE: The descaling procedure can be started only when the machine is cold. If the operations are not carried out according to the indicated time, the machine will not start the descaling process. In this case, turn off the machine and repeat the steps from the beginning.
Limescale normally builds up with the use of the machine. The machine is equipped with an automatic program allowing you to optimise cleaning and to remove limescale deposits from the inside. The descaling procedure should be done at least every 2 months. Failure to descale the machine may cause malfunctions not covered by the warranty. Only use descaling products for coffee machines. Do not use vinegar, lye, salt or formic acid as they may damage the machine. Follow the procedure described below and not the instructions on the package of the descaling solution.
1
Turn off the machine.
2
Remove the tank and empty out the remaining water.
3
Fill the tank with fresh water up to the maximum level and let the descaling solution dissolve.
4

Attach the tank containing the descaling solution.
5
Close the lever, do not enter any capsule.
6
Place a container of at least 0.75 litre capacity under the dispensing spout.
7
Turn on the machine.
8
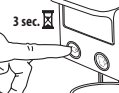
Within 15 seconds from power on, press and hold the button for 3 seconds.
9
The button flashs.
10
Press the button to start the descaling cycle. The machine starts dispensing water.
11
At the end of the descaling cycle the button is steady on, while the button is flashing.
12
Remove the container and empty it.
13
Wash the tank thoroughly and fill it again with fresh water.
14

Attach the tank containing fresh water.
15
Place a container of at least 0.75 litre capacity under the dispensing spout.
16
Press the button to start the rinse cycle. The machine starts dispensing water.
17
At the end of the rinse cycle the

button and the

button flash simultaneously.
18
Remove the container and empty it.
19
Wait until the button and the button become steady on. The machine is now ready for use.
DESCALING • PROBLEM – CAUSE – SOLUTION
| PROBLEM | CAUSE | SOLUTION |
| The descaling cycle is interrupted. | . Power failure. .The machine has been accidentally turned off. . The capsule compartment cover is opened when the cycle has already started. | . The cycle automatically restarts from the interruption. . Turn the machine on: the cycle automatically restarts from the interruption. . Close the capsule compartment cover: the cycle automatically restarts from the interruption. |
| The rinse cycle is interrupted. | . Power failure. . The machine has been accidentally turned off. . The capsule compartment cover is opened when the cycle has already started. | . The cycle automatically restarts from the interruption. . Turn the machine on again: the cycle automatically restarts from the interruption. . Close the capsule compartment cover: the cycle automatically restarts from the interruption. |
| The machine does not brew water. | . The water tank is empty. | . Fill the water tank. |
WARRANTY LIMITATIONS
WARNING:
Failure to descale the machine may cause malfunctions not covered by the warranty. Do not use vinegar, lye, salt or formic acid as they may damage the machine.
Only use descaling products suitable for coffee machines. The descaling solution must be disposed of according to the manufacturers guidelines. Do not drink the liquid dispensed during the descaling process. The machine can only be used to brew coffee when the descaling process is complete.
The warranty does not cover failures caused by:
• A lack of periodical descaling.
• Operation with a voltage other than that specified on the data plate.
• Misuse or failure to follow instructions.
• Changes made internally.
• The warranty does not cover repair costs on machines which have been tampered with by unauthorised service centres. These costs will be entirely payable by the customer.
• The drip tray and used capsule holder should be kept clean. They should not be washed in a dishwasher. Failure to follow these instructions may cause problems to both components that are not covered by the warranty.
It is recommended to keep the original packaging – at least for the warranty period – for shipping the machine to an authorised service centre, if need be. Any possible damage due to transport with inadequate packaging will not be covered by the warranty.
INFORMATION FOR CORRECT DISPOSAL OF THE PRODUCT IN ACCORDANCE WITH EC DIRECTIVE
Disposal of end-of-life electric and electronic equipment by private households in the European Union. The WEEE symbol used on this product means that it must not be disposed of together with other domestic waste and should be collected separately. Consumers have the opportunity to hand in their used appliance to distributors free-of-charge on a 1:1 basis when they purchase a new product. For further information about the collection of appliances to be scrapped, please contact the local authority in your town of residence, the local waste disposal service or the retailer where the product was purchased. Consumers are responsible for disposing of end-of-life appliances in accordance with the current provisions of law and non-compliance therewith may be subject to fines and criminal sanctions. The correct disposal of this product will contribute to protecting the environment, natural resources and human health.
WARNING – MACHINE STATUS

The machine has been turned on and is in warm-up phase.

The machine has reached the right temperature for brewing.

The machine is brewing one cup of espresso.

The machine is brewing one cup of Brewed coffee.

The machine is in Power Save phase. The machine activates the Power Save function after 15 minutes of inactivity. Press any button to turn the machine on again.

The machine needs to be descaled.

The machine indicates that the descaling process has been selected. In this status the tank must contain the descaling solution.

The machine indicates that the first part of the descaling cycle is being performed. The machine is dispensing the descaling solution.

The machine indicates that the first part of the descaling cycle is complete. Rinse the water tank and fill it again with fresh drinking water.

The machine indicates that the second part of the descaling cycle is being performed. The machine is dispensing water for rinsing cycle.

There is a machine malfunction. Turn off the machine, wait for 30 seconds and then turn it on again. If the problem persists, contact an authorised service centre.
Troubleshooting
| PROBLEM | CAUSE | SOLUTION | Persistence of the problem. |
| The machine does not switch on. | . Power cord not connected to a power socket. . Power button in “0” position. | . Connect the plug to a socket conforming to the technical data indicated in the data plate. . Switch the power button to the “I” position. | Contact an authorized service centre. |
| The machine does not brew coffee. | .The water tank is empty. .The water tank is not correctly inserted. . Incomplete closure of the moving part of the machine head. . Capsule not inserted in the capsule compartment. . The capsule is not fully pierced. . Failure to start the pump. | .Fill the tank with water. . Insert the water tank correctly. . Lift the capsule compartment cover and make sure that a capsule has been inserted in the compartment. Lower the lever up to the lock position. Try again and brew coffee. . Insert a capsule into the compartment. . Use a new capsule. . Make sure that there is no capsule inside the machine. Lower the opening lever up to the lock position. Press any button to dispense water. Try again to brew coffee with a new capsule. | Contact an authorized service centre. |
| The capsule is not ejected. | . The capsule is still in the compartment. | . Close the opening lever completely, then slowly open it again, to ensure the ejection of the capsule into the removable user capsule tray. | Contact an authorized service centre. |
| The machine is too noisy. | . The water tank is empty. . The water tank is not correctly inserted. . The capsule is not fully pierced. | . Fill the tank with water. . Insert the tank correctly. . Use a new capsule. | Contact an authorized service centre. |
| Drops come out of the dispensing spout, especially during the warm-up phase. | The machine is equipped with a valve allowing to maintain constant pressure. | THIS IS NOT A FAULT. | Contact an authorized service centre |
| The machine brews coffee slowly. | Limescale in the hydraulic circuit. | Start the descaling cycle. | Contact an authorized service centre |
| Coffee tastes sour. | . The machine has not been properly rinsed after the descaling cycle. . The capsule is expired. | .Perform a new rinse cycle. . Use a new capsule. | Contact an authorized service centre |
| The buttons flash alternately. | Descaling cycle requested. | Perform the descaling cycle. | Contact an authorized service centre |
| Beverage quantity and/or temperature are not of the best quality. | . Button and capsule were not correctly paired. . Incorrect quantity and/or temperature programming. | . Use an espresso capsule correctly paired to the espresso brew button. Use a brewed coffee capsule correctly paired to the brewed coffee button. . Restore the machine factory settings and customise the quantity and/or temperature as described in the relevant sections. | Contact an authorized service centre |
You can download the PDF version of the Illy Iperespresso Y3.2 User’s Manual here.