IMPORTANT SAFEGUARDS
When using electrical appliances, basic safety precautions should be followed, including:
• Read all instructions.
• Remove all bags and packaging from appliance before use.
• Do not use appliance outdoors or for commercial purposes.
• Never leave appliance unattended when in use.
• Only use the appliance on a stable, dry surface.
• Make sure the appliance is cleaned thoroughly before using.
• Do not use appliance for other than its intended use. For household use only. Do not use outdoors.
• Close supervision is necessary when any appliance is used by or near children. Children should be supervised to ensure that they do not play with the
appliance.
• Do not operate this appliance with a damaged cord, damaged plug, after the appliance malfunctions, is dropped, or damaged in any manner. Return appliance to the nearest authorized service facility for examination, repair, or adjustment.
• For maintenance other than cleaning, please contact Store Bound directly at 1-800-898-6970 from 7AM-7PM PT Monday-Friday or by email at support@storebound.com.
• Do not place appliance on or near a hot gas burner, hot electric burner, or in a heated oven. Extreme caution must be used when moving an appliance containing hot oil or other hot liquids. Always attach plug to appliance first, then plug cord into the wall outlet. To disconnect, turn any control to “off”, then remove plug from wall outlet. Do not use appliance for other than intended use.
• Refrain from using attachments that are not recommended by the appliance manufacturer, as this may result in fire, electric shock, or personal injury.
• Do not let the cord touch hot surfaces, or hang over the edges of tables or counters.
• This appliance is not intended for use by persons (including children) with reduced physical, sensory, or mental capabilities, or lack of experience and knowledge unless they are provided with supervision and instruction concerning use of the appliance by a person responsible for their safety.
• Always be sure to unplug the appliance from the outlet prior to moving, cleaning, storage, and when not in use.
• Store Bound shall not accept liability for damages caused by improper use of the appliance.
• Improper use of the appliance can result in property damage or even in personal injury.
• This appliance has a polarized plug (one blade is wider than the other). To reduce the risk of electric shock, this plug will fit in a polarized outlet only one way. If the plug does not completely fit in the outlet, reverse the plug. If it still does not fit, contact a qualified electrician. Do not attempt to modify the plug in any way.
• Turn the appliance OFF, then unplug from the outlet when not in use, before assembling or disassembling parts and before cleaning. To unplug, grasp the plug and pull from the outlet. Never pull from the power cord.
• A short power supply cord is to be provided to reduce the risk resulting from becoming entangled in or tripping over a longer cord. An extension cord may be used if care is exercised in its use. If an extension cord is used, the marked electrical rating of the extension cord should be at least as great as the electrical rating of the appliance. The extension cord should be arranged so that it will not drape over the counter top or tabletop where it can be pulled on by children or tripped over unintentionally. If the appliance is of the grounded type, the cord set or extension cord should be a grounding-type 3-wire cord.
• To avoid burns, use extreme caution when removing accessories or disposing of hot grease.
• When not in use, always unplug the unit. Do not store any materials other than manufacturer’s recommended accessories in this appliance. • Do not place any of the following materials in the Chef Series Air Fryer Oven: paper, cardboard, plastic and similar products.
• Do not cover any part of the oven with metal foil. This will cause overheating of the oven.
• Oversize foods, metal foil packages and utensils must not be inserted in the oven as they may involve a risk of fire or electric shock.
• Do not allow the appliance to be covered by or touch flammable materials such as curtains, draperies or walls, when in operation. Do not store any items on top of the appliance when in operation. Do not operate under wall cabinets.
• Do not clean with metal scouring pads.
• Do not attempt to dislodge food when the appliance is plugged into electrical outlet.
• Use recommended temperature settings for all cooking/baking, roasting and air frying.
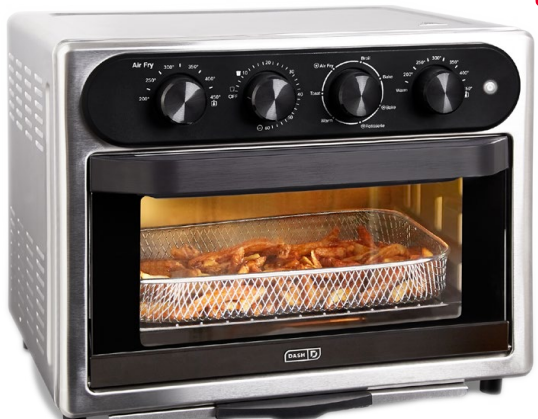
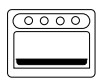
PARTS & FEATURES
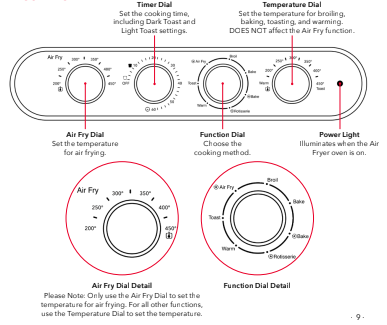
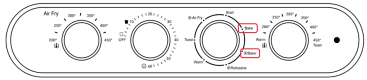
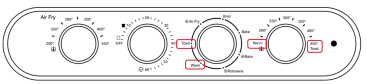
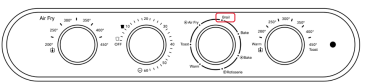
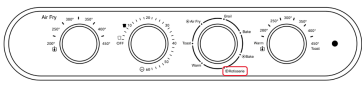
CONTROL PANEL
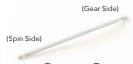
ROTISSERIE SKEWER & ACCESSORIES

Holder
Inside on the left.
Gear
Inside on the right.
AIR FRYER OVEN ACCESSORIES
Use when air frying, baking or broiling. See diagram for position details.
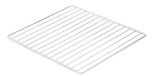
Use for toasting and broiling. See diagram for position details.
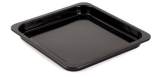
Use alone when baking/toasting ingredients. See diagram for position details.
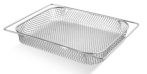
Use alone when air frying ingredients. See diagram for position details.
Using Your Chef Series Air Fryer Oven
BEFORE USING YOUR CHEF SERIES AIR FRYER OVEN:
Remove all packaging materials.
Before using, move the Chef Series Air Fryer Oven 2 to 4 inches away from the wall or from any objects on the counter top. Do not use on heat-sensitive surfaces.
Check that the Air Fryer Oven has no visible damage and that no parts are missing.
Before using the Air Fryer Oven for the first time or before using it after prolonged storage, wash and dry the appliance and any accompanying accessories. See “Cleaning & Maintenance” for instructions.
NOTE: The first time you use the Air Fryer Oven you may notice a smell or a slight light smoke. This should only last for 15 minutes. It is important to run the
appliance on Air Fry before using, without food.
USING YOUR PRO CHEF SERIES AIR FRYER OVEN:
The following section will help familiarize you with the different accessories that come with your Chef Series Air Fryer Oven and how to use them.

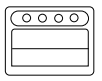
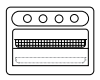
RACK POSITIONS
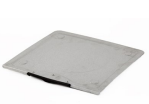
NOTE: Before use, place the Drip Tray beneath the heating element at the bottom of the Air Fryer Oven. Do not rest any accessories directly on top of the heating element.
WARMING LARGE ITEMS
Place the Baking Pan in the lowest placement.
Use the Oven Rack in the middle placement.

& WARMING SMALL
ITEMS
Use the Baking Pan in the middle placement for baking smaller items.
AIR FRYING
Use the Air Fry Basket in the middle placement.
AIR FRYING

Place the Drip Tray at the bottom of your oven below the heating element. Insert Air Fry Basket into oven at Position 2 for Air Frying/Broiling.
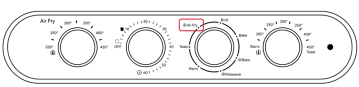
- Close the oven and set your Function Dial to Air Fry.
- Set your Air Fry Dial to the correct temperature. The Air Fry Dial only works with the air function. The temperature shown on the Temperature Dial does not affect the Air Fry Dial setting.
- Then, turn the Timer Dial to the desired cooking time to turn on the oven and begin air frying.
- The Power Light will illuminate. The Timer Dial will ring when the cycle is complete.
- To stop air frying, turn the Timer Dial to the “Off” position.

Place the Drip Tray at the bottom of your oven below the heating element. Place the Baking Pan at either Position 1 or Position 2 for Baking.
NOTE: Position 1 is for chicken or larger items.
- Close the oven and set your Function Dial to either Bake or Convection Bake. Set your Temperature Dial to the correct temperature.
- Then, turn the Timer Dial to the desired cooking time to turn on the oven.
- The Power Light will illuminate. The Timer Dial will ring when the cycle is complete.
- To stop baking, turn the Timer Dial to the “Off” position.

Place the Drip Tray at the bottom of your oven below the heating element.
WARMING:
1 Close the oven and set your Function Dial to Warm. Set your Temperature Dial to the correct temperature or “Warm”.
TOASTING:
2. Close the oven and set your Function Dial to Toast. Set your Temperature Dial to “4500F/ Toast”.
3. Then, turn the Timer Dial to 20 minutes to begin cooking, then down to your desired shade. For Light Toast, set the timer to approximately 3 minutes, and for Dark Toast set the timer to approximately 7 minutes.
4. The Power Light will illuminate. The Timer Dial will ring when the cycle is complete.
5. To stop warming or toasting, turn the Timer Dial to the “Off” position.

Place the Drip Tray at the bottom of your oven below the heating element. Place the Baking Pan at either Position 1 or Position 2 for Baking.
NOTE: Position 1 is for chicken or larger items.
- Close the oven and set your Function Dial to Broil. Set your Temperature Dial to the correct temperature.
- Then, turn the Timer Dial to the desired cooking time to turn on the oven.
- The Power Light will illuminate. The Timer Dial will ring when the cycle is complete.
- To stop broiling, turn the Timer Dial to the “Off” position.
ROTISSERIE
SETTING UP THE ROTISSERIE
A
B
1. Place the Drip Tray at the bottom of the Air Fryer Oven below the heating element.
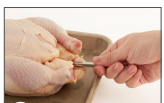
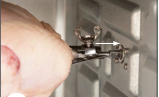
2. To put chicken on the Rotisserie Skewer, first truss with kitchen twine to ensure pieces do not fall off. Push the Rotisserie Bar through the center of the chicken (photo A).
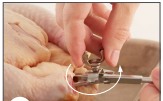
3. Slide the two Rotisserie Forks onto the skewer and into the meat so they are holding the chicken in place. Use the Screws on the Forks to tighten them to the Rotisserie Skewer (photo B).
C
D
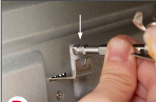
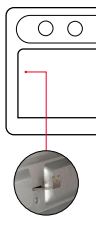
4. Open the Air Fryer Oven and put the square Gear Side component of the Rotisserie Skewer into the Rotisserie Bar Gear on the interior right side, making sure it is aligned and fully inserted (photo C). If the component is not properly aligned, the Rotisserie Skewer will not rotate.
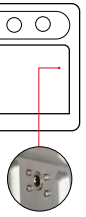
5. Place the Spin Side of the Rotisserie Bar in the Rotisserie Bar Holder on the other side of the Air Fryer Oven (photo D).

NOTE: When ready to start cooking, the Rotisserie Skewer and chicken should look like this.
CHOOSING ROTISSERIE SETTINGS
Close the door of the Air Fryer Oven and set the Function Dial to Rotisserie. Set the Temperature Dial to the correct temperature for your recipe. Then, turn the Timer Dial to the desired cooking time to turn on the oven and begin cooking.
The Power Light will illuminate. The Timer Dial will ring when the cycle is complete. To stop cooking, turn the Timer Dial to the “Off” position.
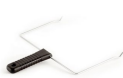
REMOVING THE ROTISSERIE
A
B
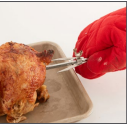
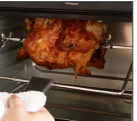
When cooking is finished, remove the Rotisserie Skewer by using the Removal Tool to hook underneath the Rotisserie Bar and lift up and out (photo A). Place the rotisserie on a heat resistant surface to cool.
NOTE: ALWAYS use the Removal Tool and kitchen gloves to remove the rotisserie as the Rotisserie Skewer and Forks will be extremely hot.
Let the rotisserie sit for a few minutes before using gloves to loosen the Screws and remove the Rotisserie Forks. Then, remove the Rotisserie Bar from the chicken (photo B).
TIPS & TRICKS
When Using Oil:
Distribute any oil evenly on foods and ingredients to achieve the crispiest results. Most oils can be used for air frying. Olive oil is preferred for a richer flavor. However, vegetable, grapeseed oil, or canola oil are recommended for a milder flavor.
Oil can also be sprayed or brushed onto foods for air frying. You can also use a non-stick cooking spray to ensure fried foods do not stick to the Baking Pan or Air Fry Basket.
For Coatings/Breadings:
You can use a variety of different breadings and coatings when air frying foods. Some examples of different crumb mixtures include: breadcrumbs (including seasoned breadcrumbs), panko breadcrumbs, cornflakes, potato chip crumbs, graham cracker crumbs, quinoa, and different types of flours.
Flipping/Tossing Foods:
Most foods do not need to be flipped during cooking, but larger items, like chicken cutlets, should be flipped halfway during the cooking process to ensure even cooking and browning.
When air frying larger quantities of food, ensure that you toss food halfway through cooking to ensure even cooking and coloring. You may open the Chef Series Air Fryer Oven to flip or toss your food and this will not affect the cooking process.
For foods that cook quickly, like bacon and chips, use higher temperatures. Use lower temperatures for foods that take longer to cook such as breaded chicken. Ingredients will cook more evenly if they are cut to the same size.
Line the Baking Pan with aluminum foil for easy cleanup. It is important to note that when most foods cook, they also release water. When cooking larger amounts of food for a longer period of time, condensation may build up, which could leave moisture on your counter top.
More Tips & Tricks:
Air frying smaller items or fewer items will require a slightly shorter cooking time than larger items or a greater number of items.
Shaking smaller items halfway during the preparation time optimizes the end result and can help prevent unevenly fried foods.
When making homemade french fries, soak fresh potatoes in water for 30 minutes, then add a small amount of oil for a crispy result. Fry your potatoes in the Air Fryer Oven within a few minutes of adding the oil.
Do not prepare extremely greasy items, such as sausages, in the Chef Series Air Fryer Oven.
You can also use the Chef Series Air Fryer Oven to reheat foods. To reheat foods, set the Temperature Dial to 300°F for up to 10 minutes.

CLEANING & MAINTENANCE
NOTE: Always allow the Chef Series Air Fryer Oven to cool completely before cleaning. Always unplug the Air Fryer Oven from the electrical outlet before cleaning.
Do not use abrasive cleaners, as they will damage the finish. Simply wipe the exterior with a clean, damp cloth and dry thoroughly. Apply the cleansing agent to a cloth, not directly onto the appliance, before cleaning.
To clean interior walls, use a damp cloth and a mild liquid soap solution or a spray solution on a sponge. Never use harsh abrasives or corrosive products. Never use steel wool pads, etc., on interior of oven.
After cooking greasy foods and after your oven has cooled, always clean top interior of the Air Fryer Oven. When cleaned regularly, your Air Fryer Oven will perform like new every time. Removing the grease will also help to keep toasting consistent every time.
To remove crumbs, slide out the Drip Tray and discard crumbs. Wipe clean and replace.
To remove baked-on grease, soak the Drip Tray in hot, sudsy water or use non-abrasive cleaners. Never wrap the cord around the outside of the oven.
Any other servicing should be performed by an authorized service representative.
All accessories are dishwasher safe. Alternatively, you can clean the accessories with hot water, dish soap, and a non-abrasive sponge.
Make sure that the appliance is unplugged and all parts and accessories are clean and dry before storage.
CLEANING THE HEATING ELEMENT
NOTE: Make sure the appliance has cooled down completely before cleaning the heating element.
Unplug the Chef Series Air Fryer Oven and wait until it is cool before cleaning.
Remove any accessories from the interior. These non-electric parts can be cleaned with a soft sponge and warm, soapy water.
Gently wipe down the heating element with a damp, soft sponge or a non-abrasive brush. DO NOT use a metal brush or a coarse/metallic sponge — this will damage the heating element.
Turn the Air Fryer Oven on without any food in it to allow any remaining food to be shaken loose. Once the Air Fryer Oven is cool again, you can then wipe away any extra pieces.
Trouble Shooting
| PROBLEM | POSSIBLE CAUSE | SOLUTION |
| The Chef Series Air Fryer Oven does not turn on. | 1. The appliance is not plugged in. 2. You have not set the Timer. | 1. Plug the mains plug into a grounded wall socket. 2. Turn the Timer Dial to the required preparation time to switch the appliance on. |
| The food is not done after the recommended time is up. | 1. Too much food has been added to the oven. 2. The temperature was set too low. 3. The Air Fry Dial was used to set the temperature instead of the Temperature Dial. | 1. Use less food and cook in batches if necessary. Your food will also cook more evenly. 2. Turn the Temperature Dial to the required temperature setting. 3. Only use the Air Fry Dial to set the temperature when air frying. For all other functions, use the Temperature Dial to set the temperature. |
| The food is fried unevenly in the Air Fryer Oven. | Certain types of food need to be shaken halfway through the preparation time. | Items that lie on top of or across each other (e.g. fries) need to be shaken halfway through the preparation time. |
| Snacks are not crispy when they come out of the Air Fryer Oven. | The food was not dry enough or needs more oil. | Make sure to properly dry the food or lightly brush some oil onto the snacks for a crispier result. |
| I cannot place an acces sory into the appliance properly. | There is too much food in the accessory. | Do not overfill accessories. |
| White smoke is coming out of the appliance. | 1. Your food is too greasy. 2. The oven or accessories still contain residue from previous use. | 1. When you fry greasy items in the Air Fryer Oven, an amount of fat may leak into the oven itself. The fat produces white smoke and the oven may heat up more than usual. This does not affect the appliance or the end result. 2. White smoke is caused by grease heating up in the oven. Make sure you clean the oven properly after each use. |
| Fresh fries are fried unevenly in the Air Fryer Oven. | Certain types of food need to be shaken halfway through the preparation time. | Items that lie on top of or across each other (e.g. fries) need to be shaken halfway through the preparation time. |
| Fresh fries are not crispy when they come out of the Air Fryer Oven. | The crispiness of the fries depends on the amount of oil and water in the fries. | Make sure you dry the potato sticks properly before adding oil. Cut the potato sticks smaller for a crispier result. Add slightly more oil for a crispier result. |
| Snacks are not crispy when they come out of the Air Fryer Oven. | The food was not dry enough or needs more oil. | Make sure to properly dry the food or lightly brush some oil onto the snacks for a crispier result. |
RECIPE GUIDE
stuffed peppers
Ingredients:
6 medium sweet red peppers
1 pound lean ground beef (90% lean)
1 tbsp olive oil
1 medium zucchini, chopped
1 medium yellow summer squash, chopped
1 medium onion, finely chopped
cup finely chopped green pepper
2 cups coarsely chopped fresh spinach
4 garlic cloves, minced
1 cup ready-to-serve long grain and wild rice
1 can (8 ounces) tomato sauce
1⁄2 cup shredded part-skim mozzarella cheese
1⁄4 tsp salt
3 slices reduced-fat provolone cheese, halved
Directions:
- Cut and discard tops from red peppers; remove seeds. In a 6-qt. stockpot, cook peppers in boiling water until crisp-tender, 3-5 minutes; drain and rinse in cold water.
- In a large skillet, cook beef over medium heat until no longer pink, breaking into crumbles, 6-8 minutes. Remove with a slotted spoon; pour off drippings.
- In same pan, heat oil over medium heat; saute zucchini, yellow squash, onion and green pepper until tender, 4-5 minutes. Add spinach and garlic; cook and stir until wilted, about 1 minute. Stir in cooked beef, rice, tomato sauce, mozzarella cheese and salt.
- Place 3 red peppers in your Baking Pan. Fill with meat mixture. Bake in your Air Fryer Oven at Position 2 at 350°F until peppers are tender, about 35-40 minutes. Top with provolone cheese; bake, uncovered, until cheese is melted, about 5 minutes.
hasselback potatoes
Ingredients:
1 russet potato
1 tsp kosher salt
1 tsp olive oil
1 tsp chives, minced
Directions:
- Place potato on its side lengthwise. Pierce russet potato with a metal skewer along its entire length to serve as the stop guard for slicing.
- Carefully slice potato into tiny, thin slices without piercing through the bottom of the potato. Remove metal skewer.
- Sprinkle potato with kosher salt and olive oil. Place potato on the Baking Pan in Position 1. Tray in the Air Fryer Oven and set the Function Dial to Bake.
- Cook 50-60 minutes at 400°F until cooked through and tops are crispy.
- Garnish with chives.
Classic chocolate chip cookies
Makes about 12 (2 1⁄2”) cookies.
Ingredients:
1⁄2 stick cold, unsalted butter, cut into 1⁄2“ cubes
1⁄4 cup firmly packed brown sugar
cup granulated sugar
1⁄4 tsp baking powder
1⁄4 tsp baking soda
1⁄4 tsp salt
1 large egg, split
1⁄2 tsp vanilla extract
3⁄4 cups unbleached all-purpose flour
1⁄2 cup semisweet chocolate chips
1⁄4 cup chopped walnuts
Directions:
- In the bowl of a stand mixer fitted with the paddle attachment or with a hand mixer, beat the butter with the sugars, baking powder, baking soda, and salt until there are pea-sized lumps of butter incorporated throughout the sugar. Add the egg and vanilla and beat on low speed until just combined; small lumps of butter should remain.
- Add the flour, chocolate and walnuts all at once, and beat on increasing speed until flour is incorporated. Make 1⁄2 dozen tablespoon-sized dough balls at a time and place them on the parchment paper-lined Baking Pan.
- Place the Baking Pan in your Air Fryer Oven at Position 2. Set your function to Bake and your temperature to 350°F. Set your time to 10 minutes to start. Bake until the edges are lightly browned. Add more time if needed.
Buttermilk fried chicken
Ingredients:
1 lb chicken thighs and drumsticks, bone in
2 tsp kosher salt
1 cup buttermilk
2 cups unsalted, plain breadcrumbs
1 tbsp unsalted Cajun seasoning
Directions:
- Toss chicken with salt and place in a medium bowl. Cover with buttermilk and mix to coat thoroughly. Let marinate in refrigerator 4 hours minimum.
- Combine breadcrumbs with Cajun seasoning and mix thoroughly.
- Remove chicken from buttermilk and shake gently to drain excess. Dredge chicken in breadcrumbs until fully covered.
- Add the Drip Tray to the bottom of the Air Fryer Oven and place chicken in the Air Fryer Basket, 2-3 pieces at a time, in one layer. Insert Air Fry Basket in Position 1. Set the Function Dial to Air Fry and the temperature to 400°F.
- Air fry for 25 minutes until the chicken is fully cooked and juices run clear.
Open faced tuna melt
Ingredients:
1 can white tuna, drained
1 tbsp mayonnaise
1⁄4 red onion, diced
celery, 1 rib, sliced thinly
2 slices rye bread or english muffin halves
2 slices cheddar cheese
Directions:
- Place the bread slices or english muffin halves on your Oven Rack. Place your Oven Rack in the Air Fryer Oven at Position 2. Set your function to Toast at 400°F for 3-5 minutes. Remove your Oven Rack when finished.
- Combine the mayo, red onion, and celery in a bowl. Add the tuna and combine. Add a small amount of tuna mixture to the bread or english muffin halves. Top with a slice of cheddar cheese.
- Place the sandwich halves back on the Oven Rack and place in your Air Fryer Oven at Position 2 at 350°F for 5 minutes, or until the cheese is melted. Remove and enjoy.
Sriracha chicken wings
Ingredients:
complete chicken wings, split into flats and drumsticks
1⁄2 cup Sriracha
1⁄2 cup all-purpose flour
1 cup unsalted, plain breadcrumbs
Directions:
- Place chicken wings on paper towels and pat to dry thoroughly. Dredge chicken wings in all-purpose flour and shake off excess.
- Dip chicken wings in Sriracha, then breadcrumbs to cover thoroughly.
- Add the drip tray to the bottom of the Air Fryer Oven. Place only flats or drumsticks in the Air Fry Basket of the Air Fryer Oven.
- Set the Function Dial to Air Fry. Cook at 400°F: 25 minutes for flats and 30 minutes for drumsticks.
Grilled cheese
Ingredients:
2 slices white, whole wheat, or potato bread
1⁄2 cup to 2⁄3 cup sharp cheddar, shredded
1 tbsp butter, melted
Directions:
- Spread cheddar evenly between sliced bread.
- Place the Drip Tray at the bottom of the Air Fryer Oven. Place sandwich onto the Baking Pan in Position 1 in the Air Fryer Oven and set the function to Bake/Toast. Cook for 10 minutes at 350°F.
- Remove from Air Fryer Oven and brush both sides with melted butter. Serve with tomato soup, if desired.
Tortilla chips & guacamole
Ingredients:
Tortilla Chips
4 (8”) corn tortillas, cut into eighths
1⁄8 tsp kosher salt
Guacamole
3 avocados – peeled, pitted, and mashed
1 lime, juiced
1 tsp salt
1⁄2 cup diced onion
3 tbsp chopped fresh cilantro (optional)
1 tsp minced garlic
1 pinch ground cayenne pepper (optional)
Directions:
- Divide tortilla triangles into 2 batches. Place 1 batch in Air Fry Basket in Position 2 and set the function to Air Fry at 400°F for 15 minutes, rotating once roughly halfway through.
- Remove and top with salt. Repeat with second batch.
- For the guacamole, mash the avocados with a fork and combine with the lime juice, salt, diced onion, cilantro, minced garlic, and cayenne pepper. Serve with tortilla chips.
Fried shrimp
Ingredients:
1 lb shrimp, medium to large, peeled and deveined
1 cups all purpose flour
2 cups panko crumbs
4 tbsp grape seed or vegetable oil
2 eggs, beaten
sea salt or kosher salt
Directions:
- Peel off the tails and lay the shrimp on paper towels to dry. Mix the panko with oil. Rub between your hands to coat the oil onto the panko. Season with salt and pepper.
- Preheat the air fryer to 400°F. Season the shrimp with salt and pepper, dredge in the flour and shake off excess. Dip the shrimp into the egg and then into the seasoned panko. Press the crumbs onto the shrimp to help them stick.
- Lay the shrimp in the basket in one layer. Air fry for 6 minutes. Repeat with remaining shrimp.
- Remove shrimp and lay on a wire rack, season with salt. Serve with lemon wedges and your favorite dips.
Bacon-wrapped jalapeÑo poppers
Ingredients:
6 fresh jalapeño peppers
cup cream cheese, softened
6 slices of raw bacon
Directions:
- Slice jalapeños in half lengthwise and remove seeds.
- Fill each jalapeño slice with cream cheese using a spoon.
- Cut pieces of raw bacon in half and wrap each jalapeño.
- Place poppers in the air fryer on your Baking Pan, and set your function to Bake and your temperature to 370°F for 14 minutes.
NOTE: Your cook time may vary slightly due to your thickness of bacon and pepper.
Rotisserie Chicken
Ingredients:
1 (3 to 4 pound) whole chicken
3 cloves of garlic
1⁄2 onion
1 lemon
3 tbsp butter
1 tsp cumin
1 tsp paprika
1 tsp kosher salt
1⁄2 tsp fresh cracked black pepper
Directions:
- In a small bowl, mix butter, cumin, paprika, salt and pepper with the juice of half a lemon. Rub this mixture underneath the skin of the breast of the chicken and on the outside of the breast and drumsticks.
- Remove anything inside the cavity of the chicken. Season the cavity of the chicken with salt and pepper. Slice the lemon and squeeze half inside the cavity. Tuck a few cloves of garlic and the half onion inside the chicken. Truss the chicken with kitchen twine. Thread the rotisserie spit through the
chicken. Slide the rotisserie forks onto the spit, sticking it into the meat of the chicken. Tighten the bolts to secure. Insert into the oven and cook at 400oF for approximately 60 minutes or until a meat thermometer inserted into the thickest part of the thigh reads 165oF. - Remove from oven and tent lightly with foil. Let stand for 10 minutes
Chef Tip!
There are many videos online that show how to truss a chicken!
STOREBOUND, LLC – 1 YEAR LIMITED WARRANTY
Your StoreBound product is warranted to be free from defects in material and workmanship for a period of one (1) year from the date of the original purchase when utilized for normal and intended household use. Should any defect covered by the terms of the limited warranty be discovered within one (1) year, StoreBound, LLC will repair or replace the defective part. To process a warranty claim, contact Customer Support at 1-800-898-6970 for further assistance and instruction. A Customer Support agent will assist you by troubleshooting minor problems. If troubleshooting fails to fix the problem, a return authorization will be issued. Proof of purchase indicating the date and place of purchase is required and should accompany the return. You must also include your full name, shipping address, and telephone number. We are unable to ship returns to a PO box. StoreBound will not be responsible for delays or unprocessed claims resulting from a purchaser’s failure to provide any or all of the necessary information. Freight costs must be prepaid by the purchaser.
Send all inquiries to support@storebound.com.
There are no express warranties except as listed above.
REPAIR OR REPLACEMENT AS PROVIDED UNDER THIS WARRANTY IS THE EXCLUSIVE REMEDY OF THE CUSTOMER. STOREBOUND SHALL NOT BE LIABLE FOR ANY INCIDENTAL OR CONSEQUENTIAL DAMAGES OR FOR BREACH OF ANY EXPRESS OR IMPLIED WARRANTY ON THIS PRODUCT EXCEPT TO THE EXTENT REQUIRED BY APPLICABLE LAW. ANY IMPLIED WARRANTY OF MERCHANTABILITY OR FITNESS FOR A PARTICULAR PURPOSE ON THIS PRODUCT IS LIMITED IN DURATION TO THE DURATION OF THIS WARRANTY.
Some states do not allow the exclusion or limitation of incidental or consequential damages, or limitations on how long an implied warranty lasts. Therefore, the above exclusions or limitations may not apply to you. This warranty gives you specific legal rights and you may also have other rights, which vary from state to state.
REPAIRS
DANGER! Risk of electric shock! The Dash Chef Series Air Fryer Oven is an electrical appliance. Do not attempt to repair the appliance yourself under any circumstances. Contact Customer Support regarding repairs to the appliance.
PLEASE NOTE:
Your Chef Series Air Fryer Oven accessories are dishwasher-safe. Electrical parts are not dishwasher-safe.
You can download the PDF version of the Chef Series air fryer oven User’s Manual here.