Set up your Video Doorbell.
Download the Ring app.
The Ring app walks you through setting up and managing your Video Doorbell.
Search for “Ring” in one of the app stores below, or visit ring.com/app
Please make sure you have your wifi password ready for the next step.
Fully charge your Video Doorbell.
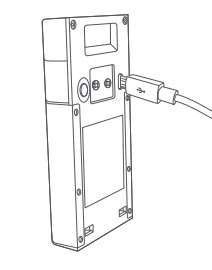
Plug it into a USB power source with the included cable. Once the light ring is fully lit, it’s ready to use.
Set up your Video Doorbell near your wifi router.
In the Ring app, select Set Up a Device. When prompted, select Doorbells, and follow the in-app instructions.
Try it out.
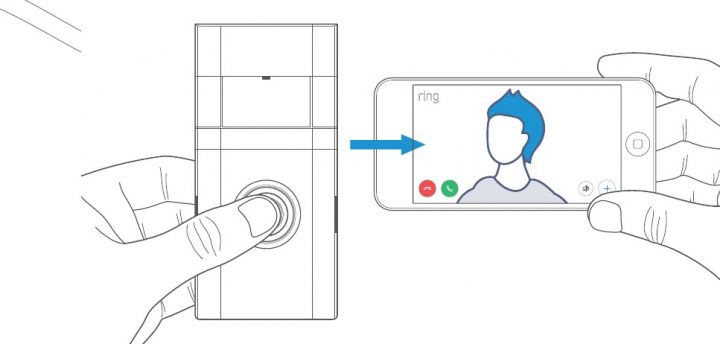
After setup, push the button on the front of your Video Doorbell to see video from the camera in the Ring app.
If you have problems with video quality after installation, you may need to move your router closer to your door, of add a Ring Chime Pro. Learn more at: ring.com/chime-pro
2. Install your Video Doorbell.
Set your install height.
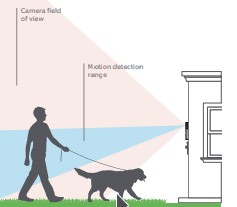
Install your Video Doorbell approximately four feet (1.20 meters) above the ground for optimal performance.
If you’re connecting to existing doorbell wiring that’s higher than four feet and want to angle your Video Doorbell down for a better view, you can purchase a Wedge Kit online at ring.com/accessories.
Steps for wiring to an existing doorbell
Remove your existing doorbell.(optional)
If replacing an existing doorbell, shut off power at the breaker. Then remove it from the wall and disconnect the wires.
Your Video Doorbell is compatible with doorbell systems supplying 8-24 volts AC at 50 or 60Hz, 40VA max.
Do not wire your Video Doorbell to a DC-powered intercom system or other DC power source.
Do you have an in-home chime?
The chime can ring when the button on your Video Doorbell is pressed. Just follow the in-app instructions during setup.
Don’t have an in-home chime?
If you see the “No In-Home Chime” button during setup, be sure to press it.
NO IN-HOME CHIME
To change your wiring settings after setup, go to Device Settings > Chime Connection.
Also, consider purchasing a Ring Chime or Chime Pro, which allows you to hear Ring alerts from anywhere in your home.
Insert the included mini-level.
This helps to ensure the camera is parallel to the ground when you install your Doorbell.
Mark the screw holes.
Use the bracket as a template to mark the four corner holes. The recommended install height is 4 feet above the ground.
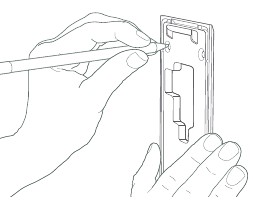
Install the anchors. (optional)
If installing on stucco, brick, or concrete, mark 4 drill holes. Use a 1/4” masonry drill bit to drill holes in your wall, then insert the included anchors.
If you’re installing on wood, skip this step.
Install the mounting bracket.
If you’re wiring your Video Doorbell, feed your doorbell wires through the hole in the mounting bracket first.
Using a Philips head screwdriver, drive the screws into your wall (or into the anchors, if installed) until they are flush with the mounting bracket.
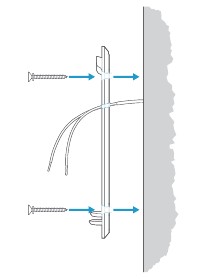
Steps for wiring to an existing doorbell
Connect the wires. (optional)
Connect the wires coming out of your wall to the screws on the back of your Video Doorbell. Either wire can connect to either screw. The order doesn’t matter.
Your Video Doorbell is compatible with doorbell systems supplying 8-24 volts AC, 50mA, at 50 or 60Hz, 40VA max.
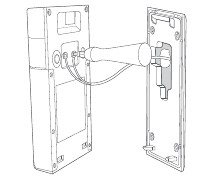
If wiring directly to a doorbell transformer, connect a 25 ohm, SOW wirewound resistor in series with one of the doorbell wires to protect your Video Doorbell.
Do not connect to a DC transformer, halogen or lighting transformer, or intercom.
Attach your Video Doorbell to the mounting bracket.
Hook the slot on the rear of your Video Doorbell onto the tab near the top of the mounting bracket.
Then, let the Doorbell pivot down to sit flush on its bracket.
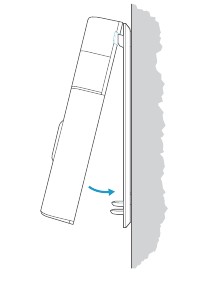
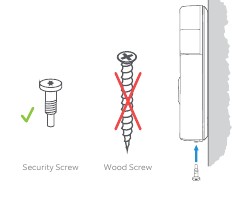
Secure your Video Doorbell.
CAUTION!
If you use the wrong screws to secure the Video Doorbell, you could damage the battery during installation, create a fire hazard, and be seriously injured.
DO NOT USE any screw other than the included short security screws when securing your Video Doorbell to the bracket.
Use the star-shaped end of the included screwdriver to drive the two security screws into the bottom of your Video Doorbell.
Your Video Doorbell is now ready to use.
If you wired in your Video Doorbell, you can now restore power at the breaker.
ring
For additional help, visit: ring.com/help Or give us a call:
US 1 800 656 1918
Canada 1 855 300 7289
Worldwide +1 310 929 7085
For a list of all our customer support numbers, visit: ring.com/callus
To review your warranty coverage, please visit
ring.com/warranty
© 2020 Ring LLC or its affiliates.
Ring and all related marks are trademarks of Ring LLC
Or its affiliates,
You can find the PDF version of the Ring Doorbell RVD1 Gen 2 installation manual here.
