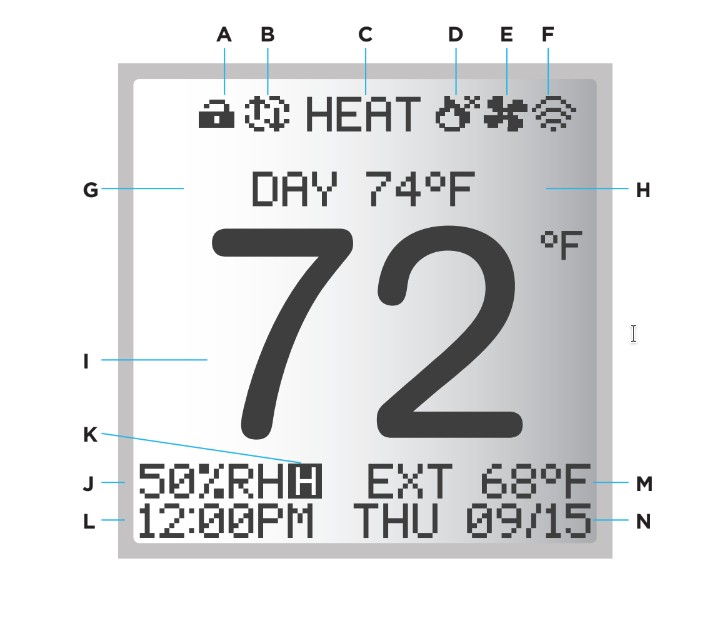
A. Keypad Lock
B. Auto-changeover
C. Current Systems Mode
D. Active System Process
E. Fan Status
F. Wifi Connection Status
G. Current Schedule Period
H. Current Set Temperature
I. Ambient Temperature
J. Relative Humidity
K. Humidification Mode
L. Current Time
M. External Temperature
N. Current Date
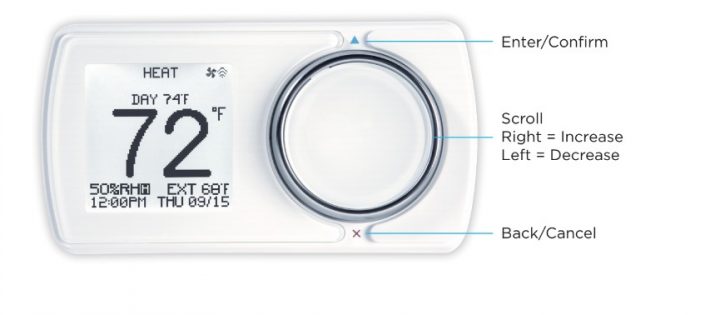
Everyday Use: ADJUSTING TEMPERATURE
- Rotate the wheel clockwise to increase the set temperature.
- Rotate the wheel counter-clockwise to decrease the set temperature.
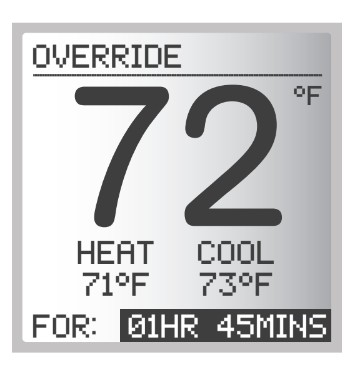
Once you reach desired set temperature, press A to override the set temperature. You will then be prompted to select an override period— rotate the wheel to select a hold time for the override temperature.
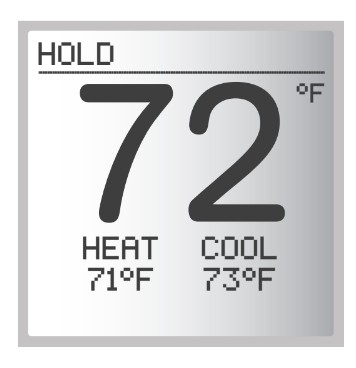
If you have not yet set a schedule, it will hold this new temperature indefinitely.
Everyday Use: System MODE and FAN Settings
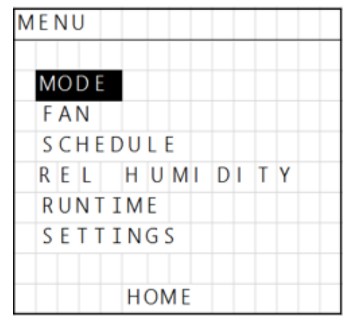
Press [ UP ] to open the main menu, and select MODE.
Press [ X ] once to move back to the previous screen.
Press and hold [ X ] for 5 seconds to return all the way back to the Home screen.
There are three selectable mode settings for your system:
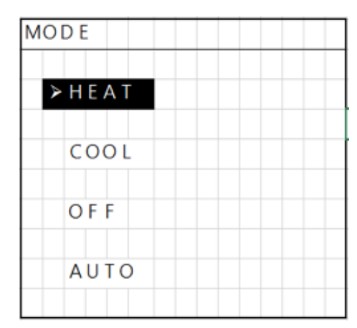
Press [ UP ] to open the main menu. Highlight mode and press [ UP ].
Rotate the wheel to select your desired system mode and press [ UP ] to confirm.
- Auto: GEOx will automatically activate your cooling or heating system to maintain a temperature within a given range.
- Heat: GEOx will automatically activate your heating system to keep your temperature above a certain set point.
- Cool: GEOx will automatically activate your cooling system to keep your temperature below a certain set point.
FAN Setting
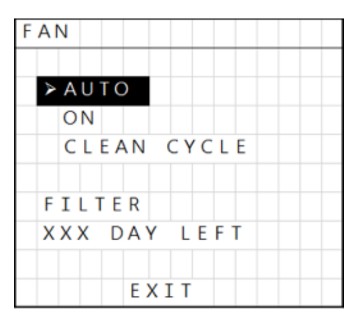
There are three selectable mode settings for your fan (if present):
To adjust your fan settings, open the main menu by pressing [ UP ].
Highlight fan and press [ UP ] to confirm.
Select your desired fan setting and press [ UP ] to confirm.
- AUTO: thermostat gives fan control to the heat/cool equipment, and the fan only runs as needed during heat or cool operation.
- ON: the thermostat will run the system fan continuously at all times, even if there is no call for heating or cooling.
- CLEAN CYCLE: the thermostat will run the system fan for 18 minutes per hour, in three 20 minute segments (6 minutes on and 14 minutes off, per segment).
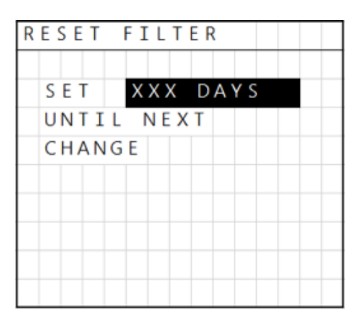
You can also set a countdown timer for your filter in this menu by highlighting filter, pressing [ UP ] to confirm, and rotating the wheel to select your filter’s remaining lifespan.
Everyday Use: ADJUSTING & SETTING SCHEDULES
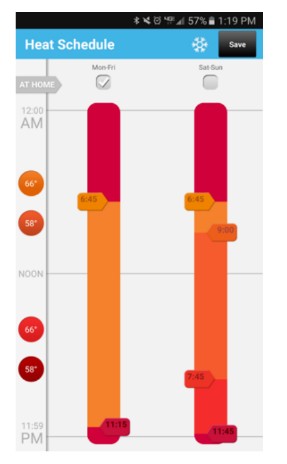
- Set a schedule quickly and easily using the LUX App.
- Create a new schedule by following the on-screen prompts in the app and selecting your preferences.
- Adjust your set schedule by tapping the “calendar” icon and moving the sliders to your preferred settings.
- Tap the snowflake/flame icon in the top-right to switch to your heat or cool schedule.
If you are not connected to Wi-Fi or if you do not have the LUX app, you can create and change a schedule on the GEOx device.
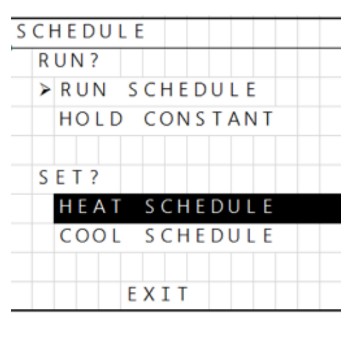
Highlight the “Schedule” menu and select it by pressing [UP]. If you do not want to follow a scheduled routine, you can choose “Hold Constant” to maintain a single temperature.
Highlight “Heat Schedule” or “Cool Schedule” and press [UP]. Follow the on-screen prompts to set your schedule. You may set custom schedules for each day of the week and you may set a schedule using either 2 or 4 time periods for each day.
Everyday Use: ADJUSTING RELATIVE HUMIDITY
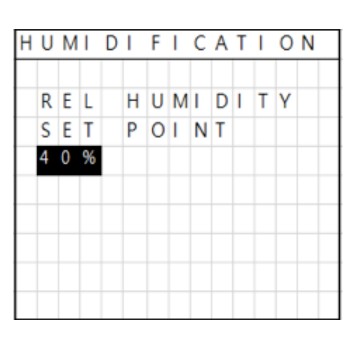
Press [ UP ] to open the main menu. Highlight “Rel Humidity” and select it by pressing [ UP ]. If you are in “humidify” or “dehumidify” mode, you can now rotate the wheel to adjust your relative humidity setting. Confirm your new settings by pressing [ UP ].
For more information about humidity options, settings, and wiring connections, view the humidity section detailed in the SYSTEM SETTINGS section.
Everyday Use: RUNTIME
Your GEOx has many output terminals, and gives you a detailed view of how much each of these terminals has run, in Hours and Minutes.
This screen shows a cumulative total of runtime and these numbers cannot be reset without performing a full reset of the thermostat to factory defaults (not recommended).
MENU ITEM: SETTINGS
Custom Settings: NETWORK
If your GEOx thermostat is not currently connected to a USING APP Wi-Fi network, please select “Configure USING APP” in the Network page
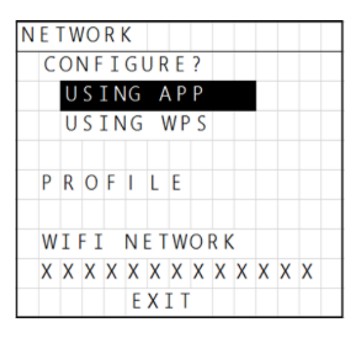
The thermostat will begin the Wi-Fi joining process. To connect to a Wi-Fi network, download the LUX Products app from the iOS App Store or the Google Play Store. Launch the LUX app, create an account, and log into the app.
Once in the app, add a new thermostat by selecting the “+” at the top left corner of the app screen. The mobile app and thermostat screens will guide you through the Wi-Fi joining process.
Custom Settings: Display
Backlight:
Settings to adjust the duration of the display screen lighting, either “Off”, or from 5 to 15 seconds, or “Always On” (only observed by the thermostat when powered by 24 VAC System Power, or 5 VDC Micro USB).
Format:
Time options include 12HR (AM/PM) or 24HR (Military Time). Date options include the visual order of how the date is displayed. Temperature scale can be selected between degrees F/C.
Language:
At this time, only English is offered within the thermostat display.
Orientation:
This setting permits rotation of the entire display screen 90 degrees, to accommodate either vertical or horizontal mounting methods.
Custom Settings: System
Set System:
These setting are used to configure the thermostat for your heating and/or cooling equipment.
Available Mode, System Type (equipment):
Choose each item in the following screens as appropriate for the equipment present in your system:
Stage-1 Swing:
This setting adjusts wide or narrow the temperature control feels.
In most cases, the factory default of O.25F works well.
No. of Stages:
The choices available will differ slightly depending upon the equipment you have selected in the previous screens. Select as appropriate for each individual system type.
Stage-2 Offset:
These settings (if multiple stages are used) determine how much the room temperature can sag from the target set temperature, before the additional stages are applied.
Valve Type (heat pump system type only):
This setting determines the switching style for the shared O/B terminal. When set to “O” this pin is energized at all times while in cool mode, and when set to “B” this pin is energized at all times while in heat mode.
AUX Offset (heat pump system type only):
When supplemental auxiliary heating is present with a heat pump, this setting determines how much the room temperature can decrease before calling for the supplemental heat source.
Temp Limits:
These are limits for how high or low the user can adjust the heating or cooling set point, and are separately adjustable and flexible for both modes of operation.
Minimum Run:
ON Time sets the amount of time load-on event must remain on, to prevent short-cycling. OFF Time is how long the equipment remains off between cycles. SUSPEND prevents all delays for 10 minutes, so the system can be called for right away for testing purposes. After 10 minutes, all delays return to normal automatically.
De/Humidifier:
OFF:
There are no RH% humidification or de-humidification controls actions performed.
DE-HUMID:
- De-Humid No Fan: this is for a separate dehumidification device that does not require the system’s blower fan to run during a call for dehumidification.
- De-Humid W/Fan: this is for a separate dehumidification device that requires the system’s blower fan to run during a call for dehumidification.
- Cooling: this uses the air conditioning components in a flexible manner to try and achieve the target RH% set point without separate dehumidification equipment. This option provides a setting on the next screen which permits intentional “over-cooling” beyond the cool mode set temperature if the dehumidification RH% set point has not been reached. This setting allows up to 15F degrees of over-cooling.
Dehumidification RH% set point range is from 40% to 80%
HUMID:
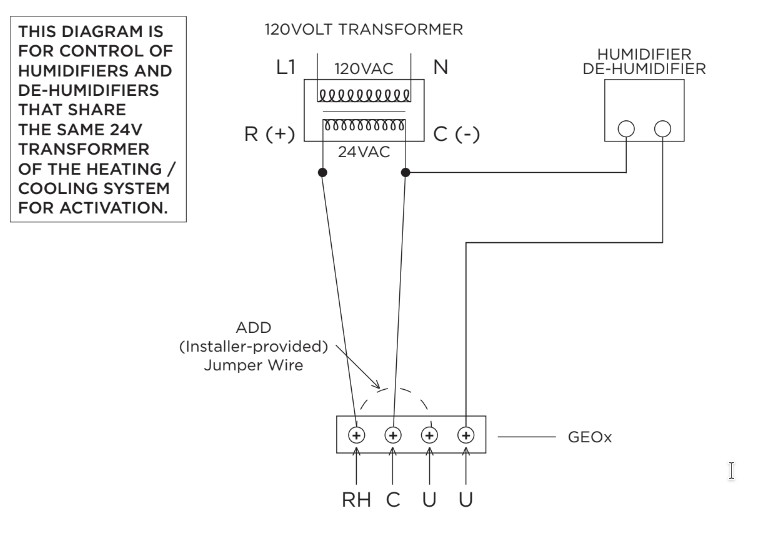
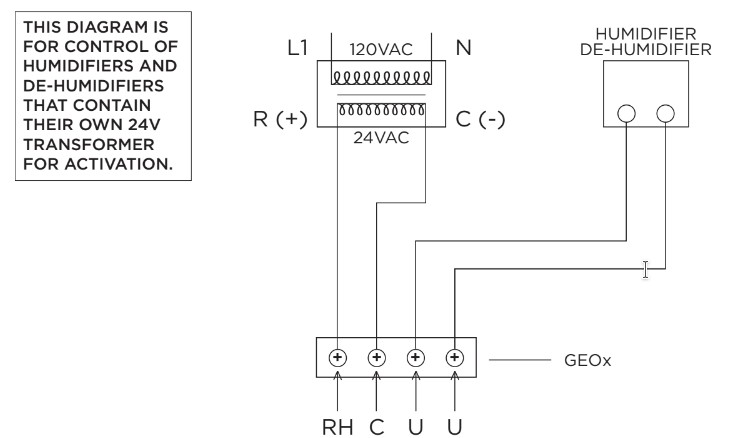
This is for controlling an in-duct humidifier, either powered with its own separate power source or the existing system’s 24 VAC transformer (see wiring options below).
Humidification RH% set point range is from 10% to 6O%.
AUTO-HUMID:
This is for controlling the same equipment as HUMID (above), however the RH% set point is not directly adjustable by the user. The RH% set point is automatically adjusted and controlled with a sliding scale based upon present outdoor temperature.
| OUTDOOR TEMPERATURE | RH% SET POINT |
| Less than -20F | 15% |
| Between -20F and 0F | 20% |
| Between -10F and 0F | 25% |
| Between 0F and 10F | 30% |
| Between 10F and 20F | 35% |
| Greater than 20 | 40% |
Humidification / De-Humidification Wiring Options
Calibration:
This allows the user to manually correct for any error in the perceived room temperature that is displayed, and can also be used to synchronize multiple thermostats within the same home.
Calibration can be set from -9F to +9F degrees from the default of 0F degrees of adjustment.
Custom Settings: About-Device, and About-Network
About – Device:
This page shows the thermostat model, specific software versions installed, and the unique device ID of the thermostat, which will be needed for technical support.
About – Network:
This page shows the name of the Wi-Fi network that the thermostat is connected to, the network status, IP Address the thermostat has been assigned by your router, and the date/time of the most recent communication between the thermostat and the online server. Before the additional stages are applied.
Custom Settings: Time and Date
NOTE: This item will not be shown if the thermostat is connected online, as time will be set by the online server, including automatic Daylight Savings Time adjustments.
When not connected to a Wi-Fi network, the Year, Month, Day, and Clock Time can all be adjusted manually.
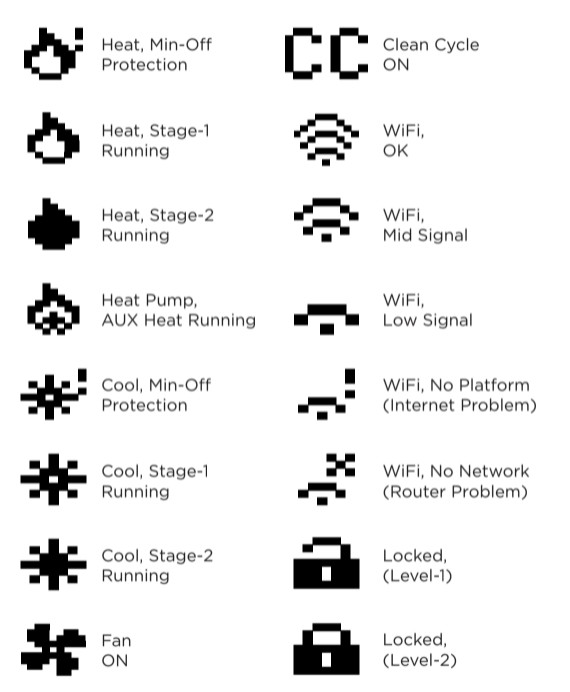
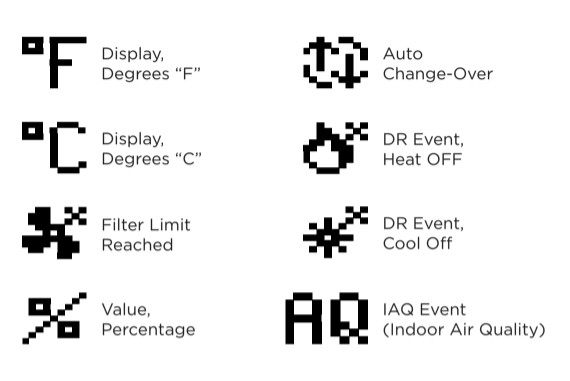
Appendix: LCD Display Icon Reference
The following are thermostat screen icons that may be shown under various conditions or modes:
You can get the complete PDF version of the LUX Geo Smart Thermostat with humidification/dehumidifaction user manual here.
